2000 Mercury Grand Marquis Fuse Box Diagram
Alright folks, let's dive into the fuse box diagram for a 2000 Mercury Grand Marquis. If you're tackling electrical repairs, adding aftermarket accessories, or simply trying to understand how your car's systems are wired, this diagram is your best friend. We're going to break down the diagram, its symbols, and how to use it effectively. Understanding this will empower you to diagnose and fix electrical issues without blindly poking around and potentially causing more damage.
Why This Diagram Matters
Why bother learning about fuse box diagrams? Several reasons:
- Troubleshooting Electrical Problems: The most common use. When a circuit fails (lights, wipers, radio, etc.), checking the fuse is the first step. The diagram tells you which fuse protects that circuit.
- Adding Aftermarket Accessories: Want to install a new stereo, fog lights, or a remote starter? Knowing the fuse box layout lets you tap into the correct circuits and add fuses appropriately to protect your new equipment and your car's existing systems.
- Understanding Your Vehicle's Electrical System: Even if you aren't actively working on your car, knowing the basics of the fuse box helps you understand how different systems are powered and protected.
- Preventing Catastrophic Damage: A blown fuse is designed to protect more expensive components. Bypassing a fuse or using the wrong amperage can lead to overheating, fires, and damage to the ECU (Engine Control Unit), wiring harnesses, and other vital parts.
Key Specs and Main Parts of the Fuse Box
The 2000 Grand Marquis typically has two fuse box locations:
- Under-Dash Fuse Box: Located on the driver's side, often near the left kick panel. This box primarily contains fuses for interior components, lighting, and some engine management systems.
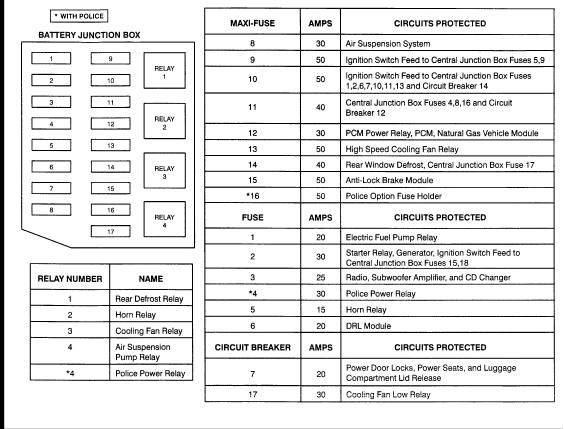
- Power Distribution Box (Under-Hood): Situated in the engine compartment, this box houses high-amperage fuses and relays. It manages circuits for the starter, alternator, cooling fan, and other critical systems.
Key Specs to Consider:
- Fuse Amperage: Each fuse is rated for a specific amperage (e.g., 5A, 10A, 15A, 20A, 25A, 30A). Using a fuse with a higher amperage than specified is extremely dangerous and can cause electrical fires. Always replace a blown fuse with one of the same amperage rating.
- Fuse Type: The 2000 Grand Marquis primarily uses blade-type fuses (also called spade fuses). These are color-coded to indicate their amperage rating. Common blade types are mini, ATO (standard), and Maxi fuses, with Maxi fuses generally found in the under-hood power distribution box.
- Relays: These are electromechanical switches that control high-current circuits using a low-current signal. They're often used for headlights, fuel pumps, and other power-hungry devices. Relays can also fail, and the fuse box diagram shows their location.
- Circuit Breakers: Some circuits, particularly those related to power windows or seats, may use circuit breakers. These automatically reset after a short period, unlike fuses which need to be manually replaced.
Understanding Fuse Box Diagram Symbols
Fuse box diagrams use symbols and abbreviations to represent different components and circuits. Here's a breakdown of common elements:
- Lines: Lines represent the wiring connecting components. Thicker lines may indicate higher current carrying capacity.
- Fuse Symbols: Fuses are typically depicted as a small rectangle with a line running through it, or as a squiggly line. The amperage rating is usually printed next to the symbol.
- Relay Symbols: Relays are shown as a square or rectangle with lines representing the coil and the switch contacts.
- Ground Symbols: A ground symbol (often a series of descending lines) indicates where a circuit connects to the vehicle's chassis for a return path.
- Abbreviations: You'll encounter abbreviations like:
- IGN: Ignition
- BAT: Battery
- ACC: Accessory
- PCM: Powertrain Control Module (Engine Computer)
- ABS: Anti-lock Braking System
- GEM: Generic Electronic Module (Controls various body functions)
- Color Coding: While the physical fuses are color-coded, the diagram itself may not always use color. Instead, rely on the amperage rating printed on the diagram.
How It Works: Tracing a Circuit
Let's say your headlights aren't working. Here's how to use the diagram:
- Identify the Headlight Fuse: Consult the fuse box diagram to locate the fuse labeled "Headlights" or something similar (e.g., "LH Headlamp," "RH Headlamp").
- Check the Fuse: Physically inspect the fuse. A blown fuse will have a broken filament inside. You can also use a multimeter set to continuity to check if the fuse is good (it should show continuity).
- Replace the Fuse: If the fuse is blown, replace it with a new fuse of the exact same amperage.
- If the Fuse Blows Again: This indicates a short circuit in the headlight circuit. You'll need to trace the wiring, looking for damaged insulation or loose connections. This requires more advanced troubleshooting skills and potentially a wiring diagram that shows the entire headlight circuit.
Real-World Use: Basic Troubleshooting Tips
- Start with the Simplest Checks: Before diving into the diagram, make sure the component itself isn't faulty. For example, if a light isn't working, try replacing the bulb first.
- Keep a Spare Fuse Kit: Always have a selection of fuses on hand, especially common amperage ratings.
- Use a Test Light or Multimeter: These tools are essential for verifying that power is reaching the fuse and the component. A test light is simpler for basic voltage checks, while a multimeter can measure voltage, current, and resistance for more in-depth diagnostics.
- Document Your Work: If you're modifying or adding circuits, keep a detailed record of what you've done, including which fuses you tapped into and the amperage ratings you used.
- Inspect Connectors: Loose or corroded connectors can cause intermittent problems. Clean connectors with electrical contact cleaner and ensure they're securely attached.
Safety First!
Working with automotive electrical systems can be dangerous. Here are some safety precautions:
- Disconnect the Battery: Before working on any electrical circuit, disconnect the negative (-) battery cable. This prevents accidental shorts and potential electrocution.
- Avoid Working in Wet Conditions: Water and electricity are a dangerous combination.
- Be Careful Around High-Current Circuits: The starter, alternator, and battery circuits carry high currents. Avoid shorting these circuits, as it can cause severe damage and burns.
- Never Bypass a Fuse: If a fuse repeatedly blows, there's a problem in the circuit. Bypassing the fuse will not fix the problem and can lead to a fire.
- Proper Tools: Use insulated tools designed for automotive electrical work.
Warning about Airbag Systems: The airbag system is extremely sensitive, and tampering with it can cause accidental deployment, resulting in serious injury. If you suspect a problem with the airbag system, consult a qualified technician.
You now have a solid grasp of how to use a 2000 Mercury Grand Marquis fuse box diagram. Remember to always prioritize safety and double-check your work. With a bit of patience and the right tools, you can confidently tackle many electrical repairs yourself.
To further assist you, we have a downloadable PDF of the 2000 Mercury Grand Marquis fuse box diagram, which includes detailed layouts and component descriptions. You can find the link below and use it for your next car adventure.