
2001 Chevy Silverado Fuse Box Diagram
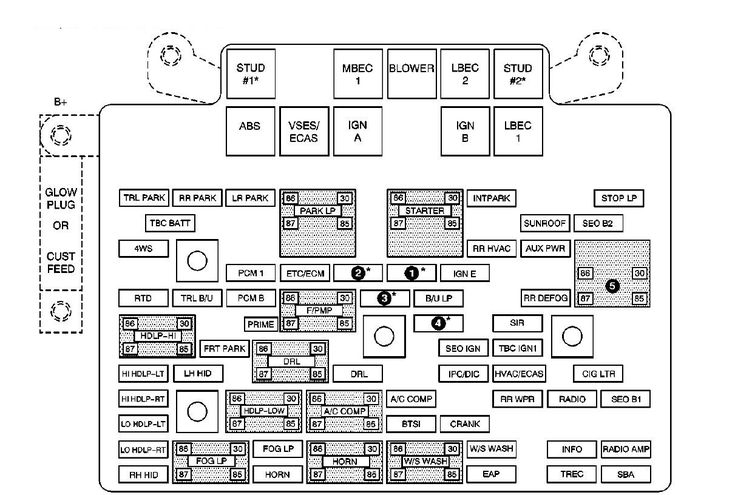
The 2001 Chevy Silverado. A workhorse of a truck, known for its reliability and longevity. But even the most dependable machines can experience electrical gremlins. When those problems strike, understanding the fuse box diagram is crucial. Whether you're a seasoned DIYer or just starting to tinker, knowing how to interpret this diagram can save you time, money, and a whole lot of frustration. We're here to break it down for you.
Purpose: Why the 2001 Silverado Fuse Box Diagram Matters
The fuse box diagram is essentially the Rosetta Stone for your truck's electrical system. It's a map that identifies each fuse, relay, and circuit breaker and what components they protect. Without it, you're just guessing when trying to diagnose an electrical issue. Here's why it’s so important:
- Troubleshooting: Identify and replace blown fuses quickly, getting your truck back on the road faster.
- Electrical Modifications: If you're adding aftermarket accessories (lights, stereos, etc.), knowing which circuits can handle the extra load is critical to avoid overloading and causing damage.
- Preventative Maintenance: Understanding the electrical layout can help you identify potential weak points and address them before they become major problems.
- Learning: Gaining a deeper understanding of your truck’s electrical system empowers you to tackle more complex repairs in the future.
Think of it as a roadmap for your truck's nervous system. It tells you where everything is connected and how it all functions together.
Key Specs and Main Parts of the Fuse Box
The 2001 Silverado typically has two main fuse box locations:
- Under-hood Fuse Box: Located in the engine compartment, usually near the battery. This box houses fuses and relays that protect high-current components like the starter motor, alternator, cooling fans, and headlights.
- Instrument Panel Fuse Box: Located inside the cab, typically on the driver's side, often behind a small access panel. This box protects lower-current circuits like the radio, interior lights, power windows, and windshield wipers.
Key Components:
- Fuses: These are the sacrificial links in the electrical chain. They're designed to blow and break the circuit if the current exceeds a safe level, preventing damage to other components. Fuses are rated in amperes (amps), which indicates how much current they can handle before blowing.
- Relays: Electrically operated switches that control high-current circuits with a low-current signal. They're used to protect switches from high current loads and to allow the control of multiple circuits from a single point. For example, the headlight switch controls a relay that then switches the main headlight power.
- Circuit Breakers: Similar to fuses, but they can be reset after they trip. They're often used for circuits that might experience temporary overloads.
- Diode: These are often overlooked, but are critical for protecting sensitive electronics. They only allow current to flow in one direction, preventing back-feeding and potential damage to the control modules.
Each fuse box has a cover that should have a diagram printed on it. However, these diagrams can be faded, damaged, or even missing. That's where a reliable electronic diagram comes in handy. And don't forget that depending on the specific trim level and options installed in your 2001 Silverado, the layout of the fuses and relays can vary slightly, so always double-check against the diagram specific to your truck.
Understanding the Symbols on the Fuse Box Diagram
Fuse box diagrams use a combination of lines, colors, and icons to represent different components and circuits. Deciphering these symbols is essential for understanding the diagram.
- Lines: Solid lines typically represent the wiring harness. Thicker lines might indicate higher-current circuits. Dashed lines might indicate ground connections or control circuits.
- Colors: Wire colors are often indicated on the diagram using abbreviations (e.g., BLK for black, RED for red, YEL for yellow). Knowing the wire color can help you trace a specific circuit through the truck.
- Icons: Specific icons are used to represent different components. Common icons include:
- Fuse: A rectangle with a break in the middle.
- Relay: A square with a coil symbol and switch contacts.
- Headlight: A stylized headlight symbol.
- Wiper Motor: A stylized wiper symbol.
- Horn: A stylized horn symbol.
It’s crucial to match the diagram in the owner's manual, or the one you download from us, to the physical layout of the fuse box. Sometimes, the orientation of the diagram is slightly different, so rotate it in your mind (or physically rotate the diagram) to match what you see in the fuse box.
How It Works: Tracing a Circuit
Let's say your tail lights aren't working. Here's how you'd use the fuse box diagram to troubleshoot the problem:
- Consult the Diagram: Find the fuse labeled "Tail Lights" in either the under-hood or instrument panel fuse box diagram.
- Locate the Fuse: Physically locate the corresponding fuse in the fuse box.
- Inspect the Fuse: Remove the fuse and visually inspect it. A blown fuse will have a broken filament. You can also use a multimeter to test the fuse for continuity.
- Replace the Fuse: If the fuse is blown, replace it with a new fuse of the same amperage rating. Using a fuse with a higher amperage rating can overload the circuit and cause a fire.
- Test the Circuit: After replacing the fuse, turn on the tail lights to see if they now work. If the fuse blows again immediately, there's a short circuit in the tail light wiring that needs to be investigated further.
This same process can be used to troubleshoot any electrical problem in your truck. The key is to start with the fuse box diagram and systematically work your way through the circuit.
Real-World Use: Basic Troubleshooting Tips
Here are some practical troubleshooting tips using the fuse box diagram:
- Start Simple: Always check the easiest and most obvious things first. Is the switch turned on? Is the bulb burned out? Is the connector plugged in?
- Use a Multimeter: A multimeter is an invaluable tool for electrical troubleshooting. It can be used to check for voltage, continuity, and resistance. Continuity testing can check if a wire has been broken.
- Check Grounds: Many electrical problems are caused by bad ground connections. Make sure all ground wires are securely attached to clean, unpainted metal surfaces.
- Look for Shorts: A short circuit occurs when a wire comes into contact with ground. This can cause a fuse to blow repeatedly. Look for damaged or frayed wires that might be touching the chassis.
- Isolate the Problem: If you have multiple components on the same circuit that aren't working, try disconnecting them one at a time to see if one of them is causing the problem.
Remember, always double-check your work and be careful when working with electricity.
Safety: Highlighting Risky Components
Working with your Silverado's electrical system can be dangerous. Here are some important safety precautions:
- Disconnect the Battery: Before working on any electrical components, disconnect the negative battery cable to prevent accidental shorts and shocks.
- Use Insulated Tools: Use tools with insulated handles to protect yourself from electric shock.
- Never Replace a Fuse with a Higher Amperage Rating: This can overload the circuit and cause a fire. Always use the correct amperage rating.
- Be Careful Around the Airbag System: The airbag system is extremely sensitive and can be accidentally deployed if not handled properly. Consult the service manual before working near any airbag components.
- Work in a Well-Ventilated Area: When working with solvents or cleaners, work in a well-ventilated area to avoid inhaling harmful fumes.
High-risk areas include anything around the SRS(Airbag) system, or any high voltage circuitry (like HID headlights). If unsure, consult a professional.
We know this is a lot to take in. But now you're armed with the knowledge needed to safely and effectively diagnose your 2001 Chevy Silverado's electrical problems using the fuse box diagram. If you need a high resolution diagram, we've got the file ready to download. You'll be back on the road in no time!