2001 Chevy Silverado Stereo Wiring Diagram Color Code
Understanding the 2001 Chevy Silverado stereo wiring diagram color code is crucial for anyone looking to upgrade their sound system, troubleshoot electrical issues, or simply gain a deeper understanding of their vehicle's inner workings. Whether you're replacing a blown speaker, installing a new head unit, or adding an amplifier, knowing which wire does what can save you time, money, and a potential electrical headache. This article will delve into the specifics of the 2001 Silverado stereo wiring, providing you with the knowledge and confidence to tackle your next automotive audio project.
Purpose of the Diagram
The primary purpose of a stereo wiring diagram, like the one for the 2001 Chevy Silverado, is to provide a visual representation of the electrical connections within the audio system. It acts as a roadmap, showing you where each wire originates, its destination, and its function. This is incredibly useful for:
- Repairing damaged wiring: Identifying broken or frayed wires and knowing where to properly splice in a replacement.
- Upgrading the stereo system: Connecting aftermarket components like amplifiers, subwoofers, and new head units without guesswork.
- Troubleshooting electrical problems: Diagnosing issues like a blown fuse, a speaker that isn't working, or a malfunctioning head unit.
- Learning about automotive electrical systems: Gaining a deeper understanding of how the various components of your Silverado's audio system are interconnected.
Key Specs and Main Parts
Before diving into the color codes, let's outline the key components typically found in a 2001 Chevy Silverado stereo system:
- Head Unit (Radio): The brain of the system, providing the audio source and often controlling other functions like CD playback and radio tuning.
- Speakers: Responsible for converting electrical signals into audible sound. The Silverado typically has speakers in the front doors, and potentially in the rear doors or rear pillars.
- Wiring Harness: A bundle of wires that connects the head unit to the rest of the vehicle's electrical system, including power, ground, speakers, and other accessories.
- Antenna: Receives radio signals and transmits them to the head unit.
- Factory Amplifier (Optional): Some Silverado models came equipped with a factory amplifier to boost the audio signal to the speakers. Understanding if you have one and its location is important, especially when bypassing it.
Important specs to consider include:
- Voltage: The system operates on the vehicle's 12V DC electrical system.
- Impedance: Speakers typically have an impedance of 4 ohms. Connecting speakers with significantly lower impedance can damage the amplifier (either the head unit's internal amp or a separate amplifier).
- Wattage: The maximum power output of the head unit and/or amplifier. This determines the maximum power that can be delivered to the speakers.
Symbols: Understanding the Diagram
A wiring diagram uses a specific set of symbols to represent different components and connections. Common symbols include:
- Solid Lines: Represent wires. The thickness of the line usually doesn't indicate wire gauge, but rather indicates the importance of the wire on the diagram.
- Dashed Lines: Can represent shielded cables or less vital connections.
- Circles: Often used to represent connectors or points of connection.
- Rectangles: Can represent components like the head unit, amplifier, or speakers.
- Ground Symbol (Usually three horizontal lines decreasing in size): Indicates a connection to the vehicle's chassis ground.
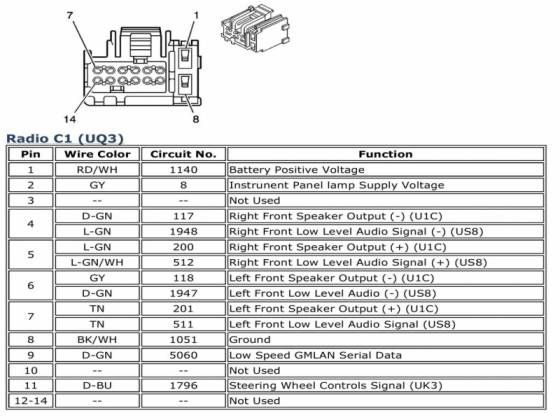
The color codes are the most critical part of the diagram. Each wire is assigned a specific color, which corresponds to its function. While there can be slight variations depending on the exact trim level and options of your Silverado, here's a general overview of the 2001 Chevy Silverado stereo wiring color code:
- Power (12V Constant): Typically Orange or Red. Provides power to the head unit even when the ignition is off (for memory and clock functions).
- Ground: Usually Black. Provides a return path for the electrical current.
- Accessory (Switched 12V): Often Yellow or Red with a stripe. Provides power to the head unit when the ignition is turned on.
- Illumination: Typically Gray. Dimms the head unit's display when the headlights are turned on.
- Antenna Power (Remote Turn-On): Usually Blue or Blue/White. Provides power to the power antenna or turns on an aftermarket amplifier.
- Speaker Wires: These are usually paired wires, with one being a solid color and the other being the same color with a black stripe. The specific colors will vary depending on the speaker location:
- Front Left: White and White/Black
- Front Right: Gray and Gray/Black
- Rear Left: Green and Green/Black
- Rear Right: Purple and Purple/Black
Always verify the color codes with your specific vehicle's wiring diagram, as variations can occur. Downloading the correct diagram is essential.
How It Works
The stereo system works by receiving power from the vehicle's electrical system. The constant power wire keeps the head unit's memory and clock running, while the switched power wire turns the unit on when the ignition is activated. When you select a source (radio, CD, etc.), the head unit processes the audio signal and sends it to the speakers via the speaker wires. If the vehicle has a factory amplifier, the head unit sends a low-level signal to the amplifier, which then amplifies the signal and sends it to the speakers. The antenna receives radio signals and sends them to the head unit for processing.
The color codes help to ensure that each wire is connected to the correct terminal. For example, connecting the power wire to the ground terminal would create a short circuit and could damage the head unit or blow a fuse.
Real-World Use: Basic Troubleshooting Tips
Here are some common troubleshooting scenarios and how the wiring diagram can help:
- No Power to Head Unit: Check the fuses first. If the fuses are good, use a multimeter to test the constant and switched power wires to ensure they are receiving 12V. Verify the ground connection is solid.
- One Speaker Not Working: Check the speaker connections to the head unit and the speaker itself. Use a multimeter to test the speaker wire for continuity. You can also swap the speaker wires with a known working speaker to isolate the problem.
- Distorted Sound: Check the speaker wires for shorts or damage. Make sure the speakers are properly grounded. A faulty speaker can also cause distortion.
- Radio Reception Issues: Ensure the antenna is properly connected to the head unit. Check the antenna wire for damage.
Safety Considerations
Working with automotive electrical systems can be dangerous if proper precautions are not taken. Here are some key safety tips:
- Disconnect the Battery: Always disconnect the negative terminal of the battery before working on any electrical components. This will prevent accidental short circuits and electric shock.
- Use a Multimeter: A multimeter is an essential tool for testing voltage, continuity, and resistance. Learn how to use it properly before starting any electrical work.
- Avoid Working with Live Wires: Never cut or splice wires while the ignition is turned on or the battery is connected.
- Be Careful with Capacitors: Some components, like amplifiers, contain capacitors that can store a dangerous electrical charge even after the power is disconnected. Discharge capacitors before handling them. Consult the amplifier's documentation for how to do this safely.
- Proper Wire Connections: Always use proper crimping tools and connectors to ensure secure and reliable wire connections. Poor connections can cause shorts, overheating, and electrical fires. Avoid using "scotch locks" as they are notorious for creating corrosion and poor connections over time.
Always be cautious when working near the airbag system (if equipped). Improper wiring can cause airbag malfunction. If you're not comfortable working around airbags, it's best to consult a professional.
We have the complete 2001 Chevy Silverado stereo wiring diagram file available for download. It provides a detailed overview of the entire audio system, including wire colors, component locations, and connection points. Refer to it constantly when working on your project.