2001 Dodge Dakota Brake Line Diagram
Alright, let's talk about the 2001 Dodge Dakota brake line diagram. Whether you're dealing with a leak, upgrading your braking system, or just trying to understand how your Dakota stops, having a clear understanding of the brake lines is absolutely critical. This isn't just some abstract exercise; it's about your safety and the safety of others on the road.
Purpose of the Brake Line Diagram
Why bother with a diagram? Simple. First, for repairs. Pinpointing a leak without knowing where the lines run is like searching for a needle in a haystack. The diagram shows you the entire routing, making it easier to isolate the problem area. Second, for modifications. Thinking about upgrading to stainless steel brake lines or installing a proportioning valve? You'll need to know where to disconnect, where to connect, and how the new components integrate into the existing system. And third, for plain old understanding. Knowing the layout of the brake system helps you diagnose problems more effectively and perform routine maintenance with confidence.
Key Specs and Main Parts
Let's break down the key components and specifications typically found in a 2001 Dodge Dakota brake system, keeping in mind that variations might exist based on specific trim levels (2WD vs. 4WD, ABS vs. non-ABS).
- Master Cylinder: This is the heart of the system. It's what generates hydraulic pressure when you press the brake pedal. It contains the brake fluid reservoir, which should always be kept filled to the appropriate level.
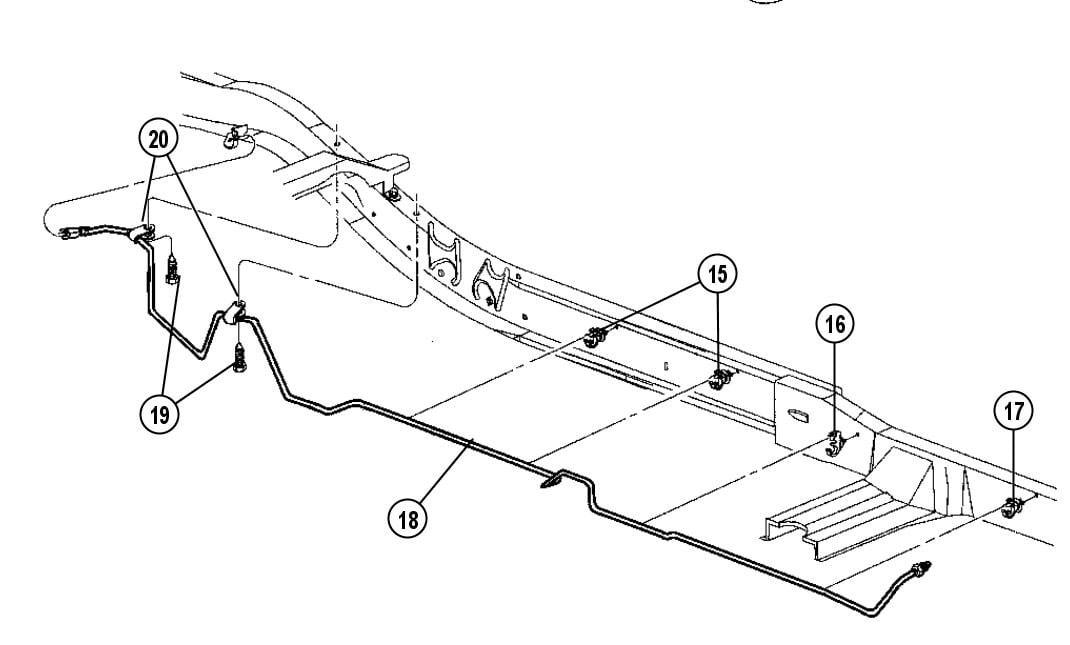
- Brake Lines: These are the metal tubes that carry brake fluid from the master cylinder to the wheels. Typically made of steel (or upgraded to stainless steel), they are designed to withstand high pressure.
- Brake Hoses: These are flexible rubber hoses that connect the brake lines to the calipers/wheel cylinders. The flexibility is crucial to allow for suspension movement. These are a common point of failure due to age and degradation.
- Brake Calipers (Front): Contain pistons that push brake pads against the rotors.
- Brake Drums/Wheel Cylinders (Rear): Some 2001 Dakotas have drum brakes in the rear. Wheel cylinders, similar to calipers, push the brake shoes against the drums.
- Proportioning Valve: This valve regulates the brake pressure between the front and rear brakes to prevent rear wheel lock-up during hard braking.
- ABS (Anti-lock Braking System) Module (If Equipped): This sophisticated system prevents wheel lock-up during braking, enhancing control. It includes sensors, a control module, and a hydraulic unit that modulates brake pressure independently to each wheel. The presence of ABS significantly alters the brake line layout.
Common Brake Line Diameters: Typically, brake lines are 3/16" or 1/4" in diameter. The exact size can vary depending on the location in the system. The fittings are typically inverted flare fittings.
Symbols – Understanding the Diagram
A good brake line diagram isn't just a bunch of squiggly lines. It uses specific symbols to represent different components and their connections. Here’s what you might encounter:
- Solid Lines: Represent the main brake lines.
- Dotted Lines: May indicate vacuum lines, electrical wiring related to ABS, or less critical connections. Always refer to the diagram legend for clarification.
- Arrows: Show the direction of brake fluid flow.
- Circles or Squares: Indicate connection points or junctions.
- Different Colors: Some diagrams use color-coding to differentiate between different brake lines or circuits. For example, one color might represent the front brake circuit, while another represents the rear. Always refer to the diagram's color key!
- Component Symbols: Icons representing the master cylinder, proportioning valve, ABS module, calipers, and wheel cylinders. These are usually stylized drawings or simplified representations.
It’s crucial to carefully examine the legend provided with the diagram. Every manufacturer might use slightly different conventions.
How It Works: A Simplified Explanation
The brake system is a hydraulic system. When you press the brake pedal, you push a piston in the master cylinder. This action forces brake fluid through the brake lines to the calipers (or wheel cylinders). The calipers then clamp the brake pads against the rotors, creating friction and slowing the vehicle. For drum brakes, the wheel cylinders push the brake shoes against the inside of the brake drums.
The proportioning valve is there to balance the braking force. Front brakes typically handle a larger share of the stopping power. The proportioning valve prevents the rear wheels from locking up before the front wheels, which can lead to a loss of control.
If your Dakota has ABS, the system uses sensors at each wheel to monitor wheel speed. If a wheel starts to lock up, the ABS module rapidly pulses the brake pressure to that wheel, preventing the lock-up and allowing you to maintain steering control.
Real-World Use: Basic Troubleshooting
Okay, let’s get practical. Here are some troubleshooting tips using the brake line diagram:
- Brake Fluid Leak: Use the diagram to trace the brake lines from the master cylinder to each wheel. Look for wet spots or drips along the lines, at connections, and around the calipers/wheel cylinders. Don’t forget to check the brake hoses – they can crack and leak, especially with age.
- Spongy Brake Pedal: This could be due to air in the brake lines. The diagram helps you understand the bleeding sequence. You'll typically bleed the brakes starting with the wheel furthest from the master cylinder and working your way closer.
- Uneven Braking: This might indicate a problem with a specific caliper or wheel cylinder. Use the diagram to isolate the affected brake line and component. It could also be a problem with the proportioning valve or the ABS system (if equipped).
- ABS Light On: This indicates a problem with the ABS system. While the brake line diagram doesn’t directly diagnose electrical faults, it helps you understand the physical layout of the ABS components, like the sensors and the ABS module.
Safety Considerations
Working on brakes is serious business. Here are some critical safety tips:
- Brake Fluid is Corrosive: Wear eye protection and gloves. If brake fluid gets on your skin or in your eyes, flush immediately with water.
- Brake Dust Can Contain Asbestos: If you're working on older brake components, especially drum brakes, be aware that the brake dust might contain asbestos. Wear a respirator to avoid inhaling the dust. Dispose of used brake components properly.
- High Pressure: Brake lines are under high pressure when the brake pedal is pressed. Never disconnect a brake line while the system is pressurized. Always relieve the pressure by bleeding the brakes.
- Proper Tools: Use the correct tools, especially line wrenches, to avoid damaging the brake line fittings.
- Bleed the Brakes: After any work on the brake lines, you must bleed the brakes to remove air from the system.
- Test Drive Carefully: After completing any brake work, perform a slow, controlled test drive in a safe area to ensure the brakes are functioning properly before driving in traffic.
The master cylinder and ABS module are particularly sensitive and potentially dangerous components. If you’re not comfortable working on these, it's best to take your Dakota to a qualified mechanic.
Important Note: Always consult your vehicle's repair manual for specific instructions and torque specifications. This article provides general guidance, but your specific vehicle's configuration may vary.
We have the full 2001 Dodge Dakota brake line diagram available for download. It includes detailed illustrations and specifications to help you with your repair or modification project. Good luck, and remember to prioritize safety!