2001 Dodge Ram 2500 Vacuum Line Diagram
If you're wrenching on a 2001 Dodge Ram 2500, especially if you're troubleshooting engine issues, vacuum leaks, or emissions problems, a reliable vacuum line diagram is absolutely essential. This guide provides a detailed overview of the 2001 Dodge Ram 2500 vacuum line system, equipping you with the knowledge to diagnose problems, perform repairs, and even understand how this often-overlooked system contributes to your truck's overall performance. We'll cover everything from the diagram's key specs and symbols to practical troubleshooting tips. And best of all, we have a high-resolution vacuum line diagram available for download, making your job even easier.
Purpose of the Vacuum Line Diagram
The vacuum system in your 2001 Dodge Ram 2500 plays a crucial role in various engine and vehicle functions. A vacuum line diagram serves as your roadmap to this system. Here's why it matters:
- Repair & Diagnosis: Vacuum leaks are a common source of engine problems, including poor fuel economy, rough idling, and stalling. The diagram helps you pinpoint the location of these leaks.
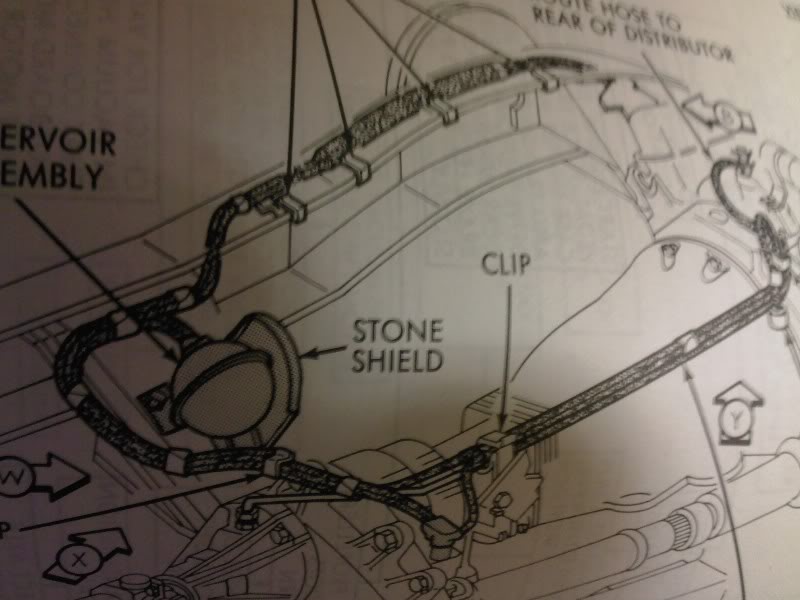
- Component Identification: The diagram clearly identifies each vacuum-operated component, such as the EGR valve, PCV valve, and vacuum reservoirs.
- System Understanding: Understanding the vacuum system's layout helps you grasp how different components interact and contribute to the engine's overall operation.
- Modifications: If you're planning any engine modifications or performance upgrades, a vacuum line diagram is invaluable for ensuring compatibility and avoiding unintended consequences.
- Restoration: When restoring a 2001 Ram 2500, the diagram ensures that vacuum lines are routed correctly, maintaining the vehicle's original functionality.
Key Specs and Main Parts
The 2001 Dodge Ram 2500, depending on the engine option, uses a fairly complex vacuum system. Here are some critical components involved:
- Engine Options: The vacuum line configuration varies slightly depending on whether you have the 5.9L Cummins diesel, the 5.9L Magnum V8 gasoline engine, or the 8.0L Magnum V10 gasoline engine. The most significant differences will be in the emissions control components and their associated vacuum lines.
- Vacuum Pump (Diesel): The Cummins diesel engine relies on a dedicated vacuum pump, usually gear-driven off the engine, to generate vacuum. This is because diesel engines don't produce manifold vacuum like gasoline engines.
- Intake Manifold Vacuum (Gasoline): Gasoline engines use the vacuum created in the intake manifold during engine operation.
- Vacuum Reservoir: This component stores vacuum to provide a consistent supply to various actuators, even when engine vacuum fluctuates. Look for a plastic or metal container, often black, located in the engine bay.
- Check Valves: These one-way valves prevent vacuum from bleeding off when the engine is not producing sufficient vacuum.
- EGR Valve (Exhaust Gas Recirculation): Controls the flow of exhaust gas back into the intake manifold to reduce emissions. Vacuum operates a diaphragm within the valve.
- PCV Valve (Positive Crankcase Ventilation): Vents crankcase gases into the intake manifold to reduce pressure and emissions. While not directly vacuum-operated in the same way as other components, its function is closely tied to the vacuum system.
- HVAC Controls: Vacuum is used to operate the various vents and dampers within the heating, ventilation, and air conditioning (HVAC) system.
- Cruise Control: Vacuum typically controls the throttle actuator in cruise control systems.
- Axle Disconnect (4x4 Models): On some 4x4 models, vacuum may be used to engage or disengage the front axle.
Understanding the Vacuum Line Diagram Symbols
Vacuum line diagrams use standardized symbols to represent different components and lines. Familiarizing yourself with these symbols is key to understanding the diagram:
- Solid Lines: Typically represent vacuum lines. The thickness of the line may indicate the size of the hose.
- Dotted Lines: May represent control lines or lines with restricted flow. They can also represent electrical connections.
- Arrows: Indicate the direction of vacuum flow.
- Circles or Squares: Usually represent vacuum-operated components, such as valves or actuators.
- "T" or "Y" Fittings: Show where vacuum lines split or connect.
- Check Valves: Illustrated with a symbol representing a one-way flow path (typically a triangle pointing towards a line).
- Colors: While not universally standardized, colors can be used to differentiate between different vacuum circuits or hose sizes. Common colors include black, red, green, and yellow. The key for the diagram will explain any color-coding.
How the Vacuum System Works
The basic principle of the vacuum system is to utilize the pressure differential between the atmosphere and the intake manifold (or the vacuum pump on diesels) to operate various components. Here's a simplified overview:
On gasoline engines, as the engine runs, the pistons move down on the intake stroke, creating a vacuum (lower pressure) in the intake manifold. This vacuum is then channeled through a network of hoses to various components. When vacuum is applied to a component like the EGR valve, it pulls on a diaphragm, opening the valve and allowing exhaust gas to flow into the intake manifold.
On diesel engines, the vacuum pump generates a vacuum that is then supplied to various components through a series of hoses. Similar to the gasoline system, vacuum operates actuators and valves to control various functions.
The vacuum reservoir acts as a buffer, ensuring a consistent vacuum supply even when the engine vacuum fluctuates. Check valves prevent vacuum from leaking back, maintaining the required vacuum levels.
Real-World Use and Basic Troubleshooting
Using the vacuum line diagram for troubleshooting is a practical and effective way to diagnose common problems:
- Vacuum Leak Detection: Visually inspect all vacuum lines for cracks, breaks, or loose connections. Pay close attention to areas near heat sources or moving parts. Use a vacuum gauge to measure the vacuum at various points in the system to pinpoint leaks. A simple trick is to spray carburetor cleaner around suspected leak points. If the engine RPM changes, you've likely found a leak.
- Component Testing: Use the diagram to identify the vacuum lines connected to a specific component. Disconnect the line and use a vacuum pump to apply vacuum. Observe whether the component operates as expected. For example, you can test the EGR valve by applying vacuum to the diaphragm and checking if the valve opens.
- Rough Idle Diagnosis: A vacuum leak can cause a rough idle. By systematically checking vacuum lines and components, you can often isolate the source of the problem.
- Poor Fuel Economy: Vacuum leaks can disrupt the air-fuel mixture, leading to poor fuel economy. Refer to the diagram to identify and repair any leaks.
Safety Considerations
While working on the vacuum system is generally safe, keep the following precautions in mind:
- Hot Engine: Avoid working on the vacuum system when the engine is hot. Allow the engine to cool down completely before starting any repairs.
- Sharp Edges: Be careful of sharp edges on hoses and metal components. Wear gloves to protect your hands.
- Fuel Lines: Some vacuum lines may run close to fuel lines. Be extra cautious when working in these areas to avoid damaging the fuel lines.
- Electrical Components: Be aware of nearby electrical components and avoid accidentally disconnecting or damaging them.
- EGR Valve: Exhaust gases can be extremely hot. Be careful when working around the EGR valve, especially after the engine has been running.
- Cummins Diesel Vacuum Pump: This pump can be fairly robust and located in tight spots. Ensure you are using the correct tools and procedures to avoid injury when servicing or removing it. Improper removal or installation can cause damage to the pump or the engine.
Diagram Download
You now have a solid understanding of the 2001 Dodge Ram 2500 vacuum line system. To further assist you in your repair and diagnostic endeavors, we have the complete, high-resolution vacuum line diagram available for download. This diagram will provide you with a detailed visual reference for all the vacuum lines and components in your truck. This resource is invaluable when tackling vacuum-related issues on your 2001 Ram 2500.
Happy wrenching!