
2001 Ford F150 Serpentine Belt Diagram
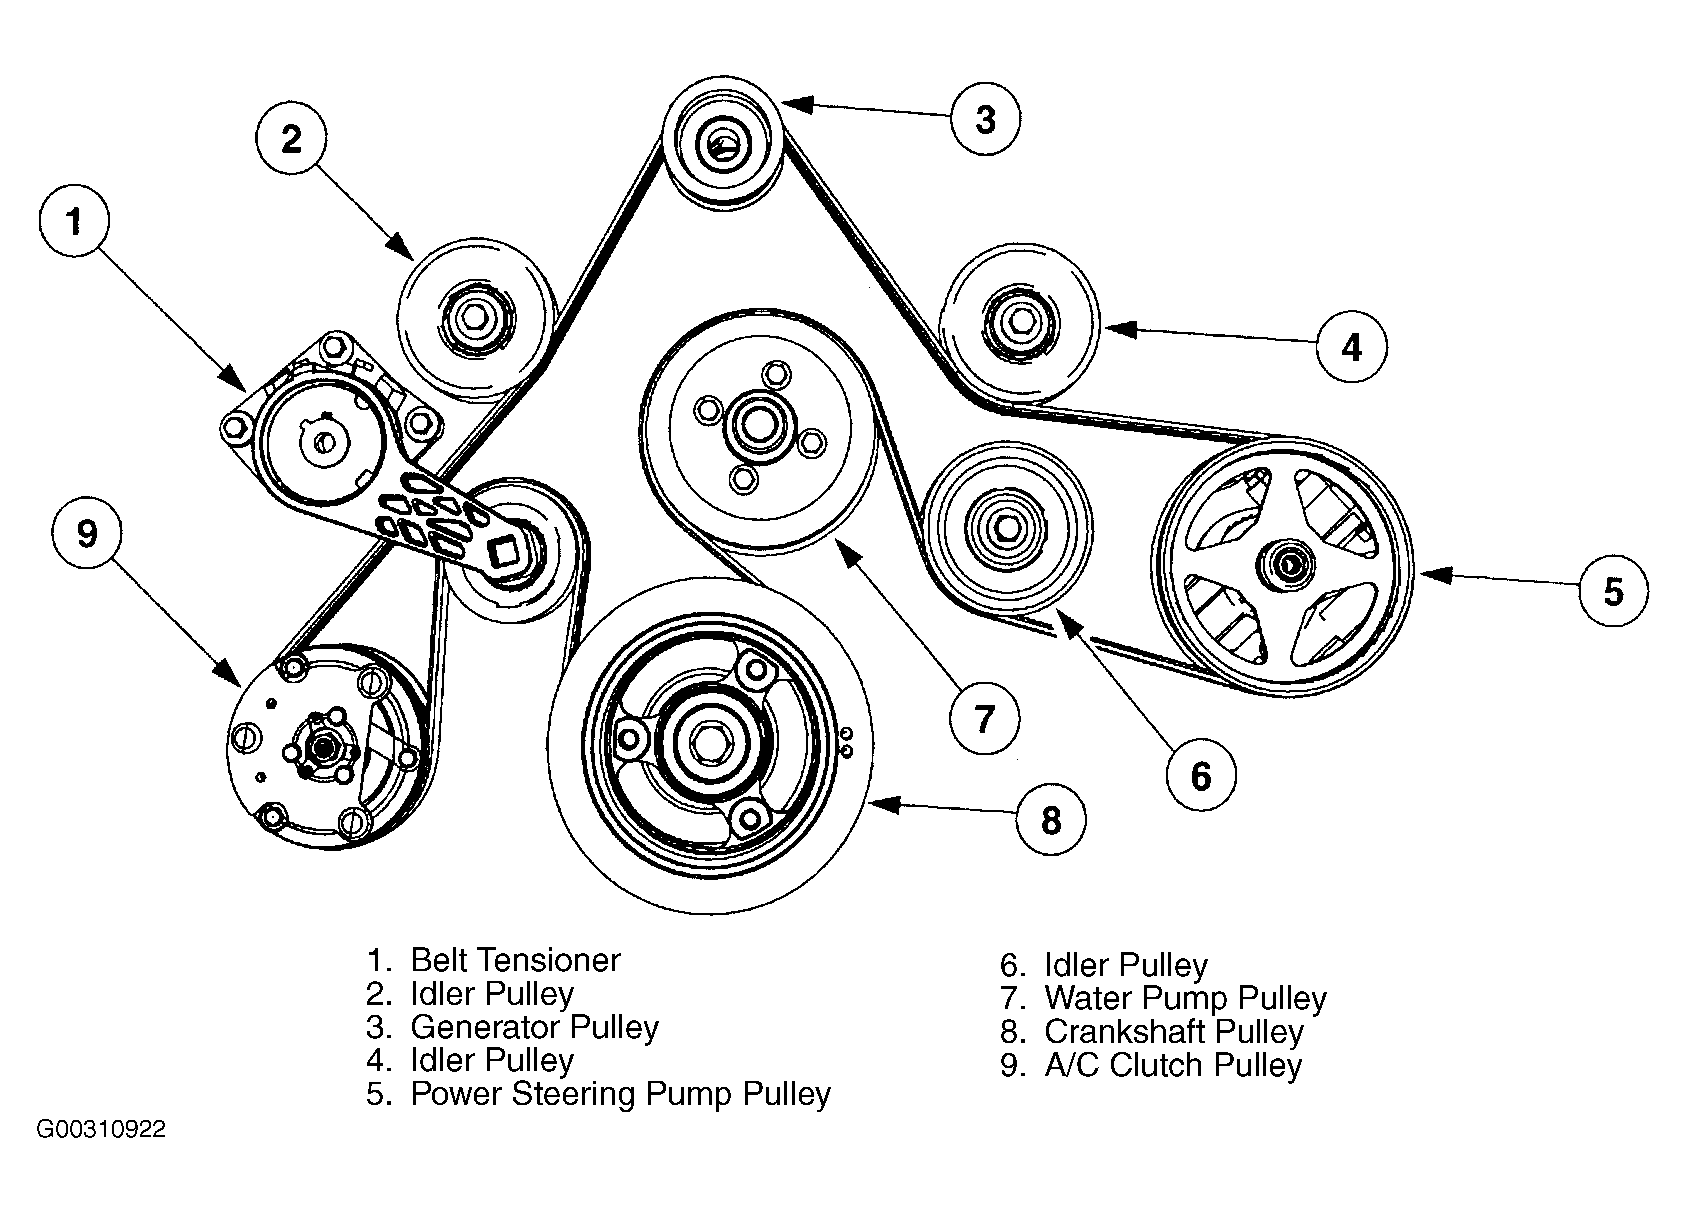
Hey there, fellow wrench-turners! Let's dive into something crucial for keeping your 2001 Ford F-150 purring like a kitten (or roaring like a beast, depending on your exhaust setup): the serpentine belt diagram. This isn't just some piece of paper; it's your roadmap to understanding how your engine's accessories are powered, and essential for successful maintenance and repairs.
Why This Diagram Matters
Think of the serpentine belt as the hardworking vein system for your engine's accessories. It snakes around various pulleys, driving components like the alternator, power steering pump, air conditioning compressor, and water pump. If the belt breaks, all those systems go down, leading to potential overheating, loss of power steering, and a very uncomfortable ride, especially on a hot day. This diagram is your key to:
- Proper Installation: Ensuring the belt is routed correctly after replacement. A misrouted belt can cause premature wear or even component failure.
- Troubleshooting: Diagnosing noises like squeals or chirps. The diagram helps you pinpoint which accessory might be causing the issue.
- Preventative Maintenance: Understanding the system allows for proactive inspections, catching potential problems before they become major headaches.
- Learning and Modification: Grasping the belt routing is foundational if you're planning on modifying your engine or adding accessories.
Key Specs and Main Parts
The 2001 F-150 came with a few engine options, primarily the 4.2L V6, the 4.6L V8, and the 5.4L V8. Each engine has a slightly different serpentine belt routing. So, before you even look at the diagram, make absolutely sure you've got the one for your engine. Here's a breakdown of the main players:
- Serpentine Belt: The rubber belt itself, made of a durable compound designed to withstand high temperatures and constant flexing.
- Crankshaft Pulley (Harmonic Balancer): Located at the bottom of the engine, connected to the crankshaft. This pulley drives the entire serpentine belt system.
- Alternator Pulley: Powers the charging system, keeping your battery topped up.
- Power Steering Pump Pulley: Provides hydraulic assistance for steering.
- Air Conditioning Compressor Pulley: Engages when you turn on the AC, circulating refrigerant.
- Water Pump Pulley: Circulates coolant throughout the engine to prevent overheating.
- Tensioner Pulley: Spring-loaded to maintain proper belt tension. This is critical for preventing slippage and premature wear.
- Idler Pulley: A smooth pulley used to guide the belt and provide optimal wrap angle around other pulleys.
Understanding the Symbols
The serpentine belt diagram isn't just a random collection of lines and circles; it's a carefully crafted representation of the system. Here's what the common symbols mean:
- Solid Lines: Represent the path of the serpentine belt itself. Pay close attention to the direction of the lines, as they indicate the direction the belt is moving.
- Circles/Pulleys: Each circle represents a pulley. The diagram may label the pulleys with abbreviations such as ALT (Alternator), P/S (Power Steering), A/C (Air Conditioning), WP (Water Pump), CRK (Crankshaft), TENS (Tensioner) and IDL (Idler).
- Arrows: Indicate the direction of rotation for each pulley. This is important for understanding how the belt drives each component.
- Tensioner Symbol: Usually depicted as a pulley with an arrow indicating the direction of movement when adjusting the tension. It might also include a spring symbol.
- Grooved vs. Smooth Pulleys: The diagram usually indicates which pulleys have grooves (for the ribbed side of the belt) and which are smooth (for the back of the belt).
How It Works
The serpentine belt system is a marvel of engineering simplicity. The crankshaft pulley, powered directly by the engine, spins the serpentine belt. The belt, in turn, wraps around the other pulleys, transferring the rotational force to each accessory. The tensioner pulley maintains the correct amount of tension on the belt, preventing it from slipping or becoming loose. Think of it like a complex chain drive, but with a single, long belt.
The tensioner pulley is a crucial component. It's spring-loaded and automatically adjusts to compensate for belt stretching and wear. Without the proper tension, the belt will slip, leading to reduced performance of the accessories and potentially causing damage. A worn-out tensioner can also contribute to belt noise.
Real-World Use: Basic Troubleshooting
Here's where the diagram becomes your best friend when things go south:
- Squealing Belt: A common symptom is a high-pitched squeal, especially when starting the engine or turning the steering wheel. This often indicates a loose or worn belt, a glazed pulley, or a failing tensioner. Use the diagram to inspect the belt and pulleys for signs of wear or damage. You might try spraying a small amount of belt dressing (sparingly!) on the belt to see if the noise goes away temporarily. If it does, replace the belt.
- Chirping Noise: A rhythmic chirping sound often points to a misaligned pulley or a small object caught in the belt. Use the diagram to carefully inspect each pulley for alignment and obstructions.
- Overheating: If your engine is overheating, the water pump might not be circulating coolant properly due to a slipping or broken serpentine belt. Check the diagram to confirm the belt is correctly routed and in good condition.
- Loss of Power Steering: If your steering suddenly becomes very difficult, especially at low speeds, the power steering pump might not be getting power due to a belt issue. Refer to the diagram to check the belt routing and tension.
Safety First!
Working on the serpentine belt system can be dangerous if you're not careful. Here are some critical safety precautions:
- Disconnect the Battery: Before working on any part of the electrical system, including the alternator, disconnect the negative battery cable.
- Engine Off and Cool: Never work on the serpentine belt system while the engine is running or hot. The belt and pulleys can cause serious injury.
- Keep Fingers Clear: When releasing the tensioner, be extremely careful to keep your fingers clear of the belt and pulleys. The spring-loaded tensioner can snap back with considerable force.
- Wear Eye Protection: Always wear safety glasses when working on your vehicle to protect your eyes from debris.
- Work in a Well-Ventilated Area: If you're using any solvents or cleaners, work in a well-ventilated area to avoid inhaling harmful fumes.
Ready to Get Started?
With a good understanding of the serpentine belt diagram and the proper safety precautions, you'll be well-equipped to tackle serpentine belt replacements and troubleshooting on your 2001 Ford F-150. Remember, correct routing is paramount for the longevity and proper function of your engine accessories. Don't hesitate to consult the diagram throughout the process.
We have the serpentine belt diagram file available for you to download, ensuring you have the precise reference you need for your 2001 F-150, whether it's the 4.2L V6, 4.6L V8, or the 5.4L V8 engine. Good luck!