
2001 Ford Taurus Belt Routing Diagram
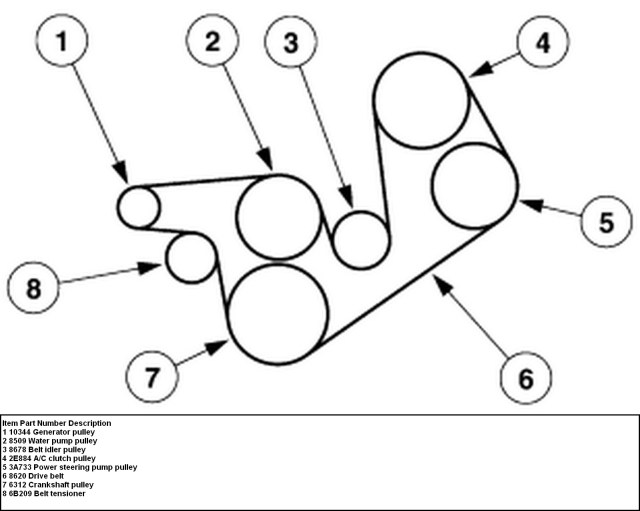
Alright, let's dive into the serpentine belt routing diagram for the 2001 Ford Taurus. Understanding this diagram is crucial for anyone tackling engine maintenance, whether you're replacing a worn belt, diagnosing a squealing noise, or just wanting to familiarize yourself with your engine's layout. We'll break down everything from the diagram's purpose to real-world troubleshooting. We also have the actual 2001 Ford Taurus Belt Routing Diagram available for download to help you get the job done.
Purpose of the 2001 Ford Taurus Belt Routing Diagram
Why bother with a belt routing diagram? Several reasons:
- Replacing a Serpentine Belt: This is the most common reason. The diagram shows you the exact path the belt must take around all the pulleys. Installing it incorrectly can lead to component damage or, at best, a very noisy and ineffective belt system.
- Troubleshooting Belt Noise: A squealing or chirping belt can indicate a problem with one of the components it drives. The diagram helps you identify each component to isolate the issue.
- Component Replacement: If you're replacing the alternator, power steering pump, or any other belt-driven accessory, you'll need to remove and reinstall the belt. The diagram makes this process much smoother.
- General Engine Familiarization: For those who enjoy understanding how their cars work, the diagram provides a visual representation of the serpentine belt system and its connection to various engine components.
Key Specs and Main Parts
The 2001 Ford Taurus typically came with either a 3.0L Vulcan OHV V6 or a 3.0L Duratec DOHC V6 engine. While the general principles of the serpentine belt system are the same, the specific routing can differ slightly between these engines. Make sure you're referencing the correct diagram for your engine!
Here are the main components involved:
- Serpentine Belt: The heart of the system, a single long belt that transmits power from the crankshaft to various accessories. The "serpentine" name comes from the way it snakes around all the pulleys.
- Crankshaft Pulley (or Damper): Connected directly to the crankshaft, this pulley provides the rotational force that drives the entire system. The crankshaft damper also serves as a harmonic balancer which reduces the vibrations produced by the engine.
- Alternator Pulley: The alternator converts mechanical energy into electrical energy to charge the battery and power the car's electrical system.
- Power Steering Pump Pulley: The power steering pump provides hydraulic pressure to assist with steering.
- Air Conditioning Compressor Pulley: The A/C compressor circulates refrigerant, a critical component of the air conditioning system.
- Water Pump Pulley: The water pump circulates coolant throughout the engine to prevent overheating.
- Tensioner Pulley: This spring-loaded pulley maintains the correct tension on the serpentine belt. It's critical for proper belt operation and preventing slippage.
- Idler Pulley (Possibly): Some Taurus models may have an idler pulley, which is a smooth pulley used to guide the belt around other components or to increase the wrap angle on a specific pulley. The 'wrap angle' is the amount of the pulley circumference that the belt contacts.
Symbols – Lines, Colors, and Icons
Understanding the symbols on the diagram is key to interpreting it correctly. While specific diagrams may vary slightly, here are some common conventions:
- Solid Lines: Generally represent the section of the serpentine belt that is making contact with the pulley.
- Dashed Lines: Often indicate the back side of the belt, showing where it passes behind a pulley.
- Arrows: Indicate the direction of belt travel. Always pay close attention to these to ensure you route the belt correctly.
- Component Icons: Small images or simplified drawings of each component (alternator, power steering pump, etc.) will typically be labelled.
- Color Coding (Less Common): Some diagrams may use color to distinguish between different sections of the belt or to highlight specific components. Always refer to the diagram's legend if color is used.
How It Works
The serpentine belt system is a clever way to drive multiple engine accessories with a single belt. Here's a simplified breakdown:
- The crankshaft provides the rotational force.
- The serpentine belt wraps around the crankshaft pulley and then snakes its way around all the other pulleys.
- As the crankshaft rotates, it drives the serpentine belt, which in turn spins each accessory pulley.
- The tensioner pulley maintains constant tension on the belt, preventing slippage and ensuring that all components are driven effectively.
The belt tension is critical for proper function. Too loose, and the belt will slip, causing noise and reducing the performance of the accessories. Too tight, and it can put excessive stress on the pulleys and bearings, leading to premature wear or failure.
Real-World Use – Basic Troubleshooting Tips
Here are a few common scenarios where the belt routing diagram can be invaluable:
- Squealing Belt: A squealing belt often indicates slippage. Check the belt tensioner to make sure it's functioning correctly. Also, inspect the belt for cracks, glazing, or other signs of wear. Use the diagram to identify the different pulleys involved and listen carefully near each one to pinpoint the source of the noise. A misaligned pulley can also cause a squeal.
- Belt Coming Off: This is a serious issue. A worn or damaged belt, a faulty tensioner, or a misaligned pulley can all cause the belt to come off. Never operate the vehicle if the belt is off, as this can damage critical components. The diagram will help you confirm the belt is routed correctly after reinstallation and identify any potential alignment issues.
- Accessory Not Working: If your alternator isn't charging, your power steering isn't working, or your A/C isn't cooling, the problem could be a broken or slipping belt. Check the belt tension and condition. Use the diagram to make sure the belt is properly routed around the affected accessory's pulley.
- Belt Replacement: When replacing the belt, take a picture of the old belt's routing before removing it. This serves as a backup in case you lose the diagram or have difficulty interpreting it.
Safety – Highlight Risky Components
Working around the serpentine belt system can be dangerous if proper precautions aren't taken.
- Engine Off: Always ensure the engine is off and the key is removed from the ignition before working on the serpentine belt system. Accidental engine starting can cause severe injury.
- Hot Engine: Avoid working on the belt system immediately after the engine has been running, as components can be extremely hot.
- Moving Parts: Keep your hands, hair, and clothing clear of the serpentine belt and pulleys while the engine is running.
- Tensioner Spring: The tensioner pulley is spring-loaded and can snap back with considerable force when released. Use the correct tools to relieve the tension safely.
- Battery Disconnect: Consider disconnecting the negative battery terminal to prevent any accidental electrical shorts or unexpected activation of electrical components.
Finally, remember to always consult your vehicle's service manual for specific instructions and torque specifications. Safety first! Now you should be ready to tackle that belt replacement and diagnostic with greater understanding. We have the file, click here to download the 2001 Ford Taurus Belt Routing Diagram to have on hand during your project!