2001 Ford Taurus Serpentine Belt Routing Diagram
Let's dive into the serpentine belt routing diagram for the 2001 Ford Taurus. Whether you're tackling a belt replacement, diagnosing a squealing noise, or just getting a better understanding of your engine's accessory drive system, this diagram is your roadmap. We're going to break down the key elements, explain how it all works, and offer some practical troubleshooting tips.
Purpose of the Serpentine Belt Routing Diagram
The serpentine belt routing diagram is essentially a visual guide showing the exact path your serpentine belt takes around the various engine accessories. It's crucial for a few key reasons:
- Correct Belt Installation: Installing the belt incorrectly can lead to serious problems, including accessory malfunctions (power steering, alternator, air conditioning) and even belt damage. The diagram ensures you get it right the first time.
- Troubleshooting: When a belt slips, squeals, or breaks, the diagram helps you identify the affected components and check for misalignments or damaged pulleys.
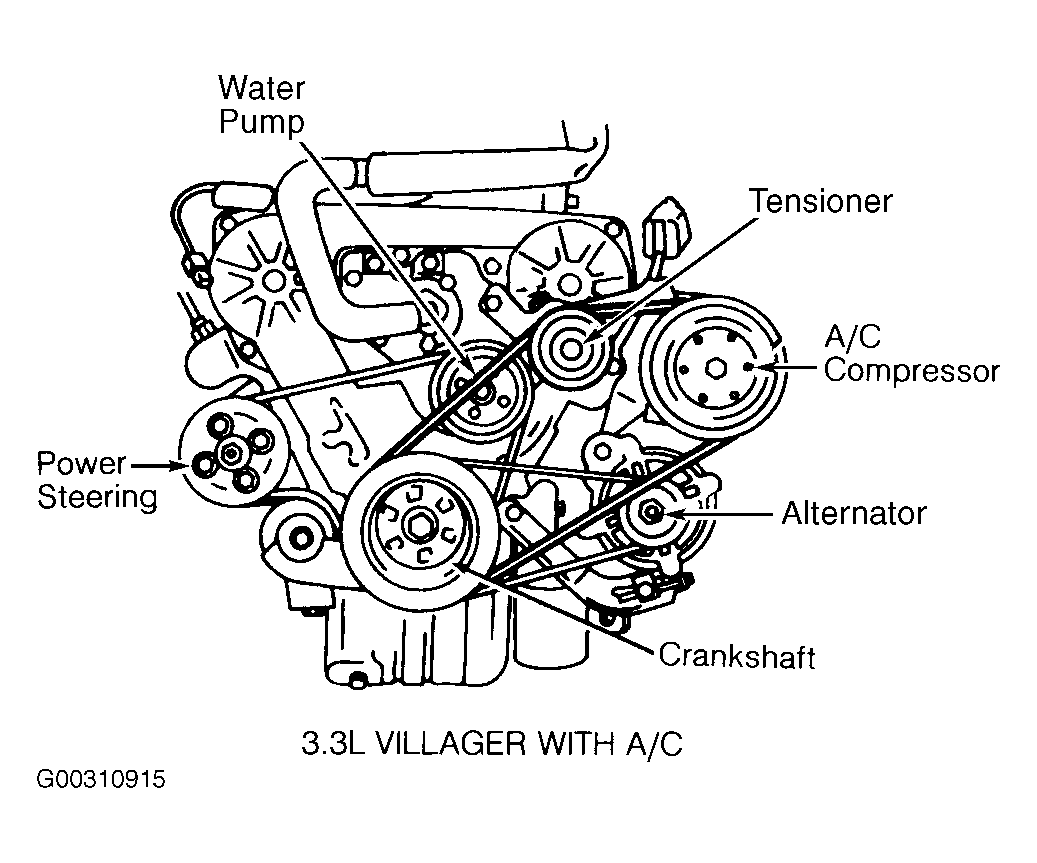
- Component Identification: You can use the diagram to locate and identify different engine accessories, such as the power steering pump, alternator, AC compressor, and tensioner.
- Maintenance & Repair: This is vital whenever you need to remove and replace the belt. Having the routing diagram saves you time and frustration.
Key Specs and Main Parts of the 2001 Ford Taurus Accessory Drive
The 2001 Ford Taurus, depending on the engine (typically either a 3.0L Vulcan OHV V6 or a 3.0L Duratec DOHC V6), has a specific serpentine belt routing configuration. Although the principle is the same, the exact arrangement might differ slightly between the two engines, so make sure you have the diagram for your engine. Here are the major components:
- Crankshaft Pulley (Harmonic Balancer): This pulley is connected directly to the engine's crankshaft and drives the serpentine belt.
- Alternator Pulley: The alternator generates electricity to power the car's electrical system and charge the battery.
- Power Steering Pump Pulley: The power steering pump provides hydraulic assistance to make steering easier.
- Air Conditioning (AC) Compressor Pulley: The AC compressor is responsible for compressing the refrigerant in the air conditioning system.
- Idler Pulley: An idler pulley is a smooth pulley used to guide the belt and maintain proper tension. Some Taurus models have one or more.
- Tensioner Pulley: The tensioner pulley is spring-loaded and automatically adjusts to maintain the correct tension on the serpentine belt. This is critical for proper operation of all accessories. This component is usually spring loaded, with a bolt to apply leverage and relieve tension to allow installation/removal of the serpentine belt.
The serpentine belt itself is a long, continuous belt made of reinforced rubber. Its cross-section typically features multiple "V" shaped ribs that fit into corresponding grooves on the pulleys. This "V" profile provides increased grip and power transmission.
Decoding the Serpentine Belt Routing Diagram: Symbols, Lines, and Colors
Serpentine belt routing diagrams usually employ a standardized set of symbols to convey information effectively. Understanding these symbols is key to interpreting the diagram correctly.
- Solid Lines: Solid lines represent the path of the outside (smooth) surface of the serpentine belt.
- Dashed Lines: Dashed lines usually indicate the path of the grooved side of the belt. If the diagram uses color, it'll often show the grooved side of the belt running over the grooved pulleys, and the smooth side running over smooth pulleys. This helps you easily identify the direction the belt must take.
- Arrows: Arrows indicate the direction of rotation of each pulley. This is helpful for visualizing how the belt drives each component.
- Component Symbols: Each component is typically represented by a simplified icon. For example, the alternator might be depicted as a circle with "ALT" inside, or the AC compressor as a circle with "AC."
- Tensioner Marking: The tensioner pulley will be indicated with a special marking, this is crucial to remember, because failure to relieve the tension on this component before installing the serpentine belt could result in damage.
While color isn't always used, if the diagram is in color, different colors might be used to highlight specific sections of the belt's path or to differentiate between the front and back sides of the belt.
How the Serpentine Belt System Works
The serpentine belt system is a clever design for efficiently driving multiple engine accessories with a single belt. The crankshaft pulley, driven by the engine's rotation, is the main driver. The serpentine belt wraps around this pulley and then extends to other pulleys, transferring rotational force to each accessory. The tensioner pulley maintains consistent belt tension, ensuring optimal grip and preventing slippage. Proper tension is crucial. If the belt is too loose, it will slip and squeal, reducing the performance of the accessories. If it's too tight, it can put undue stress on the pulleys and bearings, leading to premature failure. The idler pulley(s) simply redirect the belt path to provide optimal wrap around other pulleys.
The design is advantageous compared to older systems using multiple V-belts because of its compactness, simplified maintenance (only one belt to replace), and increased efficiency.
Real-World Use: Troubleshooting Tips for Your 2001 Taurus Serpentine Belt
Here are a few common issues and how the routing diagram can help you troubleshoot them:
- Squealing Noise: A squealing noise, especially when the engine is first started or under heavy load, is a common symptom of a slipping serpentine belt. Use the diagram to inspect the belt for wear, cracks, or glazing. Also, check the tensioner pulley for proper operation. If the tensioner is weak, it may not be maintaining adequate belt tension. Misalignment of the pulleys could also cause a squeal.
- Accessory Malfunction: If your power steering, alternator, or AC compressor isn't working properly, the serpentine belt might be the culprit. Check the diagram to confirm the belt is properly routed around the affected component. A broken or severely worn belt can prevent the accessory from functioning correctly.
- Belt Breakage: If your serpentine belt breaks, it's essential to diagnose the underlying cause before replacing it. Use the diagram to inspect all the pulleys for damage, such as sharp edges or rust, which can cause the belt to wear prematurely. Also, check for seized accessories that put excessive stress on the belt.
Pro Tip: Before removing the old belt, take a picture of the routing with your phone. This can be a lifesaver if you forget the proper path!
Safety Considerations
Working on the serpentine belt system involves some inherent risks. Here's what you need to be aware of:
- Moving Parts: Never work on the serpentine belt system while the engine is running. The rotating pulleys and belt can cause serious injury.
- Hot Components: The engine and exhaust components can be extremely hot. Allow the engine to cool down completely before working on the serpentine belt system.
- Tensioner Spring: The tensioner pulley is spring-loaded and can snap back with considerable force when released. Use the correct tools to relieve tension safely. Follow the proper procedure for releasing the tensioner. Incorrectly releasing the tensioner could cause injury.
- Eye Protection: Always wear safety glasses to protect your eyes from debris.
Keep your hands and clothing clear of all moving parts. When removing and installing the belt, ensure the parking brake is engaged and the vehicle is properly supported.
Final Thoughts & Diagram Access
Understanding the 2001 Ford Taurus serpentine belt routing diagram is a valuable skill for any DIY mechanic. It empowers you to perform basic maintenance, diagnose problems, and save money on repairs. Remember to always prioritize safety and consult the service manual for specific instructions and torque specifications.
We have the 2001 Ford Taurus Serpentine Belt Routing Diagram available for download. You can access it [insert download link or instruction here - e.g., by clicking the button below, or visiting our website at example.com/diagram]. This will provide you with a high-resolution, printable version of the diagram for easy reference in your garage.