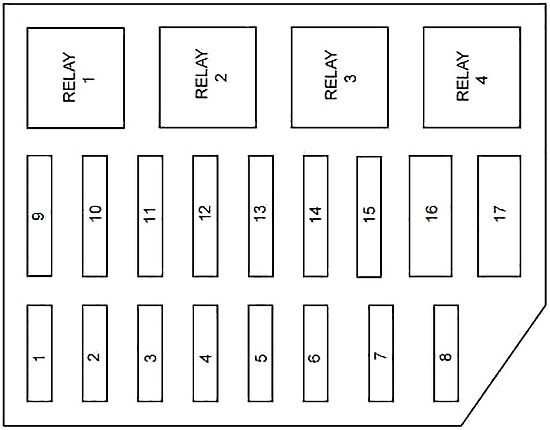
2001 Mercury Grand Marquis Fuse Box Diagram
If you're wrenching on a 2001 Mercury Grand Marquis, understanding its fuse box diagram is absolutely crucial. Whether you're troubleshooting an electrical issue, planning a modification, or just trying to learn more about your car, knowing how the fuse box works and what each fuse protects can save you time, money, and potential headaches. This guide will walk you through the key aspects of the 2001 Grand Marquis fuse box diagram, explaining its components, symbols, and practical applications.
Purpose of the Fuse Box Diagram
The fuse box diagram is essentially a roadmap for your car's electrical system. It tells you exactly which fuse protects which circuit. Why is this important? Well, think of fuses as miniature circuit breakers for your car. They're designed to protect sensitive electrical components from overloads and short circuits. If a component malfunctions and draws too much current, the corresponding fuse will blow, interrupting the circuit and preventing damage. Without the diagram, you'd be stuck guessing which fuse to check or replace, potentially leading to further problems.
This diagram is invaluable for:
- Troubleshooting electrical problems: Identifying the blown fuse associated with a malfunctioning component.
- Performing electrical repairs: Ensuring you're working on the correct circuit and preventing accidental shorts.
- Installing aftermarket accessories: Tapping into the appropriate circuits without overloading them.
- General understanding of your car's electrical system: Learning how different components are wired and protected.
Key Specs and Main Parts
The 2001 Mercury Grand Marquis actually has *two* main fuse boxes. One is located under the hood, usually near the battery or the driver's side fender. This is often referred to as the Power Distribution Box or Engine Compartment Fuse Box. The other is located inside the cabin, typically under the dashboard on the driver's side. This is the Central Junction Box or Interior Fuse Box.
Each fuse box contains a variety of fuses and relays. Fuses are rated in amperes (amps), which indicate the maximum current they can handle before blowing. Common fuse ratings include 5A, 7.5A, 10A, 15A, 20A, 25A, and 30A. Relays are electromechanical switches that allow a low-current circuit to control a high-current circuit. They're used to control components like the headlights, fuel pump, and starter motor.
The diagram will show the location of each fuse and relay, along with its corresponding circuit and amperage rating. It will also typically include a description of the component or system that the fuse protects.
Key components include:
- Fuses: These are the sacrificial components, designed to break the circuit when overcurrent occurs. They come in different types, like blade fuses (most common) and cartridge fuses.
- Relays: Electrically operated switches that control high-current circuits with a low-current signal.
- Circuit Breakers: These are automatic switches that open a circuit if too much current flows. Unlike fuses, they can be reset after tripping. The 2001 Grand Marquis may use a few circuit breakers for high-demand circuits.
- Connectors: These provide a means for connecting wiring harnesses to the fuse box and its components.
- Grounding Points: These are crucial for proper circuit operation, providing a return path for current to the battery. They're usually bolted to the vehicle's frame or body.
Understanding the Symbols
The fuse box diagram uses various symbols to represent different components and wiring connections. While the specific symbols can vary slightly depending on the diagram's source, here are some common ones:
- Lines: Represent wires. Thicker lines often indicate wires with higher current-carrying capacity.
- Boxes/Rectangles: Typically represent fuses or relays. A number inside or next to the box indicates the fuse's amperage rating.
- Circles: May represent connectors or switches.
- Ground Symbol: A series of decreasing horizontal lines, indicating a connection to the vehicle's chassis (ground).
- Battery Symbol: A long and a short parallel line, indicating the positive and negative terminals of the battery, respectively.
- Colors: Wire colors are often indicated on the diagram. Common colors include red, black, blue, green, yellow, and white. These colors help you trace wires in the actual vehicle.
It's crucial to familiarize yourself with the specific symbols used in *your* 2001 Grand Marquis fuse box diagram. Look for a legend or key on the diagram that explains each symbol.
How It Works
The fuse box is essentially a central distribution point for electrical power. Power from the battery flows through the main wiring harness to the fuse box. From there, it's distributed to various circuits throughout the car, each protected by its own fuse. When you turn on a component, like the headlights, you're completing a circuit that allows current to flow from the battery, through the fuse, to the component, and back to the battery via a ground connection.
If a short circuit occurs (e.g., a wire chafes through its insulation and touches the metal chassis), the resistance in the circuit drops drastically, causing a surge of current. This surge exceeds the fuse's amperage rating, causing the fuse element to melt and break the circuit. This prevents the high current from damaging the wiring and components in that circuit.
Relays act as remote-controlled switches. A small current is used to energize a coil within the relay, which then closes a set of contacts, allowing a much larger current to flow through a separate circuit. This is useful for controlling high-current components like the starter motor, where it wouldn't be practical to run the high current directly through the ignition switch.
Real-World Use: Basic Troubleshooting Tips
Here’s a typical scenario: your cigarette lighter/power outlet isn't working.
- Consult the fuse box diagram: Locate the fuse specifically labeled for the cigarette lighter or power outlet. (Often labeled as "PWR Outlet" or similar).
- Inspect the fuse: Use a fuse puller (or needle-nose pliers) to remove the fuse. Visually inspect the fuse. If the thin wire inside the fuse is broken or blackened, the fuse is blown.
- Test the fuse (Recommended): Even if the fuse *looks* okay, it's best to test it with a multimeter. Set the multimeter to continuity mode (usually indicated by a diode symbol or a buzzer). Touch the multimeter probes to the two metal terminals on the fuse. If the multimeter beeps or shows a reading close to zero, the fuse is good. If it shows no continuity (an open circuit), the fuse is bad.
- Replace the fuse: Replace the blown fuse with a new fuse of the *same* amperage rating. Never use a fuse with a higher amperage rating, as this could damage the wiring or components.
- Test the circuit: After replacing the fuse, test the cigarette lighter/power outlet to see if it's working. If the new fuse blows immediately, there's likely a short circuit in the wiring or the component itself. Further troubleshooting will be required.
Safety Considerations
Working with automotive electrical systems can be dangerous if proper precautions aren't taken.
- Disconnect the battery: Before working on any electrical circuits, disconnect the negative terminal of the battery. This will prevent accidental shorts and electrical shocks.
- Never bypass a fuse: Never replace a fuse with a wire or other conductive material. This will remove the circuit protection and could lead to a fire.
- Use the correct fuse rating: Always replace a blown fuse with a fuse of the same amperage rating. Using a higher amperage fuse can overload the circuit and damage components.
- Be careful when working around relays: Relays can get hot when they're energized. Avoid touching them directly when the ignition is on.
- Beware of capacitors: Some electrical components, like the alternator, contain capacitors that can store a charge even after the battery is disconnected. Discharge these capacitors before working on the component.
- Airbag Circuits:Extreme caution is required when working near airbag circuits. Improper handling can cause accidental deployment, leading to serious injury. It's recommended to have a qualified technician handle any repairs involving the airbag system.
The most risky components are usually those dealing with high voltage or amperage, such as the starter motor circuit, alternator circuit, and airbag systems. Proceed with caution and consult a professional if you're unsure.
Remember, electricity doesn't care if you're experienced or not. Always prioritize safety when working on your car's electrical system.
You can download the detailed 2001 Mercury Grand Marquis Fuse Box Diagram to have it for your references.