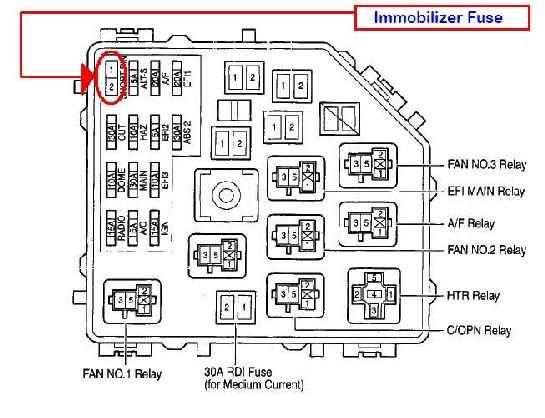
2001 Toyota Corolla Fuse Box Diagram
For the seasoned DIYer or car enthusiast tackling repairs or modifications on a 2001 Toyota Corolla, understanding the fuse box diagram is absolutely essential. It’s your roadmap to the electrical system, allowing you to diagnose issues, replace blown fuses, and even safely tap into circuits for aftermarket accessories. This article will provide a comprehensive overview of the 2001 Corolla's fuse box diagram, covering its purpose, key components, symbol interpretations, and practical troubleshooting tips.
Purpose: Your Electrical System's Roadmap
Why is understanding the fuse box diagram so crucial? Simply put, it's the key to safely interacting with your Corolla's electrical system. Here's a breakdown of its primary benefits:
- Troubleshooting Electrical Issues: When a component stops working – say, your radio, headlights, or power windows – the fuse box is the first place you should investigate. The diagram helps you quickly identify the corresponding fuse, allowing you to check for a blown fuse, which is often the culprit.
- Preventing Further Damage: Replacing a blown fuse with one of the correct amperage (we'll discuss this later) protects the circuit and prevents potential damage to more expensive components. Using the wrong amperage fuse can lead to overheating, fire, or damage to the electrical system.
- Safe Access for Modifications: Planning to install aftermarket accessories like a new stereo, driving lights, or a dashcam? The fuse box provides a convenient and relatively safe access point to tap into the car's electrical system. However, knowing which fuse controls what is absolutely crucial to avoid overloading circuits or causing shorts.
- Learning Your Vehicle's Electrical System: Studying the fuse box diagram is an excellent way to gain a better understanding of how your car's electrical system is organized and how its various components are interconnected.
Key Specs and Main Parts
The 2001 Toyota Corolla typically has two fuse box locations:
- Interior Fuse Box: Located under the dashboard, usually on the driver's side near the steering column. This box houses fuses for interior components like the radio, lights, power windows, and other comfort and convenience features.
- Engine Compartment Fuse Box: Located under the hood, typically near the battery. This box contains fuses and relays for critical engine management systems, headlights, ABS, and other vital functions.
Key Specs to Note:
- Fuse Amperage Ratings: Each fuse is rated for a specific amperage (e.g., 5A, 10A, 15A, 20A, 30A). This number indicates the maximum current the fuse can handle before blowing. It's crucial to replace a blown fuse with one of the exact same amperage rating. Using a higher amperage fuse can overload the circuit and cause serious damage.
- Relays: These are electromechanical switches that control high-current circuits using a low-current signal. They're often used for components like headlights, starter motors, and air conditioning compressors. The fuse box diagram will also indicate the location and function of various relays.
- Fuse Puller: A small plastic tool (often found inside the fuse box) designed to safely remove fuses without damaging them or your fingers.
Symbols: Decoding the Fuse Box Diagram
Understanding the symbols used in the fuse box diagram is essential for accurate interpretation. While the specific symbols may vary slightly, here are some common examples:
- Lines: Lines represent electrical wires connecting components. Solid lines typically indicate a direct connection, while dashed lines may represent a connection through a switch or relay.
- Colors: Wiring colors are often indicated on the diagram using abbreviations (e.g., BLK for black, RED for red, WHT for white). This helps you trace wires and identify specific circuits.
- Icons: Icons represent the various components protected by each fuse. Common icons include:
- Lightbulb: Indicates a fuse protecting lights (headlights, taillights, interior lights).
- Radio: Indicates a fuse protecting the radio or infotainment system.
- Fan: Indicates a fuse protecting a fan (e.g., radiator fan, blower motor fan).
- Window: Indicates a fuse protecting power windows.
- Horn: Indicates a fuse protecting the horn.
The legend accompanying the fuse box diagram will provide a detailed explanation of all the symbols used.
How It Works: The Electrical Circuit's Guardian
A fuse is essentially a sacrificial element designed to protect an electrical circuit from overcurrent. It's a thin wire enclosed in a glass or plastic housing. When the current flowing through the circuit exceeds the fuse's amperage rating, the wire inside the fuse melts, breaking the circuit and preventing damage to other components. This is why a blown fuse is often the first sign of an electrical problem. The circuit is designed in such a way that each element needs a specific amount of current to function properly. Overcurrent is when the current flowing exceeds the needed amount.
Think of it like a dam: the fuse is designed to release the water (current) at a specific pressure (amperage). If the pressure gets too high, the dam (fuse) breaks, preventing the flood (overcurrent) from damaging the city (electrical components) downstream.
Real-World Use: Basic Troubleshooting
Here's a step-by-step guide to troubleshooting electrical problems using the fuse box diagram:
- Identify the Problem: Determine which component isn't working.
- Consult the Fuse Box Diagram: Locate the diagram (usually inside the fuse box cover or in the owner's manual). Find the fuse that corresponds to the malfunctioning component.
- Locate the Fuse: Using the diagram, find the physical location of the fuse in the fuse box.
- Inspect the Fuse: Visually inspect the fuse. If the wire inside the fuse is broken or blackened, the fuse is blown. Some fuses are see-through, making visual inspection easy. Others may require a multimeter to check for continuity.
- Test with Multimeter: A multimeter will give the most accurate reading for fuse continuity. Set your multimeter to continuity mode (usually indicated by a sound wave symbol). Place the probes on each of the fuse's metal contacts. If you hear a beep, the fuse is good. If there is no beep, then the fuse is blown.
- Replace the Fuse: Use the fuse puller to remove the blown fuse. Replace it with a new fuse of the *exact* same amperage rating.
- Test the Component: Turn on the component to see if it's working.
- If the Fuse Blows Again: If the new fuse blows immediately, there's a short circuit or overload in the circuit. Do not keep replacing fuses! This could damage components or start an electrical fire. You'll need to further investigate the wiring and components in that circuit to find the root cause of the problem. A professional mechanic or electrician may be necessary.
Safety: Proceed with Caution!
Working with your car's electrical system can be dangerous if you don't take proper precautions:
- Disconnect the Battery: Before working on any electrical components, disconnect the negative terminal of the battery. This will prevent accidental shorts and electrical shocks.
- Avoid Water: Never work on electrical components in wet conditions.
- Use the Correct Fuses: As emphasized earlier, always use fuses with the correct amperage rating. Using a higher amperage fuse can overload the circuit and cause a fire.
- Identify High-Risk Components: Certain components, like the airbag system and ABS, are extremely sensitive and can be dangerous to work on without specialized knowledge and tools. If you're unsure about working on these components, consult a professional.
- Double Check: Before reconnecting the battery, double-check all your connections and ensure everything is properly installed.
By understanding the 2001 Toyota Corolla fuse box diagram, you can confidently diagnose and resolve electrical issues, perform safe modifications, and gain a deeper understanding of your vehicle's inner workings. However, remember that electrical systems can be complex, and if you're ever unsure about a procedure, it's always best to consult a qualified mechanic or electrician.
We have the complete 2001 Toyota Corolla Fuse Box Diagram available for download. This document provides a high-resolution, easily readable visual aid to assist in your electrical troubleshooting and repair endeavors. This resource will aid in your quest for auto electrical system enlightenment!