2002 Chevy Silverado Radio Wiring Harness Diagram
Welcome, fellow gearheads and DIY enthusiasts! Today, we're diving deep into the 2002 Chevy Silverado radio wiring harness diagram. Understanding this diagram is absolutely crucial whether you're upgrading your sound system, troubleshooting a faulty radio, or simply trying to understand the intricate electrical system of your Silverado. Think of it as a roadmap to your truck's audio soul. Let's get started.
Why Bother with the Wiring Diagram?
The purpose of a wiring diagram is multifaceted. It serves as your guiding light for:
- Repairs: Identifying damaged or disconnected wires. Pinpointing shorts or open circuits.
- Upgrades: Safely installing aftermarket stereos, amplifiers, and speakers. Ensuring proper connections to avoid damaging your new equipment or your truck's electrical system.
- Troubleshooting: Diagnosing radio malfunctions, such as no power, intermittent sound, or speaker issues. Isolating the problem to a specific wire or component.
- Learning: Gaining a deeper understanding of automotive electrical systems. Building your confidence in tackling future electrical projects.
Without the diagram, you're essentially working blind, risking electrical damage, improper connections, and a frustrating experience. It's the equivalent of trying to assemble IKEA furniture without the instructions – possible, but highly inefficient and potentially destructive!
Key Specs and Main Parts of the Radio Wiring Harness
The 2002 Chevy Silverado radio wiring harness connects the radio (or head unit) to the truck's electrical system and speakers. It typically comprises several wires, each serving a specific function. Here's a breakdown of the key components and specifications:
- Power Wires:
- Constant 12V (Battery): This wire provides continuous power to the radio, allowing it to retain memory settings (presets, clock, etc.). Typically, this is a thicker gauge wire, often orange or yellow.
- Switched 12V (Ignition): This wire provides power to the radio only when the ignition is turned on. This is usually a red wire.
- Ground: Provides the return path for the electrical current. Typically a black wire, often connected to the vehicle's chassis.
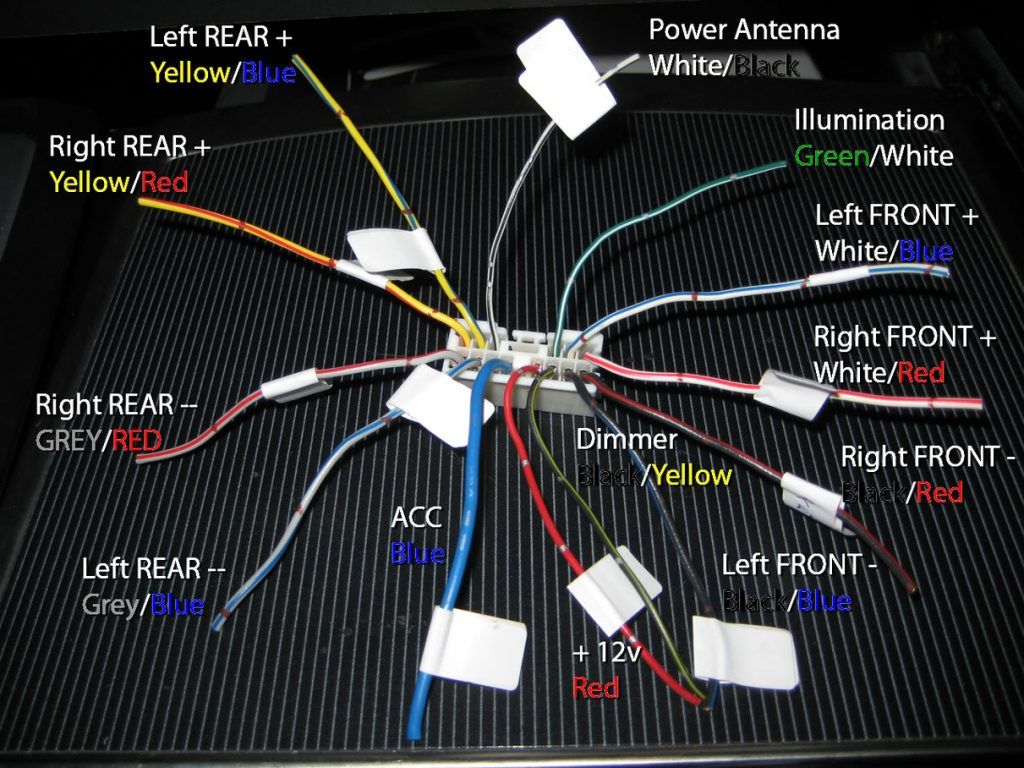
- Speaker Wires:
- These wires connect the radio to the speakers. Each speaker (front left, front right, rear left, rear right) has two wires: a positive (+) and a negative (-). The colors of these wires vary, but they're usually twisted together in pairs.
- Antenna Wire:
- This wire connects the radio to the antenna, allowing it to receive radio signals. It's typically a coaxial cable with a specific connector.
- Illumination Wire (Dimmer):
- This wire dims the radio's display when the headlights are turned on. It helps reduce glare and improve visibility at night. This wire might be orange with a white stripe.
- Other Wires:
- Depending on the radio model and truck configuration, there may be additional wires for functions such as remote turn-on for amplifiers, steering wheel controls, and vehicle speed sensors.
Decoding the Symbols: Understanding the Wiring Diagram
Wiring diagrams use a standardized set of symbols to represent electrical components and connections. Here's a guide to common symbols you'll encounter in the 2002 Chevy Silverado radio wiring diagram:
- Solid Lines: Represent wires. The thickness of the line can sometimes indicate the wire gauge (thicker lines = thicker wires).
- Dashed Lines: May represent shielded cables or connections that are not always present depending on the vehicle configuration.
- Circles: Often represent connection points, such as splices or terminals.
- Rectangles: Typically represent components, such as the radio itself, amplifiers, or fuses.
- Ground Symbol: Usually a series of horizontal lines, indicating a connection to the vehicle's chassis ground.
- Battery Symbol: Represents the battery, the source of power.
Color Codes: Wire colors are crucial for identifying the correct connections. The wiring diagram will use abbreviations for colors, such as:
- BK: Black
- RD: Red
- OR: Orange
- YL: Yellow
- GN: Green
- BL: Blue
- WT: White
Some wires may have a primary color with a stripe of a different color (e.g., WT/BL for white with a blue stripe). This is represented in the diagram as the primary color followed by a forward slash and then the stripe color.
Icons: The diagram may also use icons to represent specific components, such as speakers (often a stylized cone), antennas (a vertical line with a loop), and fuses (a zigzag line within a rectangle).
How It Works: Tracing the Electrical Flow
The radio wiring harness acts as the central nervous system for the audio system. Power flows from the battery, through the fuse box (for protection against overloads), and into the radio via the constant 12V wire. When the ignition is turned on, the switched 12V wire provides additional power, activating the radio's functions. The ground wire completes the circuit, allowing the current to flow back to the battery.
Audio signals from the radio's amplifier are then sent to the speakers through the speaker wires. Each speaker has a positive and negative wire, and it's crucial to connect them correctly to ensure proper phasing (the speakers move in the same direction, producing optimal sound). Incorrect phasing can result in weak bass and poor sound quality.
Real-World Use: Basic Troubleshooting Tips
Here are a few troubleshooting scenarios where the wiring diagram can be invaluable:
- Radio Not Turning On: Use the diagram to check the constant 12V, switched 12V, and ground wires. Verify that the fuses are not blown. Use a multimeter to test for voltage at each wire.
- No Sound from Speakers: Check the speaker wires for loose connections or damage. Use a multimeter to test the speaker wires for continuity (a complete electrical path). Try swapping the speaker wires to see if the problem shifts to another speaker, indicating a faulty speaker wire.
- Intermittent Sound: Look for loose connections or corroded terminals. Wiggle the wires while the radio is playing to see if the sound cuts in and out.
- Blown Fuses: Continuously blowing fuses indicates a short circuit. Use the wiring diagram to trace the circuit and identify the source of the short. Look for damaged wires or components that may be causing the short.
Safety First: Handling Risky Components
Working with automotive electrical systems can be dangerous if proper precautions are not taken. Here are some critical safety tips:
- Disconnect the Battery: Always disconnect the negative terminal of the battery before working on any electrical components. This will prevent accidental shorts and electrical shocks.
- Use Proper Tools: Use insulated tools designed for electrical work. This will help prevent electrical shocks and damage to the wiring.
- Avoid Working in Wet Conditions: Water is a conductor of electricity. Avoid working on electrical systems in wet or damp environments.
- Never Cut or Splice Wires with Power On: This can cause shorts, sparks, and potential injury.
- Use a Multimeter Carefully: Learn how to use a multimeter properly before attempting to test electrical circuits. Incorrect use of a multimeter can damage the meter and potentially cause injury.
- Be Aware of Airbag Systems: The Silverado's airbags are part of the electrical system. Disconnecting or tampering with airbag wiring can trigger the airbags, causing serious injury. Consult a professional if you need to work near airbag components.
Important Note: The constant 12V wire carries power even when the ignition is off. Exercise caution when working with this wire to avoid accidental shorts.
By following these safety guidelines and using the wiring diagram as your guide, you can safely and effectively troubleshoot and repair your 2002 Chevy Silverado's radio wiring harness. Remember to take your time, double-check your connections, and don't hesitate to consult a professional if you're unsure about anything. Good luck, and happy wrenching!
We have the complete 2002 Chevy Silverado radio wiring harness diagram available for download. This detailed diagram will provide you with all the information you need to tackle your audio system projects with confidence. Stay safe and enjoy the tunes!