2002 Dodge Durango Infinity Amp Wiring Diagram
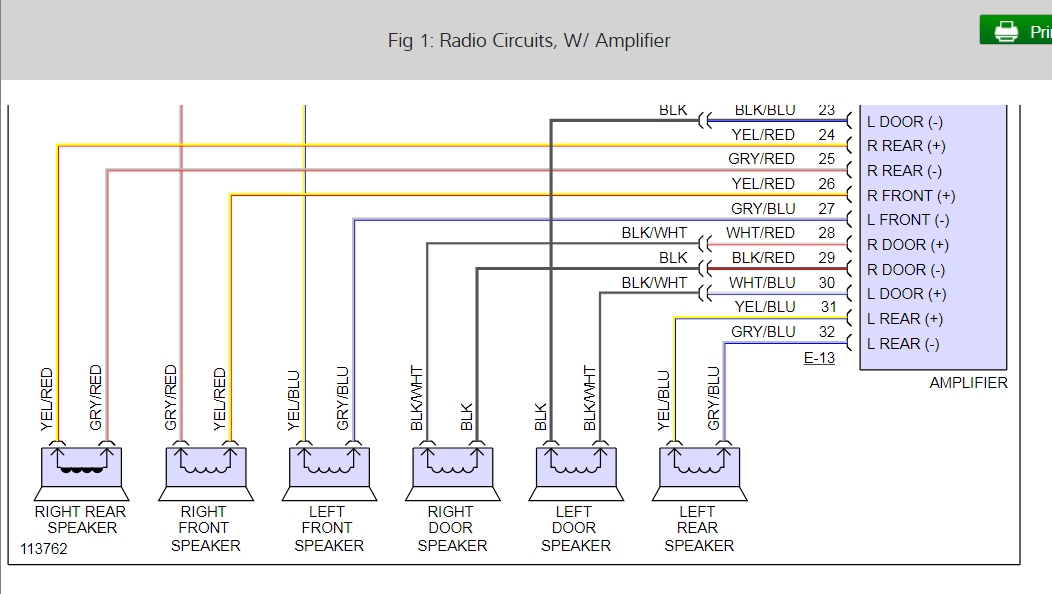
Let's dive into the wiring diagram for the 2002 Dodge Durango's Infinity amplifier. This isn't just a random schematic; it's your roadmap when tackling audio system upgrades, repairs, or even just understanding how your factory system is wired. Whether you're replacing a blown amp, adding aftermarket speakers, or tracing a mysterious buzzing sound, this diagram is essential.
Why This Diagram Matters
The 2002 Dodge Durango, equipped with the Infinity sound system, features a dedicated amplifier located in the vehicle. This amplifier powers all the speakers, and it's integrated into the car's electrical system in a specific way. Without the correct wiring diagram, attempting to modify or repair the system can lead to short circuits, damage to components, and a frustrating experience. This diagram is crucial for:
- Diagnosis: Identifying wiring faults causing audio issues.
- Upgrades: Safely integrating aftermarket components like subwoofers or head units.
- Repairs: Replacing a damaged amplifier or wiring harness.
- Understanding: Gaining a deeper understanding of the factory audio system's architecture.
Key Specs and Main Parts
Before we get into the specifics of the diagram, let's identify the key components and their functions. The Infinity system in the 2002 Durango is more than just a head unit and speakers; it's a carefully engineered setup.
- Head Unit: The source of the audio signal, typically located in the dashboard. It outputs a low-level signal (pre-amp output) to the amplifier.
- Infinity Amplifier: The heart of the audio system. This amplifier takes the low-level signal from the head unit and boosts it to a level sufficient to drive the speakers. It usually has multiple channels, one for each speaker (or pair of speakers in some cases). The 2002 Durango Infinity amp is typically a multi-channel amp, often a 6-channel or 8-channel configuration.
- Speakers: The devices that convert the amplified electrical signal into sound. The Durango's Infinity system typically includes speakers in the front doors, rear doors (or side panels), and potentially a subwoofer (depending on the specific trim level).
- Wiring Harnesses: The bundles of wires that connect all the components together. These harnesses are crucial for transmitting power, signals, and ground connections.
Important Specifications:
- Power Source: The amplifier gets its power directly from the vehicle's battery via a fused connection. This is typically a 12V DC supply.
- Impedance: The speakers are typically 4-ohm impedance. This is crucial to know when replacing speakers, as using speakers with different impedance can damage the amplifier.
- Signal Type: The head unit sends a low-level (RCA) signal to the amp.
Symbols – Understanding the Language of the Diagram
Wiring diagrams use a standardized set of symbols to represent electrical components and connections. Learning to interpret these symbols is key to understanding the diagram.
- Solid Lines: Represent wires. The thickness of the line doesn't necessarily indicate wire gauge, but sometimes thicker lines represent power wires.
- Dashed Lines: Often represent shielded cables or signal paths that are less critical for direct power delivery.
- Circles: Can represent connectors, splices, or grounding points.
- Rectangles: Typically represent components like the amplifier, head unit, or other electronic modules.
- Color Codes: Wires are often identified by color codes (e.g., BLK for black, RED for red, GRN for green, etc.). The diagram will usually include a key that explains the color codes.
- Ground Symbol: A series of descending horizontal lines connected to a vertical line indicates a ground connection.
- Fuse Symbol: A zig-zag line inside a rectangle indicates a fuse.
Typical Wiring Color Codes (General Guide, Verify on Diagram):
- Red: +12V Power
- Black: Ground
- Blue: Remote Turn-On (from head unit to amp)
- White/Gray/Green/Purple (Solid or with Black Stripe): Speaker Wires (Positive and Negative Pairs)
How It Works – The Audio Signal's Journey
The audio signal's journey through the 2002 Durango's Infinity system is straightforward:
- The head unit generates a low-level audio signal. This signal is sent to the amplifier via RCA or similar connectors.
- The amplifier receives the low-level signal and amplifies it, boosting its voltage and current.
- The amplified signal is then sent to the speakers via the speaker wires.
- The speakers convert the electrical signal into sound waves.
A crucial aspect is the remote turn-on wire. This wire, typically connected to the head unit's power antenna output, signals the amplifier to turn on when the head unit is powered up. This prevents the amplifier from constantly drawing power from the battery when the car is off.
Real-World Use – Basic Troubleshooting Tips
Here's how you can use the wiring diagram for basic troubleshooting:
- No Sound: Check the power and ground connections to the amplifier. Use a multimeter to verify that the amplifier is receiving 12V power and has a good ground connection. Also, check the remote turn-on wire to ensure it's receiving a signal when the head unit is on.
- Distorted Sound: Could be a blown speaker or a problem with the amplifier. Check the speaker wires for shorts or damage. Try swapping speakers to see if the problem follows the speaker.
- Buzzing or Hissing: Often caused by a ground loop. Ensure that all ground connections are clean and secure. You might need to use a ground loop isolator.
- One Speaker Not Working: Check the speaker wire connection at both the amplifier and the speaker. Use a multimeter to check for continuity in the speaker wire.
When troubleshooting, always disconnect the battery's negative terminal to prevent electrical shorts and potential damage. Use a multimeter to test for voltage, continuity, and resistance. Compare your readings to the expected values based on the wiring diagram.
Safety – Handle with Care
Working with car electrical systems can be dangerous. Here are some key safety precautions:
- Disconnect the Battery: Always disconnect the battery's negative terminal before working on any electrical components.
- Fuses: Fuses protect the electrical system from overcurrent. Never replace a fuse with a higher amperage fuse.
- Airbags: Be extremely careful when working near airbags. Accidental activation can cause serious injury. Consult the vehicle's service manual for proper airbag deactivation procedures if necessary.
- High-Current Wires: The power wires connected to the amplifier carry high current. Avoid shorting these wires to ground, as this can cause a fire.
Disclaimer: Working on your car's electrical system can be complex and potentially dangerous. If you are not comfortable with electrical work, consult a qualified technician.
We have the detailed wiring diagram file readily available. It includes color-coded illustrations and pinout details for the 2002 Dodge Durango Infinity amplifier. You can download the diagram and use it as a guide for your projects.