2002 Jeep Grand Cherokee Laredo Fuse Box Diagram
Alright, let's dive into the fuse box diagram for the 2002 Jeep Grand Cherokee Laredo. Whether you're chasing down an electrical gremlin, planning some aftermarket modifications, or simply want a better understanding of your Jeep's electrical system, knowing how to interpret this diagram is absolutely crucial. Consider this your guide to navigating the labyrinth of fuses and relays protecting your ride.
Purpose of the Fuse Box Diagram
The fuse box diagram serves as a roadmap to your Jeep's electrical system. It's not just a pretty picture; it's the key to:
- Troubleshooting Electrical Problems: Identify which fuse controls a specific circuit, like the radio, headlights, or power windows.
- Performing Repairs: Quickly locate the blown fuse responsible for a malfunctioning component.
- Installing Aftermarket Accessories: Properly tap into the correct circuits for powering accessories like auxiliary lights, amplifiers, or a CB radio, minimizing the risk of damaging your Jeep's existing systems.
- Understanding Your Vehicle: Gain a deeper understanding of how the different electrical systems work together.
Without it, you're essentially stumbling around in the dark, potentially causing more harm than good.
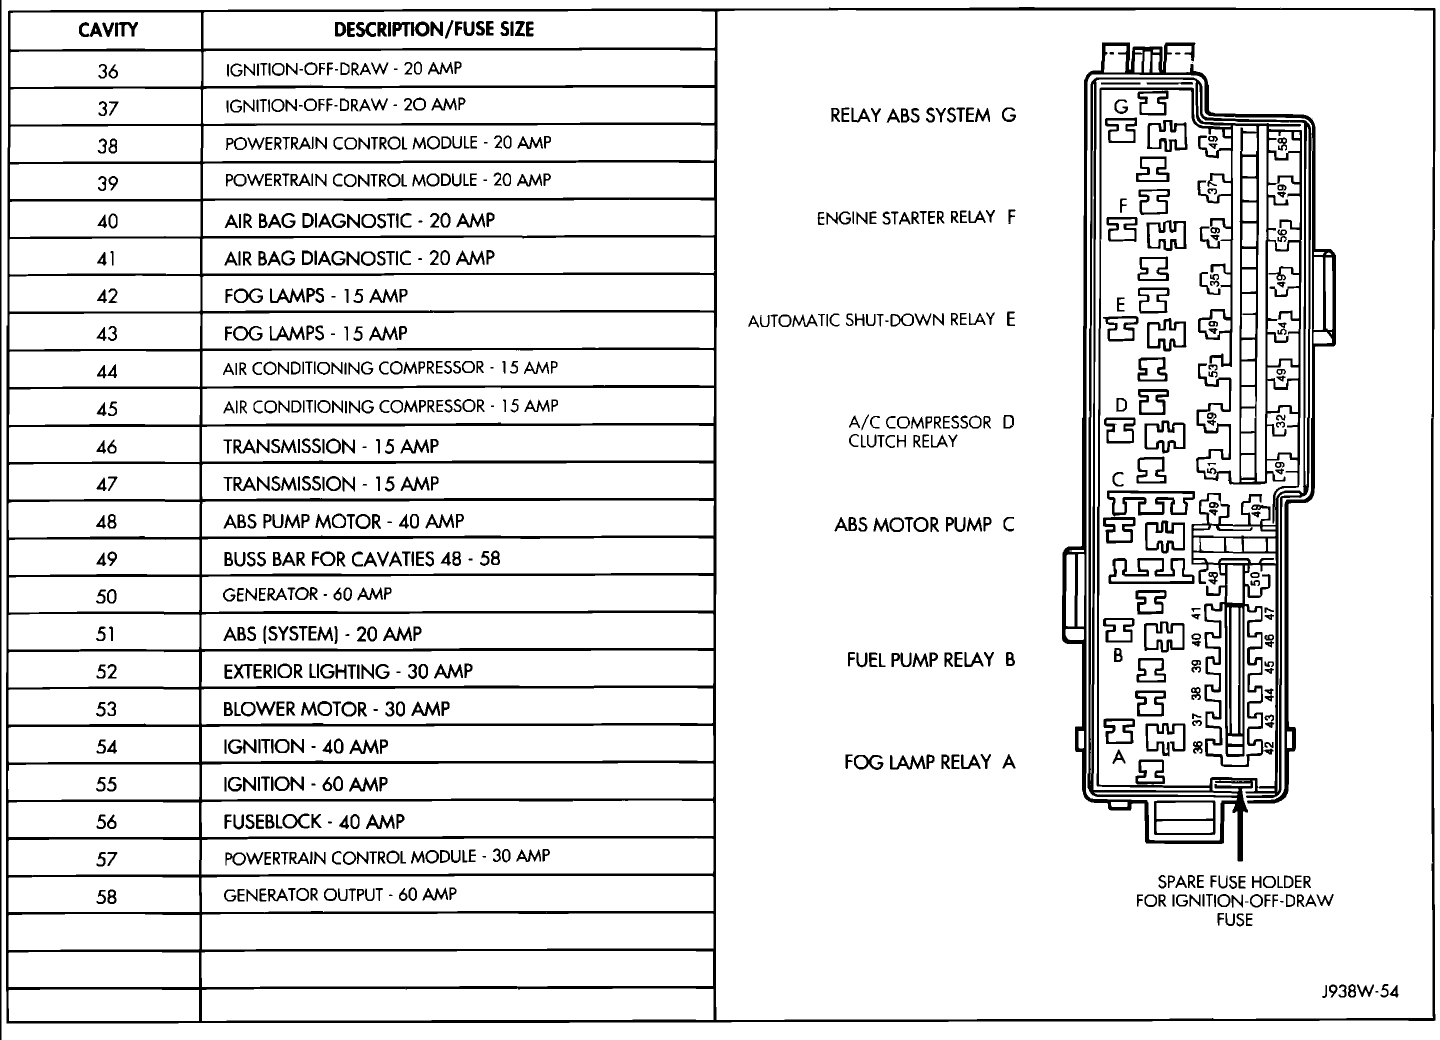
Key Specs and Main Parts of the 2002 Jeep Grand Cherokee Laredo Fuse Box
The 2002 Jeep Grand Cherokee Laredo actually has two main fuse boxes: one located inside the cabin (usually under the dashboard on the driver's side) and another under the hood in the engine compartment. We'll primarily focus on the interior fuse box, but it's important to understand both exist.
The interior fuse box is the main distribution point for circuits powering interior components and some exterior lights. It typically contains a mix of:
- Fuses: These are safety devices designed to protect circuits from overcurrent. When a circuit draws too much current (usually due to a short circuit or faulty component), the fuse's thin wire filament melts, breaking the circuit and preventing damage. They are rated in Amperes (Amps), indicating the maximum current they can handle before blowing.
- Relays: These are electromechanical switches that use a small current to control a larger current circuit. They are used to switch on and off high-current devices like the headlights, starter motor, or horn. Relays contain a coil, contacts (normally open and normally closed), and are activated by applying power to the coil.
- Circuit Breakers: Similar to fuses, but instead of melting, they trip and open the circuit. They can be reset manually or automatically after a short period. These are less common in the interior fuse box but may be present for high-draw circuits like the power seats.
The under-hood fuse box typically handles circuits related to the engine, transmission, and other critical vehicle systems. It houses larger fuses and relays for components like the fuel pump, starter motor, cooling fan, and anti-lock braking system (ABS). Both fuse boxes have a legend that maps each fuse to a specific component. Understanding this legend is key to successful troubleshooting. Make sure to consult both diagrams when working on your Jeep.
Understanding Fuse Box Symbols and Legend
The fuse box diagram isn't just a random arrangement of numbers and squares; it uses a specific set of symbols and a corresponding legend to represent different components and their functions. Here's a breakdown:
- Fuses: Typically represented as a small rectangle or square with a number next to it, indicating the fuse's amperage rating (e.g., "15A"). The physical fuse will also have this rating printed on it.
- Relays: Usually depicted as a square or rectangle with a coil symbol inside (a looped wire). The diagram will often show the relay's function (e.g., "Headlight Relay," "Fuel Pump Relay").
- Circuit Breakers: Similar to fuses, but sometimes with a small switch or lever symbol to indicate the reset mechanism.
- Lines: Lines on the diagram indicate electrical wiring. Solid lines generally represent positive (+) voltage, while dashed lines may represent ground (-) or signal wires.
- Colors: Wiring diagrams often use different colors to represent different circuits. The fuse box diagram may reference these colors, but it's more common to find color-coded wires within the wiring harness itself.
The legend is crucial. It's a table that lists each fuse or relay location (identified by a number or letter code on the diagram) and its corresponding function (e.g., "Radio," "Power Windows," "Horn"). The legend is usually printed on the inside of the fuse box cover or in the owner's manual. This is your Rosetta Stone to translating the diagram.
How the Fuse Box Works: Basic Electrical Circuit Concepts
The fuse box is essentially a central distribution point for electrical power. Power from the battery flows through the main power cables to the fuse boxes. From there, it's distributed to individual circuits, each protected by a fuse or circuit breaker. Think of it as a series of branching pathways, each with its own safety valve.
Each circuit operates independently. When you turn on a component (e.g., headlights), you complete a circuit, allowing current to flow from the battery, through the fuse, to the component, and back to ground. If there's a short circuit (an unintended path for current to flow, usually to ground), the current surge causes the fuse to blow, interrupting the circuit and preventing damage to the component and wiring.
Relays allow a low-current circuit (e.g., a switch on the dashboard) to control a high-current circuit (e.g., the headlights). When you activate the switch, it energizes the relay's coil, which closes the contacts and allows power to flow to the high-current component. This protects the switch from being overwhelmed by the high current, preventing it from burning out.
Real-World Use: Basic Troubleshooting Tips
Here's how to use the fuse box diagram to troubleshoot common electrical problems:
- Identify the Problem: Determine which component is not working. For example, the radio isn't turning on.
- Consult the Diagram: Locate the fuse or relay associated with the malfunctioning component in the fuse box diagram and legend.
- Inspect the Fuse: Visually inspect the fuse. If the filament is broken or the fuse is blackened, it's blown. You can also use a multimeter set to continuity to test the fuse. A blown fuse will show no continuity.
- Replace the Fuse: Replace the blown fuse with a new fuse of the same amperage rating. Never use a fuse with a higher amperage rating, as this can overload the circuit and cause a fire.
- Test the Component: Turn on the component and see if it works.
- If the Fuse Blows Again: If the new fuse blows immediately or shortly after replacement, there's likely a short circuit or other underlying problem in the circuit. This requires further investigation and may require professional help. Don't just keep replacing fuses; you're masking a more serious issue.
Remember to always disconnect the negative battery cable before working on any electrical components.
Safety Considerations: Risky Components
Working with electrical systems can be dangerous. Here are some specific safety precautions to keep in mind:
- High-Current Circuits: Circuits for the starter motor, alternator, and ABS system carry high currents. Avoid touching exposed wires or terminals in these circuits, even with the ignition off, as capacitors can store a charge.
- Airbag System: The airbag system is highly sensitive. Accidentally triggering the airbag can cause serious injury. Consult the repair manual for proper disabling procedures before working on any components near the airbags or their wiring.
- Fuel System: The fuel pump circuit can contain flammable fuel. Avoid sparks or open flames when working on this circuit.
- Always Disconnect the Battery: The best practice is to disconnect the negative (-) battery terminal before working on any electrical system. This eliminates the risk of accidental shorts and electrical shock.
If you're uncomfortable working with electrical systems, it's always best to consult a qualified mechanic. Improperly installed wiring or faulty repairs can create safety hazards and damage your vehicle.
We have access to the 2002 Jeep Grand Cherokee Laredo fuse box diagram. You can download it to get a detailed view and keep it handy for future reference. Understanding your Jeep's electrical system empowers you to maintain and modify your vehicle safely and effectively.