2002 Mercury Grand Marquis Fuse Box Diagram
Let's dive into the fuse box diagram of a 2002 Mercury Grand Marquis. Understanding this diagram is crucial for anyone looking to perform electrical repairs, add aftermarket accessories, or simply gain a better understanding of their vehicle's inner workings. It's your roadmap to the electrical system, preventing you from blindly poking around and potentially causing more damage. Consider it your first line of defense against electrical gremlins.
Purpose and Importance
Why bother learning about the fuse box diagram? Several reasons. First, when something electrical stops working in your Grand Marquis – a headlight, the radio, the power windows – checking the fuses is always the first step. The diagram tells you which fuse protects which circuit. Second, if you're planning to add an aftermarket component, like an amplifier or extra lighting, you need to know where to tap into the power system safely. The fuse box is the logical place, and the diagram guides you to appropriate circuits. Finally, for the sheer satisfaction of understanding how your car functions, knowing the fuse layout is invaluable. Think of it as preventative maintenance for your peace of mind and wallet!
Key Specs and Main Parts
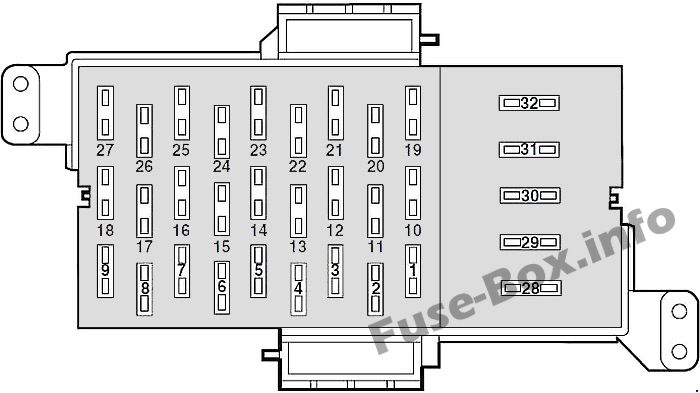
The 2002 Grand Marquis typically has two main fuse boxes: one located under the hood, near the battery (the Power Distribution Box or PDB), and another inside the passenger compartment, usually under the dashboard or on the side panel of the dashboard (the Central Junction Box or CJB). The PDB houses fuses and relays for high-current circuits like the starter motor, headlights, and ABS system. The CJB deals with lower-current circuits such as interior lighting, radio, and power accessories.
Each fuse box contains a printed diagram, often located on the inside of the fuse box cover. This diagram is your primary source of information. However, these diagrams can fade, become damaged, or even get lost over time, which is why having a digital copy (which we have for you to download later) is essential.
Key components you'll find in the diagram include:
- Fuse Numbers/IDs: Each fuse and relay has a unique identifier (e.g., Fuse #22, Relay #R1). This is how the diagram refers to them.
- Circuit Description: A brief description of what the fuse or relay protects (e.g., "Headlights," "Fuel Pump," "Power Windows").
- Amperage Rating: The fuse's current-carrying capacity, indicated in amps (A) (e.g., 15A, 20A, 30A). Using a fuse with a higher amperage rating than specified can overload and damage the circuit.
- Relays: Electrically operated switches that control high-current circuits.
- Fuses: Sacrificial devices designed to protect circuits from overcurrent. When the current exceeds the fuse's rating, the fuse melts, breaking the circuit.
Understanding the Symbols
Fuse box diagrams use symbols to represent different components and connections. Here's a breakdown of common symbols:
- Solid Lines: Represent electrical wires or conductors.
- Dashed Lines: May indicate a ground connection or a shielded wire. Always verify the meaning of dashed lines with the diagram's legend.
- Rectangles/Squares: Usually represent fuses.
- Circles/Ovals: Often represent relays or other switching devices.
- Numbers Inside Symbols: Indicate the fuse number or relay identifier.
- Color Coding: While not always present on the diagram itself, understanding wire colors is crucial when tracing circuits. Common wire colors include red (power), black (ground), and various other colors for different circuits. The diagram *may* indicate wire colors, but you'll often need a separate wiring diagram for complete color information.
It's important to note that symbols can sometimes vary slightly depending on the specific diagram. Always refer to the diagram's legend or key for clarification.
How It Works: Electrical Flow and Protection
The fuse box acts as a central distribution point for electrical power. Power from the battery flows through the main wiring harness to the fuse boxes. Inside the fuse box, the power is distributed to individual circuits via fuses and relays.
Each fuse is designed to protect a specific circuit. If a short circuit occurs (e.g., a wire chafes against the chassis, creating a direct path to ground), the current flow through that circuit increases dramatically. This excessive current heats up the fuse element, causing it to melt and break the circuit. This prevents damage to the wiring, components, and potentially prevents a fire.
Relays are used to control high-current circuits with a low-current signal. For example, the headlights draw a significant amount of current. Instead of running all that current through the headlight switch on the dashboard (which would require a very robust switch), a relay is used. The headlight switch only controls a small amount of current to activate the relay, which then allows the high-current circuit to flow to the headlights.
Real-World Use: Basic Troubleshooting Tips
Here's how to use the fuse box diagram for basic troubleshooting:
- Identify the Problem: Determine which electrical component isn't working (e.g., turn signals, radio, windshield wipers).
- Consult the Diagram: Locate the fuse box diagram for your 2002 Grand Marquis (remember, we have a copy for you!). Find the fuse or relay associated with the malfunctioning component.
- Inspect the Fuse: Visually inspect the fuse. If the metal strip inside the fuse is broken or blackened, the fuse is blown. You can also use a multimeter to test continuity across the fuse terminals. If there's no continuity, the fuse is blown.
- Replace the Fuse: Replace the blown fuse with a new fuse of the same amperage rating. Never use a fuse with a higher amperage rating.
- Test the Component: After replacing the fuse, test the component to see if it's working again. If the fuse blows again immediately, there's likely a short circuit in the wiring or the component itself. Further investigation is required. Don't just keep replacing fuses.
- Check the Relay (if applicable): If the fuse is good, but the component still doesn't work, the relay might be faulty. You can often test a relay by swapping it with a known good relay of the same type.
Example: Your interior lights aren't working. Consult the fuse box diagram. Locate the fuse labeled "Interior Lights" (it might be under a slightly different name). Inspect the fuse. If it's blown, replace it with a fuse of the correct amperage rating. If the lights still don't work, the problem might be with the interior light switch, the wiring, or the bulbs themselves.
Safety Considerations
Working with automotive electrical systems can be dangerous. Here are some safety precautions:
- Disconnect the Battery: Before working on any electrical circuits, disconnect the negative battery cable. This will prevent accidental short circuits and electric shocks.
- Use the Right Tools: Use insulated tools designed for automotive electrical work.
- Never Bypass a Fuse: Never replace a fuse with a wire or other conductive material. This bypasses the safety mechanism and can lead to serious damage or fire.
- Be Aware of High-Voltage Components: The ignition system and charging system contain high-voltage components. Avoid touching these components when the engine is running.
- Work in a Well-Ventilated Area: When working with batteries, be aware that they can produce explosive gases. Work in a well-ventilated area and avoid sparks or flames.
Specifically, be cautious around the fuel pump relay and circuit. Tampering with the fuel system incorrectly can create a serious fire hazard.
Download Your 2002 Grand Marquis Fuse Box Diagram
We have a high-quality, printable PDF version of the 2002 Mercury Grand Marquis fuse box diagram available for download. This diagram includes detailed information about fuse locations, amperage ratings, and circuit descriptions for both the Power Distribution Box (PDB) and the Central Junction Box (CJB). With this diagram in hand, you'll be well-equipped to tackle electrical repairs and modifications on your Grand Marquis with confidence.
Disclaimer: While this information is believed to be accurate, it is provided for informational purposes only. Consult a qualified mechanic for any complex electrical repairs. We are not responsible for any damage or injury resulting from the use of this information.