2002 Toyota Corolla Serpentine Belt Diagram
Alright, let's dive into the serpentine belt diagram for the 2002 Toyota Corolla. This article is designed to equip you, the intermediate car enthusiast or DIY mechanic, with a solid understanding of how to interpret and utilize this essential diagram. Whether you're planning a belt replacement, diagnosing a squealing noise, or simply expanding your automotive knowledge, understanding this diagram is crucial.
Why This Diagram Matters
The serpentine belt, sometimes called the accessory drive belt, is a single, continuous belt responsible for powering multiple engine accessories. A proper diagram is essential for several reasons:
- Repairs and Replacements: A diagram ensures you route the new belt correctly. Incorrect routing can lead to accessory malfunctions, belt damage, and even engine overheating.
- Troubleshooting: Understanding the belt's path helps you identify potential issues. A misaligned pulley or a failing component can often be spotted by visually inspecting the belt's trajectory.
- Learning and Maintenance: Familiarizing yourself with the belt system allows for proactive maintenance and a deeper understanding of your Corolla's engine bay.
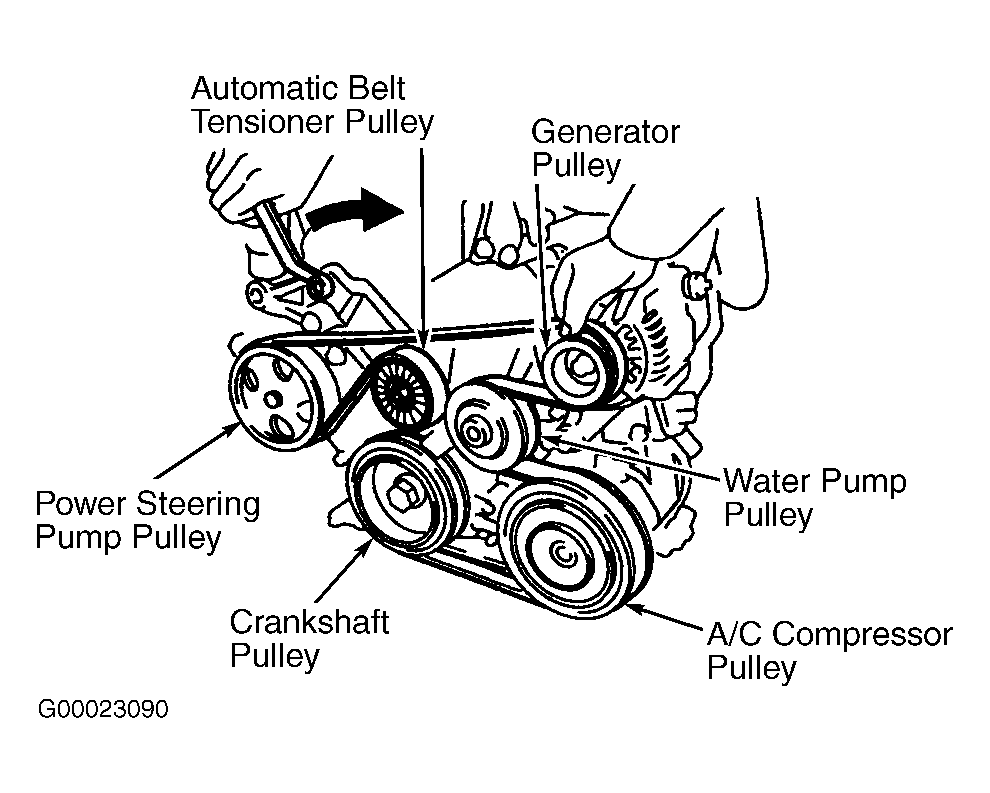
Key Specs and Main Parts
Before we dissect the diagram, let's establish the key components and some important specifications. Keep in mind that slight variations may exist depending on the specific engine option in your 2002 Corolla (typically the 1.8L 1ZZ-FE engine).
Main Components:
- Crankshaft Pulley (Crank Pulley): Driven directly by the engine, this pulley is the heart of the system and drives the serpentine belt.
- Alternator Pulley: Powers the alternator, which charges the battery and provides electricity to the car's electrical system.
- Power Steering Pump Pulley: Operates the power steering system, making steering easier.
- Air Conditioning Compressor Pulley: Drives the AC compressor, providing cool air to the cabin.
- Idler Pulley(s): Smooth, bearing-mounted pulleys that guide the belt and maintain proper tension. They don't drive any accessories.
- Tensioner Pulley: A spring-loaded pulley that automatically maintains the correct tension on the serpentine belt. This is crucial for proper accessory function and belt longevity.
Key Specs (Typical 1ZZ-FE Engine):
- Belt Length: Typically around 81-82 inches. Always verify the correct part number for your specific vehicle to ensure the correct length.
- Belt Material: EPDM (Ethylene Propylene Diene Monomer) rubber is the most common material, offering good resistance to heat, cracking, and wear.
- Tensioner Torque: Refer to your repair manual for the specific torque specification when releasing or tightening the tensioner. Overtightening can damage the tensioner.
Symbols – Understanding the Diagram
Serpentine belt diagrams are generally straightforward, but understanding the symbols and conventions is essential.
- Solid Lines: Represent the path of the serpentine belt. The thicker the line, often the more significant the belt section.
- Circles: Indicate pulleys. The diagram will usually label each pulley with the corresponding accessory (e.g., "ALT" for alternator, "P/S" for power steering).
- Arrows: Show the direction of rotation of each pulley. This is very important for confirming proper belt routing.
- Texture/Shading: Some diagrams use shading or texture to indicate the grooved side (contacting the pulleys) versus the smooth side of the belt.
- Abbreviations: Key abbreviations to look for are ALT (alternator), P/S (power steering), A/C (air conditioning), IDL (idler pulley), and TEN (tensioner).
Most importantly, pay attention to how the belt wraps around each pulley. The diagram will clearly show which side of the belt contacts each pulley – grooved side or smooth side.
How It Works
The serpentine belt system is a brilliant example of efficient power transmission. The crankshaft pulley, driven by the engine's rotation, provides the power. The serpentine belt transmits this rotational force to each of the accessory pulleys. The tensioner ensures that the belt maintains sufficient grip on each pulley, preventing slippage. The idler pulleys help guide the belt around the engine and maximize contact with the driven pulleys.
The tensioner is a critical component. It uses a spring-loaded mechanism to automatically adjust for belt stretch and wear over time. Without a properly functioning tensioner, the belt would quickly become loose, leading to accessory malfunctions and potential belt failure. A worn tensioner can also cause excessive belt noise (squealing or chirping).
Real-World Use – Basic Troubleshooting Tips
Here are some common issues and how the serpentine belt diagram can assist in diagnosing them:
- Squealing Noise: A squealing noise often indicates belt slippage. Check the belt tensioner. If the tensioner appears weak or is making noise itself, it may need replacement. Use the diagram to confirm the correct belt routing, as incorrect routing can also cause slippage.
- Accessory Malfunction: If your alternator isn't charging, your power steering isn't working, or your AC isn't cooling, check the serpentine belt. Use the diagram to verify that the belt is properly routed around the affected accessory's pulley. Look for signs of belt wear or damage.
- Belt Damage: Inspect the belt for cracks, fraying, or missing chunks. A damaged belt should be replaced immediately. When replacing the belt, compare the old belt's wear pattern to the diagram to identify any potential issues with pulley alignment.
- Tensioner Issues: A faulty tensioner can cause excessive belt vibration or noise. Visually inspect the tensioner for signs of damage or excessive movement. Refer to your repair manual for proper tensioner testing procedures.
Safety – Handle with Care
Working on the serpentine belt system can be hazardous. Consider these safety precautions:
- Disconnect the Battery: Always disconnect the negative battery terminal before working on any electrical components, including the alternator.
- Hot Engine: Never work on the serpentine belt system when the engine is hot. Allow the engine to cool completely to avoid burns.
- Moving Parts: Keep your hands and tools clear of the serpentine belt and pulleys when the engine is running. The belt moves very quickly and can cause serious injury.
- Eye Protection: Wear safety glasses to protect your eyes from debris.
The crankshaft pulley is a particularly risky component. If you are locking the crankshaft to loosen the bolt, make sure you use the correct procedure and tooling. Using the incorrect tools to lock the engine or prevent it from spinning can damage the engine.
When replacing the belt, ensure you use the correct tool (typically a wrench or socket) to relieve the tension on the tensioner pulley. Slowly release the tension and carefully remove the old belt. Follow the diagram precisely when installing the new belt.
By understanding the serpentine belt diagram and adhering to safe practices, you can confidently tackle a range of maintenance and repair tasks on your 2002 Toyota Corolla. Always consult your vehicle's repair manual for specific instructions and torque specifications.
We have a high-resolution version of the 2002 Toyota Corolla serpentine belt diagram available for download. This will provide a more detailed visual aid to supplement the information in this article.