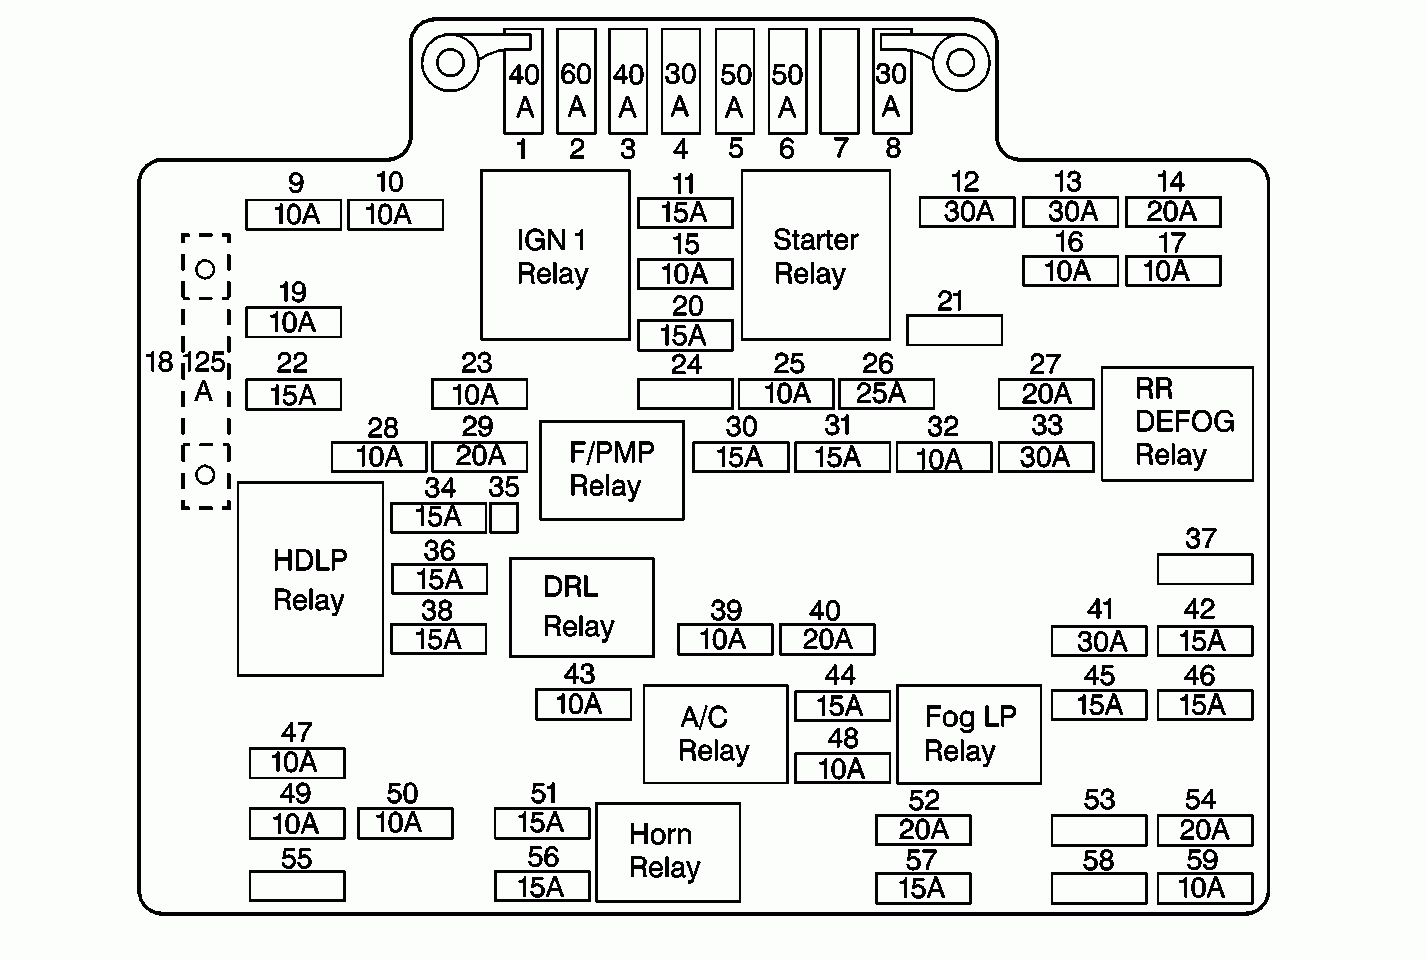
2003 Chevy Silverado 2500hd Fuse Box Diagram
Alright, let's dive into the fuse box diagram for your 2003 Chevy Silverado 2500HD. Understanding this diagram is absolutely crucial for anyone who wants to tackle electrical repairs, install aftermarket accessories, or simply diagnose a nagging issue. Consider this your roadmap to the electrical heart of your truck.
Purpose of Understanding Your Fuse Box Diagram
Why bother learning this? Simple. Without a clear understanding of your fuse box layout, you're essentially poking around in the dark. A fuse box diagram allows you to:
- Identify and replace blown fuses: The most common use. Instead of guessing which fuse controls what, you can pinpoint the culprit immediately.
- Diagnose electrical problems: If a circuit isn't working, the diagram helps you trace the power flow and identify potential points of failure, like a short circuit.
- Safely install aftermarket accessories: Adding lights, a sound system, or other electrical components requires tapping into existing circuits. The diagram shows you where to do this safely and correctly, protecting your truck's electrical system.
- Understand your truck's electrical system: Gaining a deeper understanding of how everything is wired together can empower you to perform more complex repairs and modifications down the road.
- Prevent further damage: Incorrectly tampering with electrical systems can lead to fires, damaged components, and expensive repairs. Using the diagram can help you avoid these costly mistakes.
Key Specs and Main Parts
Your 2003 Silverado 2500HD actually has two main fuse boxes: one under the hood and one inside the cab. Let's break them down:
Under-Hood Fuse Box
This fuse box, often referred to as the "Engine Compartment Fuse Block," houses fuses and relays that protect and control critical engine and drivetrain components, as well as exterior lighting.
- Location: Typically located on the driver's side, near the battery.
- Key Components Protected: Starter, fuel pump, ECM (Engine Control Module), injectors, cooling fan, headlights, horn, trailer wiring, and more.
- Relays: Electrically operated switches that control high-current circuits, allowing a low-current signal to switch on a high-power device (like the starter).
Inside-Cab Fuse Box
Located inside the passenger compartment, this fuse box protects interior electrical systems.
- Location: Usually found on the driver's side, either on the side of the dashboard (accessible when the driver's door is open) or under the dash, near the steering column.
- Key Components Protected: Radio, windows, power locks, instrument panel, interior lighting, climate control, airbags, and other comfort and convenience features.
Understanding the Symbols
Fuse box diagrams are essentially electrical schematics, but simplified. Here's a breakdown of common symbols:
- Fuses: Typically represented by a rectangle with a squiggle line running through it (resembling a fuse element). The amperage rating (e.g., 10A, 20A, 30A) is usually indicated next to the fuse symbol.
- Relays: Shown as a box with terminals and a coil symbol. The diagram may indicate which terminals are the coil, the normally open (NO) contact, and the normally closed (NC) contact.
- Wires/Circuits: Solid lines represent wires. Different colored lines may be used to indicate different circuit types, but this isn't always consistent across all diagrams. It's crucial to refer to the diagram's legend.
- Grounds: Represented by a symbol that looks like a series of downward-facing triangles, indicating a connection to the vehicle's chassis (ground).
- Circuit Breakers: Depicted similarly to fuses but may have a reset symbol next to them. These automatically interrupt the circuit in an overcurrent situation and can be reset.
- Component Icons: Simplified drawings of the component being protected (e.g., a headlight symbol for the headlight fuse).
Important Note: Always refer to the legend or key on the specific fuse box diagram for your truck. Symbols and color coding can vary slightly.
How It Works: A Simplified Circuit
Let's imagine a simplified circuit: the headlights. The basic flow is this:
- Battery: The power source.
- Fuse: A safety device. If too much current flows through the headlight circuit (due to a short circuit, for example), the fuse blows, interrupting the circuit and preventing damage.
- Switch: Allows you to turn the headlights on and off.
- Headlights: The load that consumes the electrical energy.
- Ground: Completes the circuit, returning the current to the battery.
The fuse box diagram shows you where the headlight fuse is located in the fuse box, protecting this entire circuit. If your headlights suddenly stop working, checking this fuse is the first step.
Real-World Use: Basic Troubleshooting Tips
Here's how to use the fuse box diagram to troubleshoot common issues:
- Identifying a Blown Fuse: Use the diagram to locate the fuse for the malfunctioning component. Pull the fuse and visually inspect it. A blown fuse will have a broken filament.
- No Power to an Accessory: Check the fuse for that accessory. If the fuse is good, use the diagram to trace the circuit back to the power source (battery) and ground, looking for any breaks or loose connections. A multimeter is invaluable for this.
- Parasitic Draw: If your battery keeps dying overnight, a parasitic draw (an electrical component drawing power when the vehicle is off) might be the culprit. Use the diagram to systematically pull fuses, one at a time, and monitor the current draw with an ammeter. When you pull the fuse that eliminates the draw, you've identified the circuit causing the problem.
- Installing Aftermarket Accessories: The diagram helps you identify suitable power sources for your new accessories. Use a circuit tester to ensure the circuit is only powered when the ignition is on (if that's what you want). Always use appropriate gauge wiring and fuse your new circuit properly.
Safety: Handle with Care!
Working with electrical systems can be dangerous. Here are some crucial safety precautions:
- Disconnect the Battery: Before doing any work on the electrical system, disconnect the negative terminal of the battery. This prevents accidental short circuits.
- Use Proper Tools: Use insulated tools designed for electrical work.
- Avoid Water: Never work on electrical systems in wet conditions.
- Be Aware of the Airbag System: The airbag system is highly sensitive. Consult the service manual before working near airbag components. Incorrectly tampering with the airbag system can cause it to deploy accidentally, resulting in serious injury. High current components associated with the airbags are particularly dangerous to work around.
- Consult a Professional: If you're uncomfortable working on electrical systems or encounter a problem you can't diagnose, consult a qualified mechanic.
Remember, working on your vehicle's electrical system can be rewarding, but always prioritize safety and proceed with caution. A little knowledge and the right tools can save you time, money, and potential headaches.
We have a copy of the 2003 Chevy Silverado 2500HD fuse box diagram available for download. Please find the link provided below or at the end of this article.