2003 Dodge Ram 1500 Serpentine Belt Diagram
Maintaining your 2003 Dodge Ram 1500's serpentine belt is crucial for optimal performance. This seemingly simple component is responsible for driving several vital engine accessories. Understanding its routing, tensioning, and replacement is a valuable skill for any DIY mechanic. This article will provide a comprehensive breakdown of the 2003 Dodge Ram 1500 serpentine belt diagram, enabling you to confidently tackle belt-related tasks.
Purpose of the Serpentine Belt Diagram
The serpentine belt diagram is your roadmap to understanding the belt's path around various engine components. Why is this important? Several reasons:
- Correct Belt Installation: Ensuring the belt is routed correctly is paramount. An incorrectly installed belt will not function properly, potentially damaging components.
- Belt Replacement: When replacing a worn or damaged belt, the diagram is indispensable for verifying the new belt's correct placement.
- Troubleshooting: If you experience squealing noises or accessory malfunctions (power steering loss, alternator not charging, etc.), the diagram can help you identify potential issues related to belt slippage or damage.
- Preventative Maintenance: Knowing the belt's routing allows you to visually inspect it for wear, cracks, or fraying, catching potential problems before they lead to breakdowns.
- Learning Engine Layout: Familiarizing yourself with the diagram helps you understand the overall layout of your engine and the location of different accessories.
Key Specs and Main Parts
The 2003 Dodge Ram 1500, depending on the engine, will have a specific serpentine belt length and component layout. Here's a general overview:
- Engines: The 2003 Dodge Ram 1500 typically came with three engine options:
- 3.7L V6 Magnum
- 4.7L V8 Magnum
- 5.7L Hemi V8
- Key Components Driven by the Serpentine Belt:
- Alternator: Provides electrical power to the vehicle and charges the battery.
- Power Steering Pump: Provides hydraulic assist for steering.
- Air Conditioning Compressor: Compresses refrigerant for the air conditioning system.
- Water Pump: Circulates coolant throughout the engine to prevent overheating.
- Idler Pulley(s): Smooth pulleys that guide the belt and maintain proper tension.
- Tensioner Pulley: A spring-loaded pulley that applies constant tension to the serpentine belt, preventing slippage. The tensioner is critical for proper belt function. A weak or failing tensioner will cause issues.
- Belt Length: The belt length varies depending on the engine and whether the vehicle has air conditioning. Refer to your vehicle's owner's manual or a parts catalog to determine the correct belt length. Using the correct belt is crucial; a belt that is too short or too long will not work.
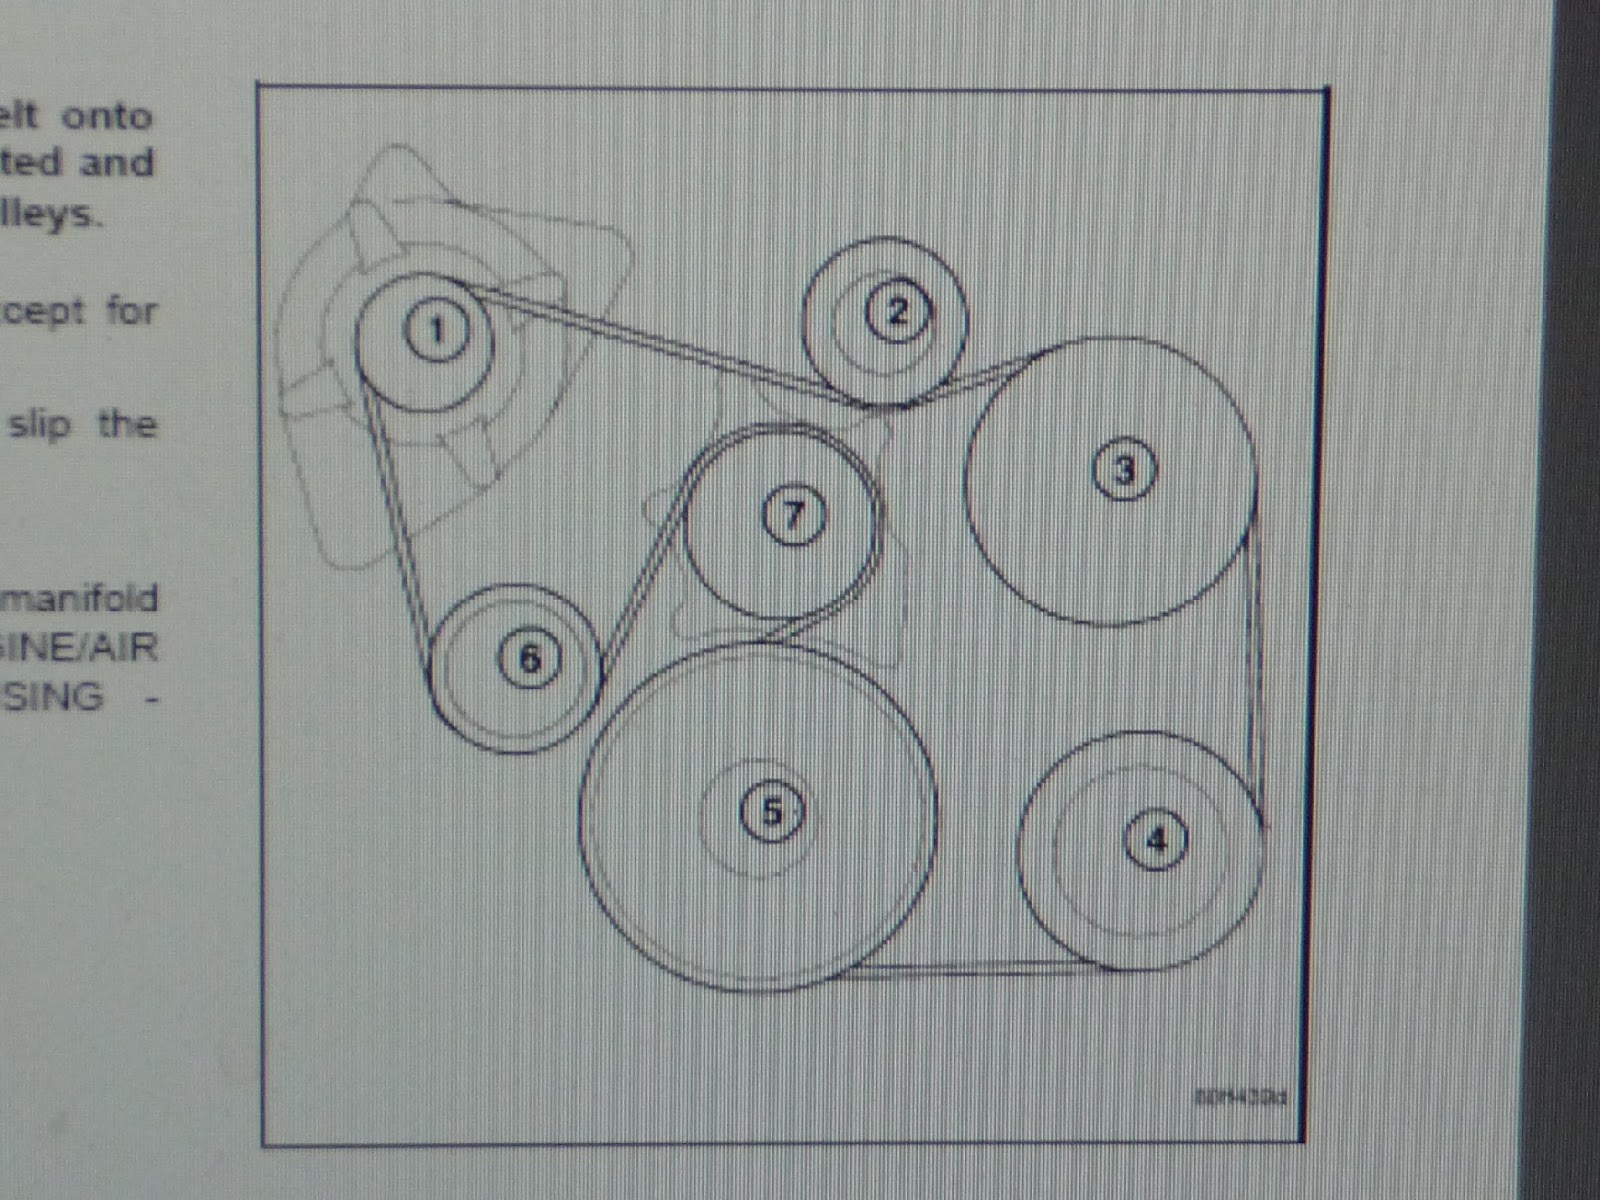
Symbols and Diagram Interpretation
Serpentine belt diagrams typically use simple symbols to represent the various components and the belt's routing. Here's a breakdown:
- Solid Lines: Represent the path of the outer surface of the serpentine belt.
- Dashed Lines: May represent the path of the inner surface of the serpentine belt, particularly around idler pulleys. However, many diagrams simply use solid lines for everything.
- Circles: Represent pulleys. The size of the circle doesn't necessarily correspond to the actual pulley size.
- Component Labels: Each pulley will be labeled with an abbreviation representing the component it drives (e.g., ALT for Alternator, P/S for Power Steering, A/C for Air Conditioning, W/P for Water Pump).
- Arrow(s): Indicate the direction of belt rotation. Following the arrows helps visualize how the belt drives each component.
- Tensioner Symbol: The tensioner pulley may be represented with a small arrow indicating its spring-loaded movement, or simply labeled "Tensioner."
Understanding these symbols allows you to trace the belt's path and identify which components it drives. Pay close attention to the direction of rotation for each pulley; incorrect routing can cause components to spin in the wrong direction, leading to damage.
How It Works
The serpentine belt works by transferring rotational force from the engine's crankshaft pulley to the various engine accessories. The crankshaft pulley is directly connected to the engine's crankshaft, which is driven by the pistons. As the crankshaft rotates, it spins the serpentine belt. The belt, in turn, drives the alternator, power steering pump, air conditioning compressor, and water pump. The tensioner pulley maintains constant tension on the belt, ensuring sufficient grip and preventing slippage. Without adequate tension, the belt will slip, leading to reduced performance of the driven accessories and potential damage. Think of it like a bicycle chain – if the chain is too loose, it will skip and not properly transfer power to the wheels.
Real-World Use and Basic Troubleshooting
Here are some practical tips for using the serpentine belt diagram for troubleshooting:
- Squealing Noise: A squealing noise, especially when starting the engine or turning the steering wheel, often indicates a slipping serpentine belt. Check the belt for wear, cracks, or glazing. Also, inspect the tensioner pulley for proper operation. A weak or failing tensioner will not maintain adequate belt tension, causing slippage.
- Accessory Malfunction: If you experience issues with your alternator, power steering, or air conditioning, check the serpentine belt's condition and routing. Make sure the belt is properly seated on all pulleys and that it's not excessively worn or damaged. A snapped serpentine belt will cause immediate failure of all driven accessories.
- Visual Inspection: Regularly inspect the serpentine belt for signs of wear, such as cracks, fraying, or missing chunks. A worn belt should be replaced promptly to prevent unexpected breakdowns. Also, check for oil or coolant contamination, which can degrade the belt material.
- Tensioner Check: Inspect the tensioner pulley for smooth operation. It should move freely without excessive play or noise. A failing tensioner can cause belt slippage, noise, and premature belt wear. Many tensioners have an indicator showing the acceptable range of movement. If the indicator is outside the range, the tensioner or belt (or both) needs to be replaced.
Safety Precautions
Working on the serpentine belt system involves certain safety risks:
- Engine Heat: Ensure the engine is cool before working on the serpentine belt. Components can become extremely hot, causing burns.
- Moving Parts: Never work on the serpentine belt system while the engine is running. The rotating belt and pulleys can cause serious injury.
- Battery Disconnect: It's always a good practice to disconnect the negative battery terminal before working on any electrical components or accessories driven by the serpentine belt.
- Tensioner Spring: The tensioner pulley is spring-loaded and can release with considerable force. Use the correct tool to relieve tension on the belt and avoid injury. Improper removal can cause the tensioner to snap back violently.
The tensioner pulley can be risky to manipulate, so be prepared and follow standard shop procedures.
By understanding the serpentine belt diagram, its purpose, and how to troubleshoot common issues, you can effectively maintain your 2003 Dodge Ram 1500's engine accessories and prevent costly repairs.
We have the file you need to see the serpentine belt diagram. You can download the diagram and view it now to help you with your task.