
2003 Ford F250 Transmission Line Diagram
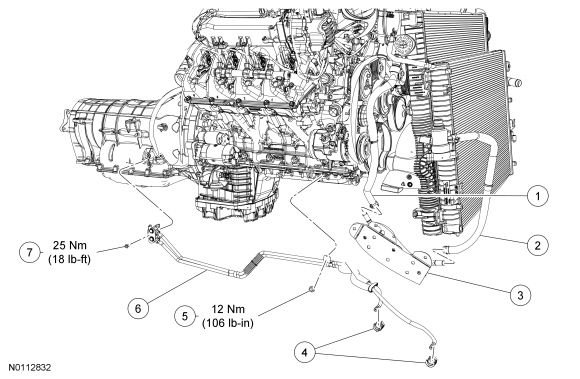
Alright, let's dive into the transmission line diagram for your 2003 Ford F250. Understanding this diagram is crucial whether you're tackling a transmission fluid leak, upgrading your cooling system, or just wanting to gain a deeper understanding of how your truck works. This guide is aimed at the intermediate DIYer, so we'll cover the key specs, symbols, operation, and even some troubleshooting tips. Think of this as your roadmap to the circulatory system of your transmission.
Purpose of the Transmission Line Diagram
Why bother with a diagram? Several reasons. First, it's essential for accurate diagnosis and repair. A seemingly minor leak can lead to major problems if left unchecked. The diagram helps you pinpoint the source and understand the path the fluid takes. Second, if you're considering upgrades, such as adding an aftermarket transmission cooler, you need to know where to tap into the system safely and effectively. Finally, understanding the diagram enhances your overall knowledge of your vehicle, empowering you to make informed decisions about maintenance and repairs.
Key Specs and Main Parts (4R100 Transmission)
The 2003 Ford F250, depending on engine configuration (most commonly the 5.4L Triton V8, 6.8L Triton V10, or the 7.3L Power Stroke Diesel), is likely equipped with the 4R100 transmission. It's a robust, electronically controlled 4-speed automatic transmission. Here's a breakdown of the key components we'll see in the diagram related to the lines:
- Transmission Case: The main housing of the transmission, where all internal components are located.
- Transmission Fluid Pan: Located at the bottom of the transmission, it holds the transmission fluid reservoir.
- Transmission Fluid Pump: Draws fluid from the pan and circulates it throughout the transmission and to the cooler. This is usually located inside the transmission near the torque converter.
- Torque Converter: Hydraulically couples the engine to the transmission. It’s filled with transmission fluid.
- Transmission Cooler Lines: These are the critical lines we're focusing on. They carry fluid to and from the transmission cooler. Expect to see both a feed line (hot fluid to the cooler) and a return line (cooled fluid back to the transmission).
- Transmission Cooler: Typically located in the radiator or as a separate unit. It dissipates heat from the transmission fluid.
- Fluid Filter: Removes contaminants from the transmission fluid, helping to maintain optimal performance.
- Pressure Ports/Test Ports: These are points along the lines where you can attach gauges to measure the fluid pressure. The diagram should indicate their locations.
Understanding the Symbols
The diagram uses a specific set of symbols to represent different components and lines. Here's a breakdown of the most common ones:
- Solid Lines: Typically represent the main transmission fluid lines. The thickness of the line might indicate the line's diameter or fluid flow capacity.
- Dashed Lines: May indicate vacuum lines, electrical connections, or auxiliary lines not directly related to the main fluid flow.
- Arrows: Indicate the direction of fluid flow. Pay close attention to these!
- Circles or Squares with Letters/Numbers: These usually identify specific components or connection points. The legend will explain what each code represents. For example, "TC" might indicate the torque converter, and "C1" might represent a specific clutch pack.
- Rectangles: Usually represents the transmission cooler.
- Special Symbols: Expect to see symbols for valves (pressure relief valves, check valves), filters, and sensors (temperature sensors, pressure sensors). The legend accompanying the diagram will be your key to deciphering these.
Color Coding: While not always present in older diagrams, color coding is becoming more common. If your diagram has it:
- Red: Usually indicates high-pressure lines.
- Blue: Often indicates low-pressure or return lines.
Important: Always refer to the specific legend that accompanies the diagram you're using. Symbols can vary slightly between manufacturers.
How It Works: The Transmission Fluid Circuit
The transmission fluid circuit is a closed-loop system designed to lubricate, cool, and transmit power within the transmission. Here's a simplified overview of how it works, focusing on the parts shown in the diagram:
- The transmission fluid pump draws fluid from the transmission fluid pan.
- The pump sends the fluid under pressure through the transmission fluid filter to remove contaminants.
- The pressurized fluid then travels through internal passages to lubricate the gears, bearings, and clutches within the transmission. It also fills the torque converter, allowing it to transfer engine power to the transmission.
- As the fluid circulates, it absorbs heat generated by friction.
- The hot fluid is then pumped out of the transmission through the feed line to the transmission cooler.
- The cooler dissipates the heat, reducing the fluid temperature.
- The cooled fluid then returns to the transmission through the return line, ready to begin the cycle again.
The diagram will show you the precise routing of these lines, including any intermediate components like check valves or pressure relief valves. It's important to understand that the flow rate and pressure within this circuit are critical for proper transmission operation. Too little pressure, and you'll experience slippage and poor shifting. Too much pressure, and you could damage seals and other components.
Real-World Use: Basic Troubleshooting
Okay, let's put this knowledge to use. Let’s say you notice a transmission fluid leak near the cooler lines. Here's how the diagram can help:
- Locate the Lines: Use the diagram to identify the feed and return lines to the cooler.
- Trace the Leak: Visually inspect the lines, fittings, and connections along their entire length. Look for signs of leakage, such as wet spots, drips, or residue.
- Identify the Source: The diagram helps you pinpoint the exact location of the leak. Is it at a fitting? A corroded section of the line? A leaking cooler?
- Plan Your Repair: Knowing the exact location allows you to determine the necessary parts and procedures. Do you need to replace a fitting, a section of line, or the entire cooler?
- Verify Your Work: After making the repair, use the diagram to double-check that all connections are correct and secure. Start the engine and monitor for leaks.
Other Troubleshooting Scenarios:
- Overheating: If your transmission is overheating, the diagram can help you check for blockages in the cooler lines or a malfunctioning cooler.
- Poor Shifting: Low fluid pressure due to a leak in the lines can cause poor shifting. The diagram can help you identify potential leak points.
Safety Considerations
Working on the transmission fluid system can be messy and potentially dangerous. Here are some important safety precautions:
- Hot Fluid: Transmission fluid can get very hot. Allow the engine and transmission to cool down completely before working on the system.
- Pressure: The transmission fluid system is pressurized. Relieve the pressure before disconnecting any lines. Consult your service manual for the proper procedure.
- Eye Protection: Wear safety glasses to protect your eyes from splashing fluid.
- Gloves: Wear gloves to protect your skin from the fluid and any potential contaminants.
- Cleanliness: Keep everything clean to prevent contamination of the transmission fluid. Use new seals and O-rings when reassembling components.
- Avoid Open Flames: Transmission fluid is flammable. Keep open flames and sources of ignition away from the work area.
High-Risk Components:
- Torque Converter: Contains a large amount of fluid and can be difficult to handle.
- Transmission Fluid Pump: Operates under high pressure.
- Transmission Cooler Lines at the Radiator: These connections are often prone to corrosion and can be difficult to remove without damaging the radiator.
Remember, if you're not comfortable working on the transmission yourself, it's always best to consult a qualified mechanic. Improper repairs can lead to serious damage.
We understand the importance of having the right resources at your fingertips. We have a copy of the 2003 Ford F250 transmission line diagram available for download. You can access it by clicking [link to download]. This diagram, combined with the knowledge you've gained here, will empower you to confidently tackle transmission-related projects on your F250.