2003 Gmc Envoy Stereo Wiring Diagram
Alright, let's dive into the 2003 GMC Envoy stereo wiring diagram. Understanding this schematic is crucial whether you're replacing a blown fuse, installing a new head unit, troubleshooting speaker issues, or just satisfying your curiosity about your Envoy's audio system. We're aiming for a clear, practical explanation to help you navigate those wires with confidence. Think of this as your detailed roadmap to your Envoy's audio system.
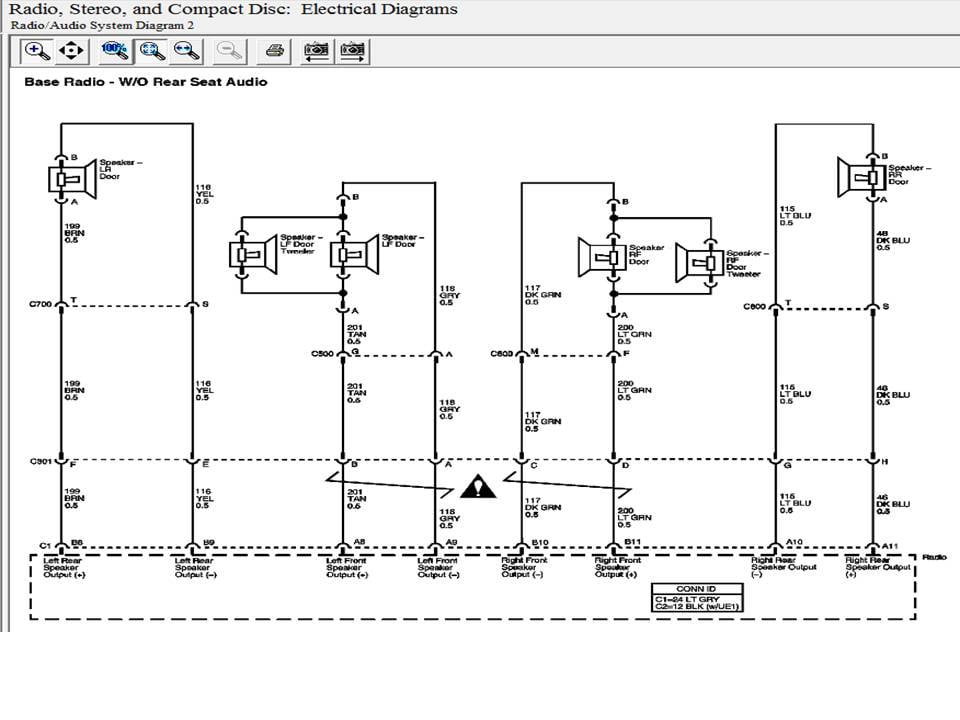
Purpose of the Wiring Diagram
Why bother with a wiring diagram? Simply put, it's your Rosetta Stone for deciphering your car's electrical system. Specifically, this diagram helps you to:
- Identify wires: Know exactly what each wire does without blindly guessing.
- Troubleshoot problems: Pinpoint the source of audio issues, like speakers not working or a head unit that won't power on.
- Install aftermarket components: Safely and correctly install new head units, amplifiers, or speakers. This is *especially* important as improper wiring can damage your new components or even the vehicle's electrical system.
- Perform repairs: Repair damaged wiring or connectors with confidence.
- Understand your system: Learn how the various components of your audio system interact with each other.
Key Specs and Main Parts
The 2003 GMC Envoy audio system isn't overly complex, but it does have some key components. It is important to note, however, that the information detailed below describes the wiring for vehicles with the standard audio setup, some models may have come with optional Bose system. These systems have significant wiring differences.
- Head Unit (Radio/CD Player): The brains of the operation, providing the audio source and controls.
- Speakers: Usually four speakers – two in the front doors and two in the rear doors. Premium models may have tweeters.
- Amplifier (Optional): Some Envoys came with a factory amplifier, typically located under the rear seat or in the cargo area. This boosts the signal to the speakers.
- Wiring Harnesses: Bundles of wires that connect the various components. The main harness plugs into the back of the head unit.
- Antenna: Receives radio signals.
- Ground Points: Crucial connections to the vehicle's chassis, providing a return path for the electrical current.
Understanding the Symbols
Wiring diagrams use a standardized set of symbols to represent electrical components and connections. Here are some common ones you'll encounter in the 2003 GMC Envoy stereo wiring diagram:
- Solid Lines: Represent wires. The thickness of the line doesn't usually indicate anything other than visual clarity.
- Dashed Lines: Sometimes indicate shielded wires or connections that aren't always present. In other diagrams, they may indicate a signal or data line as opposed to a power line.
- Circles: Often represent connectors or splice points.
- Rectangles: Usually represent electrical components like the head unit, amplifier, or speakers.
- Ground Symbol (Usually a downward-pointing triangle or a series of horizontal lines): Indicates a connection to the vehicle's chassis (ground).
- Color Codes: Each wire is color-coded to help you identify it. The diagram will have a key that lists the color abbreviations (e.g., "RD" for Red, "BLU" for Blue, "BLK" for Black, etc.).
- Numbers/Letters: Indicate the circuit number or pin number on a connector. This is vital for tracing wires back to their source.
Example Color Code Legend (Typical):
- BLK = Black
- RED = Red
- WHT = White
- GRN = Green
- BLU = Blue
- YEL = Yellow
- BRN = Brown
- ORG = Orange
- GRY = Gray
How It Works: Tracing the Signal
The audio signal originates from the head unit. Let's trace a simplified path:
- The head unit generates an audio signal (e.g., from a CD, radio, or auxiliary input).
- This signal travels through the wiring harness to the speakers (or to the amplifier if equipped).
- If an amplifier is present, it boosts the signal.
- The amplified signal then travels from the amplifier to the speakers.
- The speakers convert the electrical signal into sound waves.
The wiring diagram shows how these components are interconnected. You can follow the lines representing the wires to see exactly which wire carries which signal. Understanding the signal path is key to diagnosing audio problems.
Real-World Use: Basic Troubleshooting Tips
Here are some scenarios where the wiring diagram can be a lifesaver:
- No Power to Head Unit: Check the power and ground wires (usually red and black/brown, respectively) at the head unit connector. Use a multimeter to verify that you have 12V on the power wire and continuity to ground on the ground wire. A blown fuse is often the culprit here, so check the appropriate fuse (usually labeled "Radio" or "Audio") in the fuse box.
- One Speaker Not Working: Use the wiring diagram to identify the speaker wires for that speaker. Check the connection at the speaker and at the head unit (or amplifier, if applicable). Use a multimeter to check for continuity in the speaker wire. If the wire is intact, the speaker itself may be bad.
- Humming or Static Noise: This can be caused by a poor ground connection. Check the ground wires at the head unit, amplifier (if applicable), and speakers. Clean and tighten any loose ground connections. Also, check for interference from other wires running near the audio wires.
- Installing a New Head Unit: The wiring diagram will tell you which wire is the 12V constant (for memory), 12V switched (for power on/off), ground, antenna lead, and speaker wires. Match these up with the corresponding wires on your aftermarket head unit's wiring harness. Aftermarket wiring harnesses are often color-coded to match aftermarket stereos, but double-checking against your Envoy's wiring diagram is crucial.
Safety First!
Working with electrical systems can be dangerous. Always remember these precautions:
- Disconnect the Negative Battery Terminal: This is the most important step to prevent short circuits and potential electrical shocks.
- Use a Multimeter Properly: Learn how to use a multimeter to test voltage, continuity, and resistance safely.
- Don't Work in Wet Conditions: Water conducts electricity, increasing the risk of shock.
- Be Careful with Airbags: Airbag systems are sensitive. Avoid jarring or damaging any airbag-related components. Consult a qualified technician if you're unsure.
- Double-Check Your Work: Before reconnecting the battery, carefully review your wiring to ensure everything is connected correctly.
The most dangerous parts of the audio system are the power wires. Always disconnect the battery before working on these wires. Shorting a power wire to ground can cause a fire and damage your car's electrical system.
Where to Get the Diagram
A detailed and accurate 2003 GMC Envoy stereo wiring diagram is essential. There are various online sources; many are of poor quality or inaccurate. To get you started, we have the file available for download. It is important to note, as mentioned previously, that the information detailed here, as well as included in the downloaded document describes the wiring for vehicles with the standard audio setup, some models may have come with optional Bose system. These systems have significant wiring differences. Be sure to identify which audio system your vehicle is equipped with before beginning work on the vehicle.