
2003 Honda Pilot Serpentine Belt Diagram
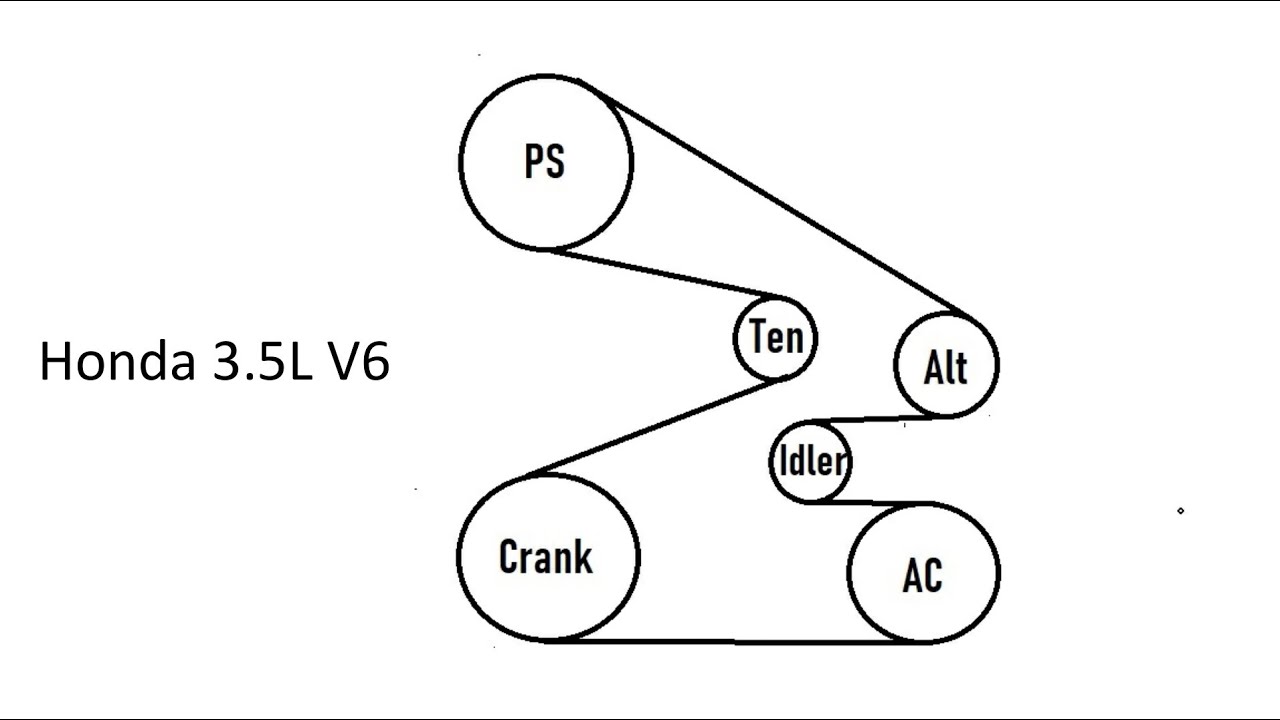
The 2003 Honda Pilot, a robust SUV known for its reliability, relies on a single serpentine belt to drive several crucial engine components. This article provides a detailed breakdown of the serpentine belt system, its diagram, and practical troubleshooting tips specifically for the 2003 Honda Pilot. Understanding this system is invaluable for preventative maintenance, diagnosing issues, and performing repairs, saving you time and money.
Purpose of the Serpentine Belt Diagram
The serpentine belt diagram is a visual roadmap of how the belt snakes around various pulleys in your 2003 Honda Pilot's engine bay. Its primary purposes are:
- Repair Guidance: When replacing a worn or broken belt, the diagram ensures you route the new belt correctly. Incorrect routing can lead to component failure, overheating, or even engine damage.
- Troubleshooting: Identifying the components powered by the belt (e.g., alternator, power steering pump, A/C compressor) allows you to pinpoint the source of a problem if one of these systems malfunctions.
- Preventative Maintenance: By visually inspecting the belt and pulleys based on the diagram, you can detect wear and tear early, preventing catastrophic belt failure.
- Educational Value: Familiarizing yourself with the diagram enhances your understanding of the engine's overall operation.
Key Specs and Main Parts
The 2003 Honda Pilot typically uses a serpentine belt with a specific length and number of ribs. While the exact dimensions can vary slightly depending on the manufacturer, a typical replacement belt for this model might be around 90-92 inches in length. Always verify the correct part number for your specific vehicle using a parts catalog or by consulting with a reputable auto parts store.
The key components in the serpentine belt system are:
- Crankshaft Pulley (Crank Pulley): Driven directly by the engine's crankshaft, this pulley initiates the rotation that powers the entire system.
- Alternator Pulley: The alternator, responsible for charging the battery and powering electrical systems, is driven by the serpentine belt.
- Power Steering Pump Pulley: The power steering pump, providing hydraulic assistance for steering, relies on the belt for its operation.
- A/C Compressor Pulley: The air conditioning compressor, essential for cooling the cabin, is also powered by the serpentine belt.
- Idler Pulley(s): These smooth pulleys guide the belt along its path and maintain optimal tension. They do not drive any specific components.
- Tensioner Pulley: This spring-loaded pulley maintains constant tension on the serpentine belt, preventing slippage and ensuring efficient operation of all driven components. The tensioner is crucial for the system to function properly. A failing tensioner is a common cause of serpentine belt issues.
Understanding Symbols in the Diagram
Serpentine belt diagrams utilize standard conventions to convey information clearly:
- Solid Lines: Indicate the path of the serpentine belt itself. The thickness of the line might subtly represent the belt width, but this is not always the case.
- Arrows: Show the direction of belt rotation around each pulley. This is critical for ensuring correct belt routing.
- Pulley Symbols: Pulleys are typically represented as circles. Some diagrams might differentiate between ribbed pulleys (driving components) and smooth pulleys (idler pulleys).
- Component Labels: Each pulley is labeled with an abbreviation or full name of the component it drives (e.g., ALT for Alternator, P/S for Power Steering, A/C for Air Conditioning).
- Tensioner Indicator: The tensioner pulley is often depicted with a spring symbol or an arrow indicating the direction of tension. Understanding this is essential for proper belt installation.
While color coding is not universally used in serpentine belt diagrams, some diagrams might use different colors to highlight the "grooved" side (contacting ribbed pulleys) versus the "smooth" side of the belt. However, always rely on the arrows for direction and pulley labels for component identification.
How the Serpentine Belt System Works
The serpentine belt system operates on the principle of friction and rotational force. The engine's crankshaft powers the crankshaft pulley, which, in turn, drives the serpentine belt. As the belt rotates, it transfers power to the pulleys of the alternator, power steering pump, A/C compressor, and other components. The tensioner pulley maintains the correct belt tension, preventing slippage and ensuring efficient power transfer. If the belt is too loose, it will slip, leading to reduced performance of the driven components. If the belt is too tight, it can prematurely wear out the pulleys and belt itself, and even damage the bearings within the driven components.
Real-World Use and Basic Troubleshooting
Here are some practical troubleshooting scenarios and how the serpentine belt diagram can assist you:
- Squealing Noise: A squealing noise, especially when starting the engine or turning the steering wheel, often indicates a slipping serpentine belt. Check the belt for cracks, wear, and proper tension. Use the diagram to ensure the belt is routed correctly and that the tensioner is functioning correctly.
- Battery Not Charging: If the alternator is not charging the battery, the serpentine belt might be slipping or broken. Verify that the belt is properly engaged with the alternator pulley and that the alternator is receiving power.
- Power Steering Loss: If you experience a sudden loss of power steering, the serpentine belt might have broken or slipped off the power steering pump pulley. Use the diagram to inspect the belt routing and condition.
- A/C Not Cooling: If the A/C is not blowing cold air, the serpentine belt might be the culprit. Check the belt's engagement with the A/C compressor pulley.
- Visual Inspection: Regularly inspect the belt for cracks, fraying, glazing, or missing chunks. Also, check the pulleys for damage or signs of misalignment. Compare the belt's path to the diagram to identify any deviations.
To access the tensioner for belt removal or installation, you'll typically use a wrench to rotate the tensioner arm, relieving the tension on the belt. Refer to your 2003 Honda Pilot's repair manual or online resources for specific instructions on tensioner operation.
Safety Considerations
Working with the serpentine belt system involves potential hazards:
- Moving Parts: Never work on the serpentine belt system while the engine is running. The rotating belt and pulleys can cause serious injury.
- Hot Components: Allow the engine to cool down completely before working on the serpentine belt system. Components like the exhaust manifold and engine block can be extremely hot.
- Tensioner Spring: The tensioner pulley is spring-loaded and can snap back forcefully if released improperly. Use the correct tools and techniques to safely release the tension.
- Battery Disconnection: Disconnect the negative battery terminal before working on any electrical components, including the alternator.
Always consult your 2003 Honda Pilot's repair manual for specific safety precautions and procedures.
We have a detailed serpentine belt diagram available for download. This diagram clearly illustrates the routing of the belt and the location of all components, making it an invaluable resource for any DIY mechanic working on a 2003 Honda Pilot.