2003 Jeep Grand Cherokee Laredo Fuse Box Diagram
Alright, let's dive into the 2003 Jeep Grand Cherokee Laredo's fuse box diagram. This is a crucial piece of information for any intermediate car owner, DIY mechanic, or even a modder tinkering with their WJ (the Jeep Grand Cherokee's platform designation from '99-'04). Understanding this diagram is the key to diagnosing electrical problems, performing safe modifications, and generally keeping your Jeep running smoothly. We're going to break it down in a way that's technically accurate but also easy to grasp.
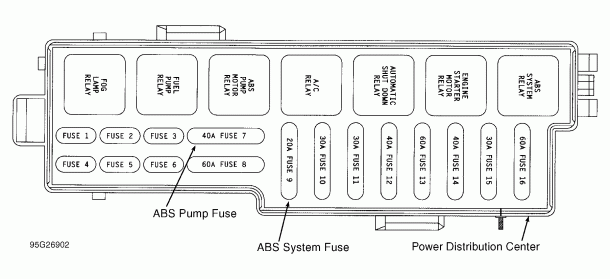
Purpose of the Fuse Box Diagram
Think of the fuse box diagram as the Rosetta Stone for your Jeep's electrical system. Its main purpose is to provide a visual representation of the fuse and relay layout within the vehicle's fuse boxes. Without it, you're essentially guessing which fuse controls what, which can lead to wasted time, potential damage, and even electrical fires. Here’s why it's so important:
- Troubleshooting Electrical Issues: When a circuit fails (headlights, radio, power windows, etc.), the diagram helps you quickly identify and check the corresponding fuse. A blown fuse is often the culprit for a non-functioning component.
- Safe Modifications: Adding aftermarket accessories like auxiliary lights, amplifiers, or a CB radio requires tapping into the existing electrical system. The diagram allows you to locate appropriate circuits and safely fuse your new additions, preventing overloads and potential damage to the vehicle's wiring harness.
- General Understanding of the Electrical System: Simply studying the diagram gives you a better grasp of how different components are interconnected and how the electrical system as a whole is structured.
- Preventing Electrical Fires: Knowing the proper amperage rating for each circuit is critical. Replacing a blown fuse with one of a higher amperage can bypass the intended protection and lead to overheating and potentially a fire. The diagram provides this vital information.
Key Specs and Main Parts
The 2003 Jeep Grand Cherokee Laredo typically has *two* main fuse boxes. It's crucial to distinguish between them:
- The Power Distribution Center (PDC): Located under the hood, usually near the battery. This houses larger fuses and relays that control high-current circuits like the starter motor, alternator, headlights, and various engine management systems. Think of it as the main power hub.
- The Junction Block (JB): Located inside the cabin, often under the dashboard or behind a kick panel (usually driver’s side). This box contains smaller fuses that protect lower-current circuits such as interior lights, radio, power windows, and other convenience features.
Each fuse box will have its own diagram. They might be printed on the inside of the fuse box cover, or located in the owner's manual. If you don't have either of those, don't worry – we have the file for you to download (more on that later). The diagram will list each fuse and relay, usually with a corresponding number and description of what circuit it protects. It will also specify the fuse's amperage rating.
Key Specs to Pay Attention To:
- Fuse Amperage (A): This number, often printed on the fuse itself and listed in the diagram, indicates the maximum current that the fuse can handle before blowing. Using the correct amperage is critical.
- Circuit Description: This describes what system the fuse is protecting (e.g., "Headlight - Right," "Radio," "Power Windows").
- Fuse Number or Location: This helps you physically locate the correct fuse within the fuse box.
Symbols: Lines, Colors, and Icons
Understanding the symbols used in the fuse box diagram is just as important as finding the diagram itself. While the diagrams are generally straightforward, here’s a breakdown of common elements:
- Lines: Lines represent the electrical circuits. A thicker line might indicate a heavier-gauge wire used for higher current.
- Colors: While the diagram itself might not use colors, the actual wires in your Jeep *do* use a color-coding system. The fuse box diagram may reference these colors in the circuit descriptions. Knowing standard automotive wiring color codes (e.g., red for power, black for ground) can be very helpful for tracing wires.
- Icons: Certain icons represent specific components or functions. For example, a headlight icon indicates the headlight circuit, a radio icon indicates the radio circuit, and so on. Relay symbols will usually be a square or rectangle with internal markings.
- Fuse Symbols: Fuses are typically represented by a zig-zag line or a small rectangle with a number (the amperage rating) inside.
- Relay Symbols: Relays are shown with a coil symbol and a switch symbol. These show how the relay works to open and close a circuit under control of the vehicle's computer or another switch.
How It Works: The Electrical System Basics
To truly understand the fuse box diagram, you need a basic grasp of how the Jeep's electrical system functions. Think of it as a closed loop:
- Power Source: The battery provides the initial electrical power.
- Distribution: The power flows through the wiring harness to various components.
- Fuses: Fuses are placed in the circuit to protect components from overcurrent. If the current exceeds the fuse's rating, the fuse blows, interrupting the circuit and preventing damage.
- Relays: Relays act as electrically controlled switches. They allow a low-current circuit (e.g., a switch on the dashboard) to control a high-current circuit (e.g., headlights). This prevents overloading the low-current circuit.
- Ground: After passing through the component, the electricity returns to the battery through a ground connection, completing the circuit.
When a component stops working, the first thing to check is the corresponding fuse. A blown fuse indicates an overcurrent situation. Replacing the fuse without addressing the underlying cause of the overcurrent will likely result in the new fuse blowing as well.
Real-World Use: Basic Troubleshooting Tips
Here’s a simple troubleshooting process using the fuse box diagram:
- Identify the Problem: What component isn't working? (Headlights, radio, etc.)
- Consult the Diagram: Locate the fuse or relay corresponding to that component in the fuse box diagram.
- Inspect the Fuse: Physically remove the fuse and inspect it. A blown fuse will have a broken filament. You can also use a multimeter set to continuity mode to check if the fuse is good.
- Replace the Fuse (If Blown): Replace the blown fuse with a fuse of the exact same amperage. Do not use a higher amperage fuse!
- Test the Component: See if the component now works. If it does, you’ve solved the problem (hopefully!).
- If the Fuse Blows Again: If the new fuse blows immediately or shortly after replacement, there’s a short circuit or overload in that circuit. You'll need to investigate further, possibly checking wiring, connectors, and the component itself.
Important Note: Before working on any electrical system, disconnect the negative battery cable to prevent accidental shorts and shocks.
Safety: Highlight Risky Components
Working with electrical systems can be dangerous. Be especially cautious around these components:
- High-Current Circuits: Circuits powering the starter motor, alternator, and headlights carry significant current. Shorting these circuits can cause sparks, burns, and even fires.
- Airbag System: The airbag system has its own dedicated fuse and wiring. Never tamper with the airbag system unless you are a qualified technician. Accidental activation can cause serious injury.
- Fuel Pump Circuit: Mishandling the fuel pump circuit can create a spark in the presence of fuel vapors, leading to a fire hazard.
Always double-check your work and use appropriate safety precautions. If you are unsure about any aspect of the electrical system, consult a qualified mechanic.
And remember, we have the 2003 Jeep Grand Cherokee Laredo fuse box diagram available for download. It's a valuable resource that can save you time, money, and potential headaches. Accessing and utilizing this diagram will significantly improve your ability to maintain and modify your WJ safely and effectively. With the correct diagram in hand, you're well-equipped to tackle basic electrical troubleshooting and repairs.