2003 Lexus Es300 Vacuum Hose Diagram
Welcome, fellow gearheads! Today, we're diving deep into the often-overlooked but crucial world of vacuum hoses, specifically focusing on the 2003 Lexus ES300. This guide is tailored for those of you who aren't afraid to get your hands dirty and want to understand the inner workings of your Lexus. We’ll cover everything you need to know about the vacuum hose system, its diagram, and how to troubleshoot common issues. Having a solid understanding of your vacuum system will save you both time and money on repairs. We even have the diagram available for download; details on that later!
Purpose: Why You Need This Diagram
A vacuum hose diagram is more than just a pretty picture; it's your roadmap to a healthy engine. Here's why it's important:
- Repairs and Maintenance: When a vacuum hose cracks, breaks, or disconnects, it can wreak havoc on your engine's performance. The diagram helps you quickly identify the affected hose and its connections.
- Troubleshooting: Vacuum leaks are notorious for causing a wide range of symptoms, from rough idling to poor fuel economy to failing an emissions test. The diagram helps you systematically trace the vacuum lines to pinpoint the leak.
- Understanding Engine Operation: Studying the diagram gives you a better understanding of how different engine components interact and rely on vacuum. This knowledge is invaluable for any DIY mechanic.
- Modifications and Upgrades: If you're planning any engine modifications, such as installing aftermarket parts, you'll need to know how those parts interact with the vacuum system.
Key Specs and Main Parts of the 2003 Lexus ES300 Vacuum System
The 2003 Lexus ES300 utilizes a 3.0-liter V6 (1MZ-FE) engine. Its vacuum system is fairly complex, incorporating numerous components. Here's a breakdown of the key parts:
- Intake Manifold: The heart of the vacuum system. The intake manifold provides the vacuum source for most other components.
- Vacuum Hoses: The arteries of the system. These hoses connect various components and transmit vacuum. They come in various sizes and materials, typically rubber or silicone.
- PCV (Positive Crankcase Ventilation) Valve: This valve regulates the flow of crankcase gases back into the intake manifold. It's crucial for emissions control and preventing oil sludge buildup. A faulty PCV valve or its associated hoses is a common cause of vacuum leaks.
- EVAP (Evaporative Emission Control) System: This system captures fuel vapors from the fuel tank and prevents them from escaping into the atmosphere. Key components include the charcoal canister, purge valve, and associated vacuum lines.
- Brake Booster: The brake booster uses vacuum to assist the driver in applying the brakes. A leak in the brake booster vacuum hose can result in a hard brake pedal.
- EGR (Exhaust Gas Recirculation) Valve: This valve reduces NOx emissions by recirculating a portion of the exhaust gas back into the intake manifold. The EGR valve is often vacuum-operated.
- Vacuum Switching Valve (VSV): VSVs are electrically controlled valves that regulate vacuum flow to different components, often based on engine temperature or other parameters. They are common in the EVAP and EGR systems.
- Check Valves: These one-way valves allow vacuum to flow in only one direction, preventing backflow. They are crucial for maintaining proper vacuum in certain systems.
- Vacuum Reservoirs (Canisters): Provide a stored source of vacuum for systems that need it on demand, especially at lower engine speeds.
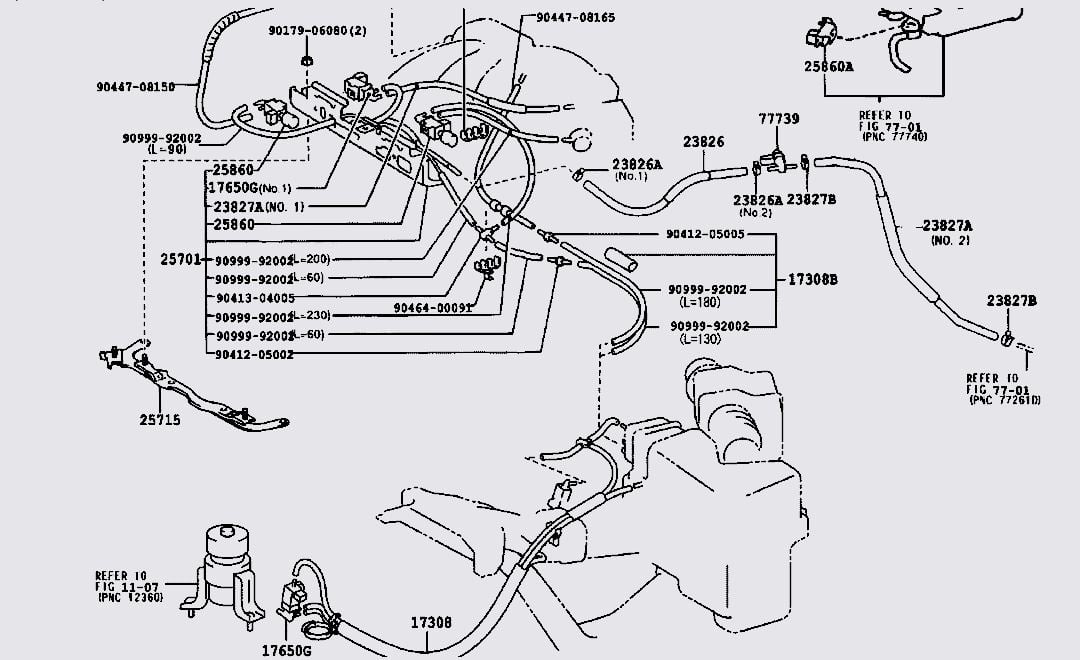
Symbols: Deciphering the Diagram
Understanding the symbols on the vacuum hose diagram is essential for accurate troubleshooting. Here's a general guide:
- Solid Lines: Typically represent vacuum hoses. The thickness of the line may or may not indicate the hose diameter.
- Dashed Lines: Often indicate electrical wiring or signal lines.
- Arrows: Show the direction of vacuum flow.
- Component Symbols: Each component (PCV valve, EGR valve, etc.) will have a specific symbol. Refer to the diagram's legend for clarification.
- Colors: Some diagrams use color-coding to differentiate between different systems or hose types. Refer to the diagram's legend for the color key.
- Numbers or Letters: May be used to identify specific hoses or connections. These often correlate to part numbers or repair procedures.
- T-Connectors & Y-Connectors: Indicate places where hoses split to feed multiple systems.
Important Note: Always refer to the specific legend of your 2003 Lexus ES300 vacuum hose diagram, as symbols can vary slightly between manufacturers and even different models of the same car.
How It Works: The Vacuum System in Action
The vacuum system relies on the principle that the intake manifold creates a vacuum (negative pressure) when the engine is running. This vacuum is then distributed through a network of hoses to operate various engine components. Here's a simplified explanation:
- The engine creates a vacuum in the intake manifold as the pistons move down on the intake stroke.
- Vacuum hoses connected to the intake manifold tap into this vacuum source.
- The vacuum is used to operate components like the brake booster (assisting braking), the PCV system (venting crankcase gases), the EVAP system (controlling fuel vapors), and the EGR valve (reducing emissions).
- VSVs control the flow of vacuum to certain components based on engine conditions, allowing for precise control of engine operation.
- Check valves prevent backflow, ensuring that vacuum is maintained in the correct direction.
A vacuum leak disrupts this carefully balanced system. When air leaks into the system, it reduces the amount of vacuum available to operate the various components, leading to performance issues. The ECU (Engine Control Unit) may attempt to compensate for the vacuum leak, but it can only do so much.
Real-World Use: Basic Troubleshooting Tips
Here are some common problems related to the vacuum system and how to troubleshoot them using the diagram:
- Rough Idle: A common symptom of a vacuum leak. Inspect the PCV valve and its hoses, as well as any hoses connected to the intake manifold.
- Poor Fuel Economy: A vacuum leak can cause the engine to run lean, leading to poor fuel economy. Check the EVAP system hoses and the EGR valve hoses.
- Hard Brake Pedal: A leak in the brake booster vacuum hose can make it difficult to apply the brakes.
- Check Engine Light (CEL): Many vacuum leaks will trigger a CEL. Use an OBD-II scanner to read the diagnostic trouble codes (DTCs). Common codes related to vacuum leaks include P0171 (System Too Lean, Bank 1), P0174 (System Too Lean, Bank 2), and codes related to the EVAP system.
Troubleshooting Steps:
- Visual Inspection: Start by visually inspecting all vacuum hoses for cracks, breaks, or disconnections. Pay close attention to hoses that are exposed to heat or oil.
- Smoke Test: A smoke test is a highly effective way to find vacuum leaks. A smoke machine injects smoke into the vacuum system, and any leaks will be readily apparent.
- Vacuum Gauge Test: A vacuum gauge can be used to measure the vacuum in the intake manifold. A low vacuum reading can indicate a leak.
- Component Testing: Test individual components, such as the PCV valve, EGR valve, and VSVs, to ensure they are functioning properly.
- Use the Diagram: Consult the vacuum hose diagram to trace the vacuum lines and identify potential leak sources.
Safety: Proceed with Caution
While working on the vacuum system is generally safe, there are a few precautions to keep in mind:
- Hot Engine: Never work on the vacuum system while the engine is hot. Allow the engine to cool down completely before starting any repairs.
- Fuel Lines: Be careful when working near fuel lines, as gasoline is highly flammable.
- Electrical Components: Disconnect the battery before working on any electrical components, such as VSVs.
- Sharp Objects: Be aware of sharp edges and hot surfaces under the hood. Wear gloves to protect your hands.
The exhaust manifold gets incredibly hot; ensure it is cooled down before attempting any work near it. Be especially cautious when dealing with fuel vapor lines; ensure the area is well ventilated.
Remember, if you're not comfortable performing any of these procedures, it's always best to consult a qualified mechanic.
And now, for the moment you've been waiting for! We have a detailed vacuum hose diagram for the 2003 Lexus ES300 ready for you to download. This diagram will be an invaluable tool in your troubleshooting and repair endeavors.