2003 Toyota Corolla Serpentine Belt Diagram
Alright, let's dive into the serpentine belt diagram for the 2003 Toyota Corolla. Understanding this diagram is crucial for anyone looking to maintain, diagnose, or repair their Corolla's accessory drive system. Whether you're swapping out a worn belt, tracing down a squeal, or just want to understand how your engine's accessories are powered, this guide will walk you through everything you need to know.
Purpose of the Serpentine Belt Diagram
Why bother with a diagram? Simple: it's your roadmap to the accessory drive system. Without it, replacing a serpentine belt becomes a guessing game, and diagnosing issues becomes significantly harder. The diagram clearly shows the belt's routing path, ensuring you install it correctly. Correct installation is absolutely vital. An incorrectly routed belt can lead to component failure, overheating, and a whole host of other problems. Furthermore, understanding the diagram helps you identify each component in the system, making troubleshooting and repair more efficient. It's also invaluable for learning about automotive mechanics in general.
Key Specs and Main Parts
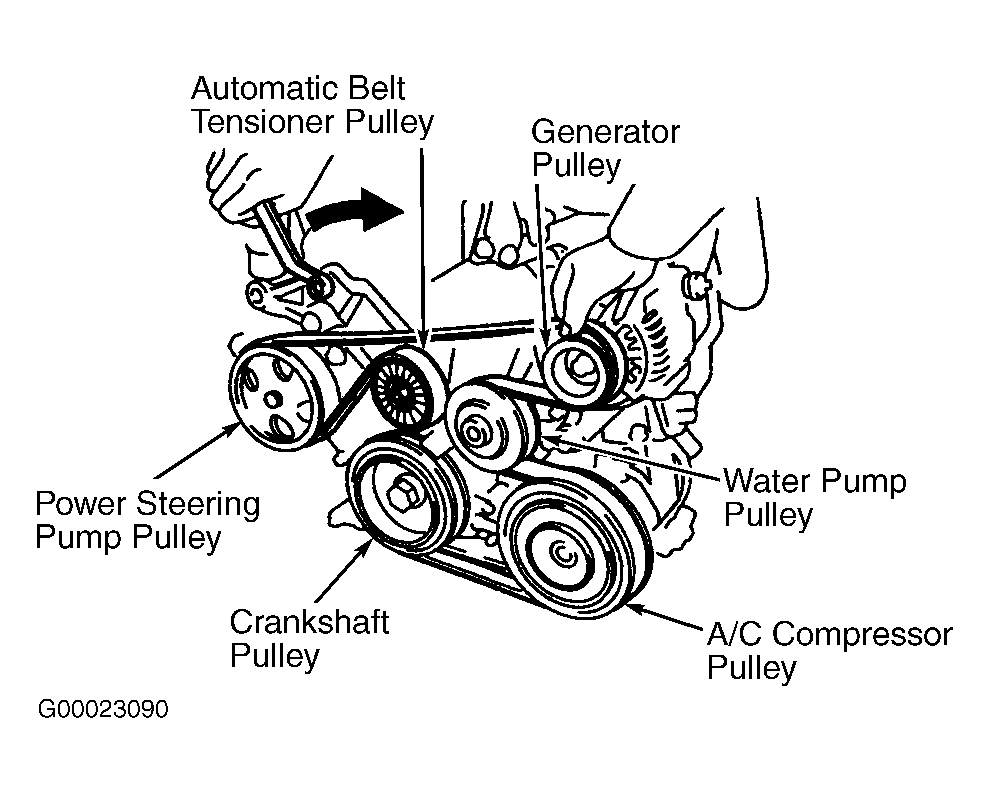
The 2003 Toyota Corolla typically uses a single serpentine belt to drive multiple accessories. Here's a breakdown of the key components and what you'll typically find represented in the diagram:
- Crankshaft Pulley (Crank Pulley): This is the heart of the system, driven directly by the engine. It provides the rotational force that powers the belt. It's a *critical* component.
- Alternator: The alternator generates electrical power for the car's systems and charges the battery. If the belt isn't spinning the alternator properly, your battery won't charge.
- Power Steering Pump: This pump provides the hydraulic pressure needed for power-assisted steering. A slipping belt can lead to hard steering, especially at low speeds.
- Air Conditioning Compressor: The A/C compressor circulates refrigerant, providing cool air. Belt slippage will result in poor A/C performance.
- Water Pump: Though sometimes driven by the timing belt on other engines, on the 2003 Corolla, the water pump may be driven by the serpentine belt. It circulates coolant throughout the engine to prevent overheating. A failing water pump, or improper drive due to a damaged serpentine belt can cause major engine damage.
- Tensioner Pulley (Automatic Tensioner): The automatic tensioner maintains the correct tension on the serpentine belt. It's spring-loaded and keeps the belt snug as it wears. A worn or failing tensioner is a common cause of belt squealing.
- Idler Pulley: Idler pulleys are smooth, non-driven pulleys that guide the belt around the engine and provide optimal wrap around other components.
Regarding belt specs, you'll need to consult your specific Corolla's documentation or a parts catalog to determine the exact length and width. These dimensions are crucial for proper fitment and performance. Don't just grab any belt!
Understanding the Symbols
Serpentine belt diagrams aren't usually flashy, but their simplicity belies their importance. Here's how to interpret the common symbols:
- Solid Lines: These represent the path of the serpentine belt. The thickness of the line doesn't typically indicate anything specific.
- Arrows: Arrows along the solid lines indicate the direction of belt rotation. This is absolutely vital for ensuring correct installation. Note which direction each pulley is turning.
- Circles or Ovals: These represent the pulleys themselves. Sometimes, the diagrams will even label them (ALT for Alternator, P/S for Power Steering, etc.).
- Text Labels: These labels identify each component. Look for abbreviations or full names.
- Tensioner Representation: The tensioner is often shown with a spring symbol or a pivoting arm, indicating its ability to adjust belt tension.
- Diagram Orientation: Diagrams are usually oriented to match the engine's layout as viewed from the front of the car.
How It Works: The Serpentine Belt System
The serpentine belt system is relatively straightforward, but understanding the principles behind it is key. The crankshaft pulley, driven by the engine's rotation, transfers power to all the other accessories via the serpentine belt. The belt wraps around each pulley, using friction to transfer rotational force. The tensioner pulley ensures the belt remains tight, preventing slippage and maintaining optimal performance. Without the proper tension, the belt slips, and the accessories won't function correctly.
The system's efficiency relies on a properly tensioned and undamaged belt. A worn or cracked belt will slip, reducing the effectiveness of the accessories. Similarly, a failing tensioner will allow the belt to loosen, causing the same problems.
Real-World Use: Troubleshooting Tips
Here are some common problems and how the diagram can help you troubleshoot them:
- Squealing Noise: A squealing noise, especially upon startup or during acceleration, is often a sign of a slipping belt. Use the diagram to inspect the belt's condition and routing. Check for cracks, fraying, or glazing. Also, inspect the tensioner for proper operation. If the tensioner is bouncing excessively, it may be faulty.
- Accessory Failure: If the A/C isn't blowing cold, the power steering is stiff, or the battery isn't charging, the serpentine belt could be the culprit. Use the diagram to confirm that the belt is properly routed around the affected accessory's pulley. Also, check the belt's tension and condition.
- Belt Jumping Off: If the belt repeatedly jumps off the pulleys, there could be a misaligned pulley, a damaged belt, or a faulty tensioner. Use a straight edge to check the alignment of the pulleys. The diagram will help you ensure the belt is routed correctly, as incorrect routing can cause it to walk off the pulleys. A damaged pulley can also cause this symptom.
Remember to always visually inspect the belt and pulleys for wear and damage before replacing the belt. A worn pulley can quickly destroy a new belt.
Safety Considerations
Working on the serpentine belt system can be risky. Here are some crucial safety precautions:
- Disconnect the Battery: Always disconnect the negative battery terminal before working on any electrical components. This prevents accidental shocks.
- Engine Off and Cool: Never work on the serpentine belt system while the engine is running or hot. The rotating components can cause serious injury. Wait for the engine to cool down completely.
- Keep Fingers Clear: Keep your fingers and hands clear of the belt and pulleys while the engine is running, even briefly. The belt can quickly pull your hand into the rotating components.
- Eye Protection: Wear safety glasses to protect your eyes from debris.
- Tensioner Safety: Be extremely cautious when releasing the tension on the serpentine belt. The tensioner is spring-loaded and can snap back with considerable force. Use the correct tool to relieve the tension safely.
Specifically, the crankshaft pulley is the most dangerous. Stay clear of it while the engine runs!
With this understanding of the 2003 Toyota Corolla serpentine belt diagram, you should be well-equipped to tackle maintenance and repairs. Remember to always consult your vehicle's specific repair manual for detailed instructions and torque specifications.
We have the diagram available for download, so you have a readily available reference when you are working on your vehicle.