
2004 Chevy Silverado Evap System Diagram
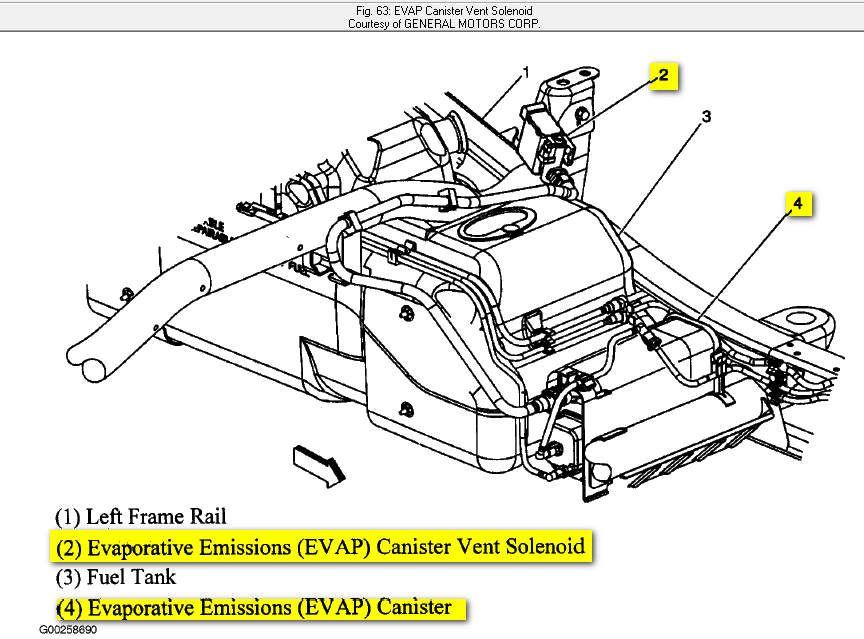
Alright, let's dive into the 2004 Chevy Silverado's Evaporative Emission Control (EVAP) system diagram. Whether you're chasing down a pesky Check Engine Light, trying to understand how your truck prevents fuel vapor pollution, or just want to better grasp its inner workings, this diagram is your roadmap. Think of it as the blueprint for your truck's smog-reducing system. We're aiming for a level of understanding beyond just replacing parts; we want to know why things are happening. And, just so you know, we have the actual diagram available for download – link will be at the end of this article. This will be much easier to understand if you have it in hand!
Purpose of the EVAP System and the Diagram
The EVAP system's primary job is to prevent harmful gasoline vapors from escaping into the atmosphere. Fuel naturally evaporates, and without a system to contain and manage these vapors, they'd contribute to smog and air pollution. The EVAP system captures these vapors, stores them temporarily, and then purges them into the engine to be burned during normal combustion. A properly functioning EVAP system also helps improve fuel economy, albeit marginally.
The diagram is crucial because it lays out the entire system, showing the location of each component, how they're connected, and their relationship to each other. It's invaluable for:
- Troubleshooting: Identifying faulty components causing EVAP system-related trouble codes (like P0440, P0442, P0455, etc.).
- Repairing: Replacing damaged or worn-out parts correctly.
- Understanding: Gaining a deeper knowledge of your vehicle's emissions control system.
- Modifying: While less common, the diagram helps when making modifications that might affect the EVAP system (e.g., fuel tank upgrades).
Key Specs and Main Parts
The 2004 Silverado uses a fairly standard EVAP system design common to many GM vehicles of that era. Here are the main components you'll find in the diagram:
- Fuel Tank: The source of fuel vapors.
- Fuel Cap: A critical component; a loose or faulty cap is a common cause of EVAP errors. It is designed to be airtight.
- Charcoal Canister: This is the vapor storage unit. Activated charcoal absorbs and holds fuel vapors.
- Canister Vent Valve: Controls airflow into the charcoal canister. It's typically Normally Open (NO), allowing fresh air to enter the canister when the purge valve is open. When closed, it seals the system for leak testing.
- Canister Purge Valve: Controls the flow of fuel vapors from the charcoal canister to the engine intake manifold. This valve is typically Normally Closed (NC) and is opened by the PCM (Powertrain Control Module) under specific operating conditions.
- Fuel Tank Pressure Sensor (FTP Sensor): Monitors the pressure or vacuum inside the fuel tank. The PCM uses this data to diagnose leaks and control the purge valve.
- Vapor Lines: Hoses and pipes that carry fuel vapors between the various components.
- EVAP Service Port: A diagnostic port used for performing leak tests with a smoke machine.
- PCM (Powertrain Control Module): The "brain" that controls the entire EVAP system, based on sensor inputs and programmed parameters.
Symbols and Diagram Interpretation
Understanding the symbols used in the EVAP system diagram is essential. Here's a breakdown of common symbols you'll encounter:
- Solid Lines: Typically represent vapor lines carrying fuel vapors.
- Dotted Lines: Often indicate vacuum lines or control lines.
- Different Colors: Color coding can vary, but generally, they're used to differentiate between different types of lines (e.g., fuel lines, vent lines, control lines). The diagram legend will explain the color coding specific to the 2004 Silverado.
- Component Symbols: Each component (valve, sensor, canister) has a unique symbol, usually a simplified representation of its physical appearance. The diagram should include a legend explaining each symbol.
- Arrows: Indicate the direction of flow (air or fuel vapors).
- Electrical Connectors: Show the wiring connections to sensors and actuators. These will typically be shown with a small square block and line representing the number of wires associated.
Pay close attention to the connections between components. The diagram clearly shows how each part is linked to another, which is crucial for tracing the flow of vapors and identifying potential blockages or leaks.
How It Works
Here's a simplified explanation of how the EVAP system operates on the 2004 Silverado:
- Vapor Generation: Fuel in the tank evaporates, creating fuel vapors.
- Vapor Storage: These vapors are routed through vapor lines to the charcoal canister. The activated charcoal absorbs and stores the vapors, preventing them from escaping into the atmosphere.
- Purge Cycle: When the engine is running and certain conditions are met (engine temperature, speed, load, etc.), the PCM opens the canister purge valve. This allows manifold vacuum to draw fresh air through the canister vent valve and pull the stored fuel vapors from the charcoal canister.
- Combustion: The fuel vapors are then drawn into the engine's intake manifold and burned along with the regular air/fuel mixture during combustion.
- Leak Testing: Periodically, the PCM performs a self-test of the EVAP system for leaks. It closes both the canister vent valve and the canister purge valve and monitors the fuel tank pressure sensor. If the pressure doesn't hold, it indicates a leak somewhere in the system, triggering a Check Engine Light.
Real-World Use: Basic Troubleshooting Tips
Here's how you can use the EVAP system diagram for basic troubleshooting:
- Check Engine Light: If you have an EVAP-related code, use the diagram to locate the components involved. For example, a P0440 (EVAP System Malfunction) could be caused by a leak anywhere in the system. Use the diagram to visually inspect all vapor lines, connections, and the fuel cap for cracks, damage, or looseness.
- Fuel Cap Inspection: The easiest and most common fix is a loose or damaged fuel cap. Ensure it's properly tightened and inspect the seal for cracks or damage.
- Visual Inspection: Carefully inspect all vapor lines for cracks, kinks, or disconnections. Pay particular attention to areas near heat sources or moving parts.
- Smoke Testing: The most effective way to find leaks is with a smoke machine. Connect the smoke machine to the EVAP service port and introduce smoke into the system. Watch for smoke escaping from any leaks. The diagram will help you trace the path of the smoke and pinpoint the source of the leak.
- Valve Testing: Use a multimeter to test the resistance of the canister vent valve and the canister purge valve. Compare your readings to the specifications in the service manual. You can also apply power to the valves to see if they actuate properly (open and close). The diagram can help you locate the electrical connectors for these valves.
Safety Considerations
Working with the EVAP system involves handling fuel vapors, which are flammable. Observe the following safety precautions:
- Work in a well-ventilated area: Avoid enclosed spaces where fuel vapors can accumulate.
- No Smoking: Never smoke or use open flames near the fuel system.
- Disconnect the Battery: Before working on any electrical components, disconnect the negative battery cable to prevent accidental shorts.
- Fuel Pressure: Be aware that the fuel tank may be under pressure, especially on a hot day. Release the pressure slowly by loosening the fuel cap carefully.
- Handle Fuel Carefully: If you need to disconnect fuel lines, have a container ready to catch any spilled fuel. Dispose of fuel properly.
- Charcoal Canister: The charcoal canister contains activated charcoal, which can be an irritant if inhaled. Avoid breathing in the dust from a damaged canister.
The fuel tank and fuel lines are high-risk components due to the presence of flammable gasoline. Exercise extreme caution when working near these parts.
This article provides a solid overview of the 2004 Chevy Silverado's EVAP system and how to interpret its diagram. Remember to always consult the specific service manual for your vehicle for detailed instructions and torque specifications. Understanding this system and its components will not only help you keep your truck running smoothly but also contribute to cleaner air. Now, click this link to download the full 2004 Chevy Silverado EVAP system diagram for a more detailed look! [Link to Download Diagram - Placeholder]. Good luck!