2004 Chevy Silverado Radio Wiring Harness Adapter
So, you're diving into the world of car audio, specifically dealing with the 2004 Chevy Silverado radio wiring harness adapter. Whether you're upgrading your head unit, diagnosing a blown fuse, or simply trying to understand how your truck's audio system is wired, a solid understanding of this adapter is crucial. This article provides a comprehensive overview to help you navigate the often-confusing world of automotive wiring.
Purpose: Why Bother with the Wiring Harness Adapter?
The 2004 Chevy Silverado's radio wiring harness adapter is the unsung hero connecting your aftermarket radio to the factory wiring system. Without it, you'd be cutting and splicing wires, a process that's messy, unreliable, and can significantly decrease your truck's resale value. Think of it as a translator between two different languages – the language of your new head unit and the language of your Silverado's original wiring. It's essential for:
- Head Unit Upgrades: Installing a new stereo without damaging factory wiring.
- System Integration: Connecting amplifiers, subwoofers, and other audio components.
- Troubleshooting: Diagnosing audio problems by isolating the radio and its connections.
- Restoring Factory Setup: Easily reverting to the original radio if desired.
Key Specs and Main Parts
Let's break down the core components and specifications you need to know:
Main Components:
- Vehicle-Specific Connector: This end plugs directly into the factory radio harness in your 2004 Silverado. It's designed to be a perfect fit, preventing accidental incorrect connections.
- Aftermarket Radio Connector: This end typically has standard wiring colors and labels that correspond to your new head unit's wiring diagram. These are generally industry-standard, using colors to denote power, ground, speakers, and remote turn-on leads.
- Wiring: The individual wires connecting the two connectors. The quality of these wires matters; look for adapters that use good quality copper wiring to minimize signal loss and ensure reliable connections.
Key Specs:
- Voltage: Primarily 12V DC (Direct Current), which is the standard voltage for automotive electrical systems.
- Wire Gauge: The thickness of the wires. Thicker gauge wires are capable of carrying more current. Typically, you'll see wire gauges ranging from 16 to 18 AWG (American Wire Gauge) in these adapters. For power and ground wires, a slightly thicker gauge is often used.
- Connector Type: The specific type of connector used on the vehicle-specific side. This is *crucial* for compatibility. Ensure the adapter is specifically designed for the 2004 Chevy Silverado. Research online or consult with a car audio specialist if you're unsure.
Symbols: Deciphering the Wiring Diagram
A wiring diagram can look intimidating at first glance, but understanding the basic symbols makes it much easier to read. Here's a breakdown:
- Lines: Lines represent wires. Thicker lines often indicate power or ground wires.
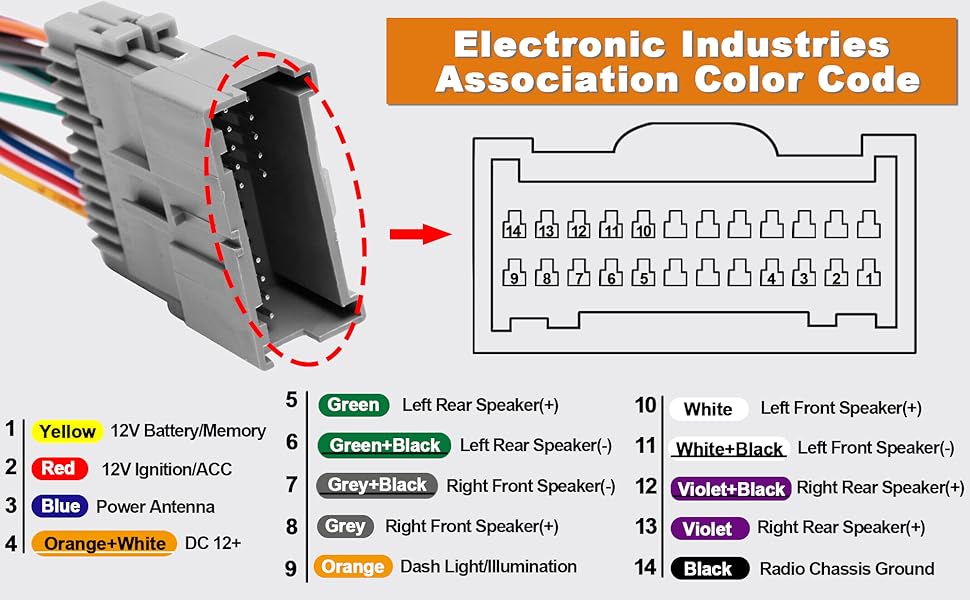
- Colors: Each wire has a specific color code that corresponds to its function. Common colors include:
- Red: Typically +12V Constant Power (for memory retention).
- Yellow: +12V Switched Power (ignition controlled).
- Black: Ground.
- White: Front Left Speaker Positive (+).
- White/Black Stripe: Front Left Speaker Negative (-).
- Gray: Front Right Speaker Positive (+).
- Gray/Black Stripe: Front Right Speaker Negative (-).
- Green: Rear Left Speaker Positive (+).
- Green/Black Stripe: Rear Left Speaker Negative (-).
- Purple: Rear Right Speaker Positive (+).
- Purple/Black Stripe: Rear Right Speaker Negative (-).
- Blue: Remote Turn-On Lead (for amplifiers).
- Orange: Illumination Wire (dims the radio display when headlights are on).
- Connectors: Represented by various shapes (squares, circles, etc.) with lines indicating the wires that connect to them.
- Ground Symbol: Usually represented by three horizontal lines, often resembling an upside-down Christmas tree.
- Fuse Symbol: A squiggly line inside a rectangle. This indicates a fuse location.
- Splice Symbol: Where two or more wires are joined together. Often represented by a dot where the lines intersect.
Remember that color codes can sometimes vary slightly between manufacturers, so always double-check the wiring diagram provided with your head unit and wiring harness adapter. Using a multimeter to confirm wire functionality is always a good idea.
How It Works: The Signal Path
The adapter acts as a bridge, taking the signals from your Silverado's factory wiring and translating them into a format that your aftermarket radio understands. Here's a simplified breakdown:
- Power: The adapter connects to the +12V constant (Red) and +12V switched (Yellow) wires in the factory harness. The constant power wire keeps the radio's memory (presets, settings) alive even when the ignition is off. The switched power wire turns the radio on and off with the ignition.
- Ground: The adapter connects to the ground wire (Black) in the factory harness, providing a return path for the electrical current.
- Speakers: The adapter connects to the speaker wires (White, Gray, Green, Purple, with corresponding black stripe wires) in the factory harness. These wires carry the amplified audio signal from the radio to the speakers.
- Remote Turn-On: The adapter *may* include a remote turn-on wire (Blue). This wire sends a +12V signal to external amplifiers when the radio is turned on, telling them to power up.
- Illumination: The adapter *may* include an illumination wire (Orange). This wire receives a signal from the headlight switch and dims the radio's display when the headlights are turned on, preventing it from being too bright at night.
Real-World Use: Basic Troubleshooting Tips
Even with a wiring harness adapter, things can sometimes go wrong. Here are some common problems and how to troubleshoot them:
- No Power to Radio:
- Check the Fuses: Use a test light or multimeter to check the radio fuse in your Silverado's fuse box. Also, check the fuse on the back of the aftermarket radio.
- Verify Connections: Ensure all connections are secure, especially the power and ground wires.
- Test Voltage: Use a multimeter to test for +12V on the red and yellow wires in the adapter when the ignition is on.
- No Sound from Speakers:
- Check Speaker Connections: Ensure the speaker wires are properly connected to both the radio and the speakers.
- Verify Speaker Wiring: Double-check the wiring diagram to ensure the speaker wires are connected to the correct terminals. Pay attention to polarity (+ and -).
- Test Speakers: Test each speaker individually to rule out a blown speaker.
- Radio Loses Memory:
- Check Constant Power: Ensure the red wire is properly connected and receiving constant +12V, even when the ignition is off.
- Humming or Static:
- Grounding Issues: Ensure the ground wire is properly connected to a clean, metal surface on the vehicle chassis. A poor ground can introduce noise into the audio system.
- Wiring Interference: Keep speaker wires away from power wires to minimize interference.
Safety: Handle with Care
Working with automotive electrical systems can be dangerous if you're not careful. Here are some safety precautions:
- Disconnect the Battery: Before starting any electrical work, disconnect the negative terminal of your Silverado's battery to prevent short circuits and potential electrical shocks.
- Work in a Well-Lit Area: Good visibility is essential for identifying wires and making secure connections.
- Use Proper Tools: Use appropriate wire strippers, crimpers, and connectors to ensure reliable and safe connections.
- Avoid Working with Live Wires: Never cut or splice wires while the battery is connected.
- Airbags: Be aware of airbag locations. Incorrect wiring near airbag systems could cause them to malfunction. If in doubt, consult a professional.
Specifically, be mindful of the constant power wire (typically red). This wire always has voltage, even with the ignition off. Accidental contact with the vehicle chassis can cause a short circuit and potentially damage your truck's electrical system or even cause a fire. Always disconnect the battery to minimize risk.
We have a detailed wiring diagram available for download. This diagram provides a visual guide to the wiring harness adapter, helping you identify each wire and its function. It includes color codes, connector pinouts, and other useful information to aid in your installation or troubleshooting efforts. With this diagram, you'll be well-equipped to tackle your Silverado's audio system with confidence.