2004 Chevy Trailblazer Stereo Wiring Harness
So, you're diving into the audio system of your 2004 Chevy Trailblazer, huh? Whether you're replacing a busted head unit, adding an amplifier, or just trying to diagnose why your favorite tunes are MIA, understanding the stereo wiring harness is absolutely crucial. This article is your deep dive into that harness, breaking down its purpose, components, and how to make sense of those colorful wires. We'll keep it technical, but also practical, so you can confidently tackle your project.
Why Bother with the Wiring Diagram?
Let's face it, poking around blindly inside your dashboard is a recipe for disaster. The wiring harness diagram acts as your roadmap. It allows you to:
- Replace the Factory Radio: Aftermarket radios don't just plug in. You need to adapt the factory harness to your new unit.
- Add Amplifiers and Subwoofers: Integrating external amps requires tapping into specific wires for signal and power.
- Troubleshoot Audio Problems: Is a speaker dead? Is there no power to the radio? The diagram helps you trace the problem back to its source.
- Learn How It All Connects: Even if you're not actively modifying things, understanding the audio system's architecture can be beneficial.
Key Specs and Main Parts of the 2004 Trailblazer Stereo Harness
The 2004 Chevy Trailblazer, like many vehicles of that era, uses a fairly standardized wiring harness, although some variations might exist based on trim level and options (like Bose audio). Here's a breakdown of the core components and what you'll typically find:
The Main Harness Connector
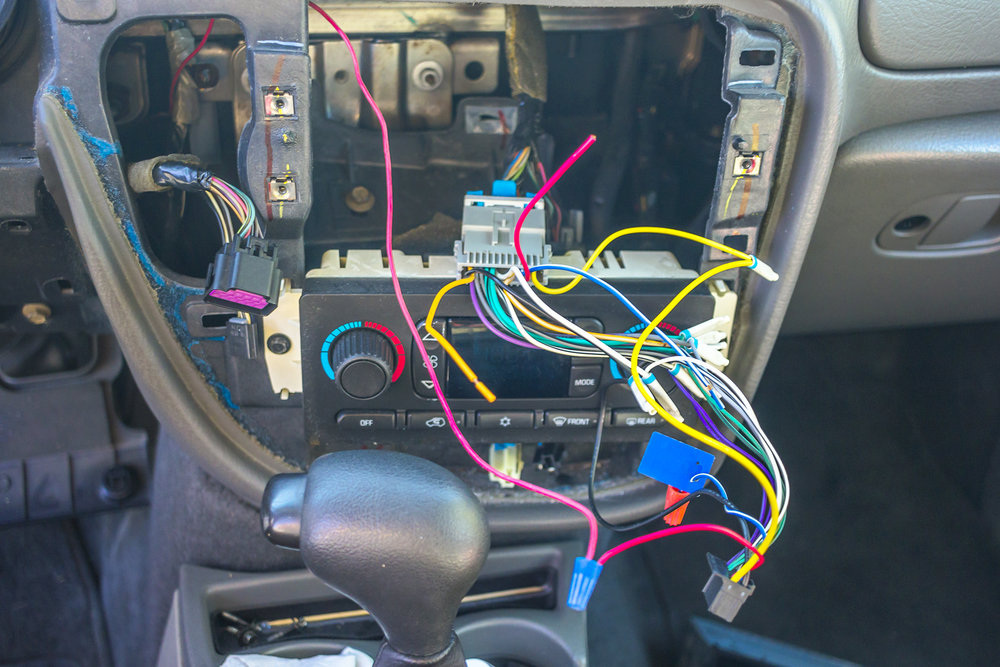
This is the big daddy – the rectangular connector that plugs directly into the back of the factory head unit. It houses most of the power, ground, speaker, and communication wires. Expect to see a 24-pin connector in most standard Trailblazers.
Power Wires
- Battery (B+): Provides constant 12V power to retain radio memory (clock settings, presets, etc.). Typically a thick, yellow wire.
- Accessory (ACC): Provides 12V power only when the ignition is in the "ACC" or "ON" position. Usually a red wire.
- Ground: Completes the electrical circuit. Usually a thick, black wire.
Speaker Wires
Each speaker has two wires: a positive (+) and a negative (-). These are typically color-coded pairs (e.g., white/gray for front left, green/purple for rear right). It's crucial to connect these correctly to maintain proper speaker phasing. Incorrect phasing can result in poor bass response and muddy sound.
Control and Illumination Wires
- Illumination: Dims the radio display when the headlights are turned on. Usually an orange or brown wire.
- Remote Turn-On (Amplifier): Sends a 12V signal to turn on an external amplifier when the radio is powered on. Usually a blue wire with a white stripe. This is often labeled as "Amp Remote" or "Antenna Trigger."
- Data Bus Wires: Some Trailblazers use a data bus (like GM's GMLAN) for communication between the radio and other vehicle systems (e.g., steering wheel controls, OnStar). These are typically a twisted pair of wires (e.g., dark blue and light blue). Messing with these wires without proper knowledge can cause serious issues.
Bose Audio Considerations
If your Trailblazer has the Bose audio system, things get a bit more complex. Bose systems typically use a separate amplifier and often use lower-level signals (RCA-type) from the head unit to the amp. The wiring harness will be different, and you'll need a specific adapter to integrate with an aftermarket radio. Identifying the Bose system before you start is critical.
Decoding the Wiring Diagram: Symbols and Colors
A good wiring diagram is more than just a picture; it's a visual language. Here's how to decipher it:
Lines
- Solid Lines: Represent wires.
- Dashed Lines: Might represent shielding or internal connections within a component.
- Thick Lines: Often indicate higher-current wires (like the battery and ground wires).
Colors
Color-coding is essential. The diagram will list the wire color next to the wire on the schematic. Common colors include:
- BLK: Black (Ground)
- RED: Red (Accessory Power)
- YEL: Yellow (Battery Power)
- WHT: White (Speaker Wires)
- GRN: Green (Speaker Wires)
- BLU: Blue (Remote Turn-On, Data Bus)
- ORG: Orange (Illumination)
Icons
Diagrams use icons to represent components. Here are a few common ones:
- Circles: May represent connection points or splices.
- Rectangles: Often represent components like the radio, amplifier, or speakers.
- Ground Symbol: A downward-pointing triangle or a series of horizontal lines getting smaller.
The key is to cross-reference the diagram's legend with the actual wires in your harness. Pay attention to any notes on the diagram that specify differences based on trim level or options.
How It Works: A Simplified Circuit
Let's trace a basic audio circuit. When you turn the ignition to "ACC" or "ON," the ACC wire gets power. This power activates the radio. The radio then sends low-level audio signals to the speaker wires. These signals cause the speakers to vibrate, producing sound. The ground wire completes the circuit, allowing the electricity to flow back to the vehicle's electrical system. The Battery (B+) wire ensures the radio retains its memory even when the ignition is off.
Real-World Use: Basic Troubleshooting Tips
Okay, time to get practical. Here are a few common problems and how the wiring diagram can help you solve them:
- No Power to the Radio: Use a multimeter to check for 12V on both the battery and accessory wires with the ignition ON. If there's no voltage, check the corresponding fuses. The diagram will show you which fuses to check.
- One Speaker is Dead: Use the diagram to identify the speaker wires for that speaker. Check the speaker connections. If the connections are good, use a multimeter to check for voltage across the speaker wires when the radio is playing. If there's no voltage, the problem might be in the radio itself or the wiring.
- Distorted Sound: Check the speaker wiring for shorts or loose connections. Also, ensure the speaker polarity is correct (positive to positive, negative to negative).
Safety First: Respecting the Electrical System
Working with automotive electrical systems can be dangerous. Always disconnect the negative terminal of the battery before working on any wiring. This prevents accidental shorts and potential damage to your vehicle's electrical components. Also, be careful when cutting or splicing wires. Use proper crimping tools and heat-shrink tubing to create secure and insulated connections. Never just twist wires together and hope for the best. It will lead to corrosion and electrical problems down the road.
Also, remember, some of the components can be extra risky. Airbags and other supplemental restraint systems (SRS) have their own electrical harnesses. Do not mess with them.
Getting the Diagram
Finding the correct wiring diagram for your specific 2004 Chevy Trailblazer is essential. There are several resources available, including online databases, repair manuals (like Chilton's or Haynes), and even your local library. We have the diagram for the standard 2004 Chevy Trailblazer stereo wiring harness available for you to download. This diagram will be your constant companion as you are working. It is an essential element for any automotive project. Feel free to use it to your advantage and don't forget the safety measures.