2004 Dodge Ram 2500 Serpentine Belt Diagram
Welcome, fellow gearheads! Today, we’re diving deep into the serpentine belt system of the 2004 Dodge Ram 2500. Whether you're tackling a squealing belt, preparing for preventive maintenance, or just trying to understand how your truck's accessories are driven, a solid understanding of the serpentine belt diagram is crucial. Consider this your go-to guide for deciphering the belt's path, identifying components, and keeping your Ram running smoothly. And the best part? We've got the diagram ready for you to download. Let's get started!
Why This Diagram Matters
The serpentine belt diagram is your roadmap to understanding the intricate dance of the belt as it snakes its way around various engine components. This diagram isn't just a pretty picture; it's an essential tool for several scenarios:
- Repairs: A failing belt can leave you stranded. The diagram helps you identify the correct routing for a new belt installation.
- Preventive Maintenance: Knowing the components driven by the belt allows you to inspect pulleys and bearings for wear and tear, preventing future breakdowns.
- Troubleshooting: Strange noises like squealing or chirping can often be traced back to the belt or a failing component in the system. The diagram helps you pinpoint the source.
- Education: Understanding how the serpentine belt system functions is a key element to being a capable mechanic or informed car owner.
Key Specs and Main Parts (2004 Dodge Ram 2500)
The 2004 Dodge Ram 2500 came with several engine options, and the serpentine belt routing can vary slightly depending on the engine. We'll focus on the most common engines and their associated components:
- 5.7L Hemi V8: This engine is widely popular and features a robust serpentine belt system.
- 5.9L Cummins Turbo Diesel I6: A workhorse engine known for its durability. The belt system is slightly different than the Hemi.
Regardless of the engine, the key components driven by the serpentine belt include:
- Crankshaft Pulley (Harmonic Balancer): The central driving force. The torque from the crankshaft rotates this pulley, which in turn drives the belt.
- Alternator: Generates electrical power to charge the battery and run electrical accessories.
- Power Steering Pump: Provides hydraulic pressure to assist steering.
- Air Conditioning Compressor: Compresses refrigerant to cool the cabin.
- Water Pump: Circulates coolant through the engine to prevent overheating.
- Idler Pulley(s): Smooth, non-driven pulleys that guide the belt and maintain proper tension.
- Tensioner Pulley: A spring-loaded pulley that automatically maintains the correct belt tension, compensating for belt stretch and wear. This is a critical component for belt longevity and proper function.
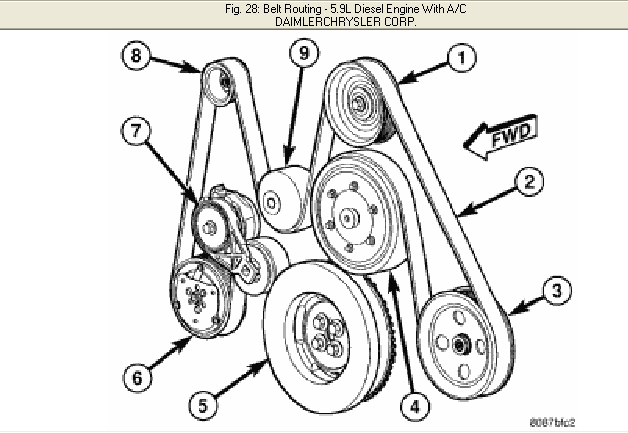
Decoding the Serpentine Belt Diagram: Symbols and Conventions
Serpentine belt diagrams are designed to be clear and concise, but understanding the symbols is crucial:
- Solid Lines: Represent the path of the belt. Pay close attention to the direction of the arrows, which indicate the belt's rotation.
- Pulleys: Represented by circles. Most diagrams will label the pulley to show which component it is associated with (ALT for alternator, P/S for power steering, etc.).
- Arrows: Indicate the direction of belt travel around each pulley. Make sure you match the arrow direction when you install the new serpentine belt.
- Smooth vs. Grooved Pulleys: The side of the belt that contacts each pulley must match the pulley's surface. The grooved side of the belt must ride on the grooved pulleys, while the smooth side of the belt must ride on the smooth pulleys.
- Tensioner Location: The diagram clearly shows the location of the tensioner. This is crucial for releasing tension during belt replacement.
Colors are generally not used consistently in these diagrams, so don't rely on them for specific information. Focus on the line's path and the pulley labels.
How It Works: The Symphony of Power Transfer
The serpentine belt system is a marvel of efficiency. The crankshaft pulley, driven by the engine's rotation, initiates the power transfer. The belt then wraps around the other pulleys, transferring rotational force to the alternator, power steering pump, A/C compressor, and water pump. The tensioner pulley ensures the belt maintains adequate tension, preventing slippage and ensuring all components receive the necessary power.
Think of it as a series of interconnected gears, but instead of gears meshing directly, they are connected by a flexible belt. Proper belt tension is paramount for optimal performance. Too loose, and the belt will slip, causing accessories to malfunction. Too tight, and it can damage bearings and shorten belt life.
Real-World Use: Troubleshooting Tips
Here are a few common issues and how the diagram can help you diagnose them:
- Squealing Noise: Often indicates a worn or glazed belt, a loose tensioner, or a misaligned pulley. Check the belt's condition first. If the belt appears okay, inspect the tensioner for proper function. The diagram will show you the location of these components.
- Chirping Noise: Can be caused by a misaligned pulley or a failing bearing in one of the driven components. Use a stethoscope (or a long screwdriver held to your ear) to listen to each pulley. The diagram will help you identify each pulley quickly.
- Accessory Malfunction: If the alternator isn't charging or the power steering isn't working, the belt might be broken or slipping. Use the diagram to confirm the belt's path and ensure it is correctly routed around the affected component.
Quick Visual Check: Before diving into detailed troubleshooting, perform a visual inspection. Look for cracks, fraying, missing chunks, or signs of glazing on the belt. Check the tensioner's alignment and movement.
Safety First: Respect the Rotating Components
This is crucial: Working around a running engine poses significant risks. NEVER work on the serpentine belt system while the engine is running unless absolutely necessary for diagnostic purposes. If you must run the engine, keep your hands, clothing, and tools clear of all rotating parts. The force of the rotating belt and pulleys can cause serious injury.
Here are some additional safety precautions:
- Disconnect the Negative Battery Terminal: This prevents accidental starting of the engine while you're working.
- Wear Eye Protection: Flying debris can cause serious eye injury.
- Use Proper Tools: A serpentine belt tool is essential for safely releasing tension on the belt during removal and installation. Don't try to pry the belt off with a screwdriver.
- Allow the Engine to Cool: Working on a hot engine can cause burns.
The tensioner pulley stores a significant amount of spring force. Releasing it incorrectly can cause the tensioner arm to snap back violently. Always use the correct tool and follow the manufacturer's instructions when releasing the tensioner.
Get Your Hands on the Diagram!
Now that you're armed with the knowledge, you'll need the diagram itself. We have the 2004 Dodge Ram 2500 serpentine belt diagram ready for you to download. This will make identifying the belt's layout much easier when doing the troubleshooting or repairs we have outlined above. Go get your hands on the diagram!