
2004 Ford F150 Exhaust System Diagram
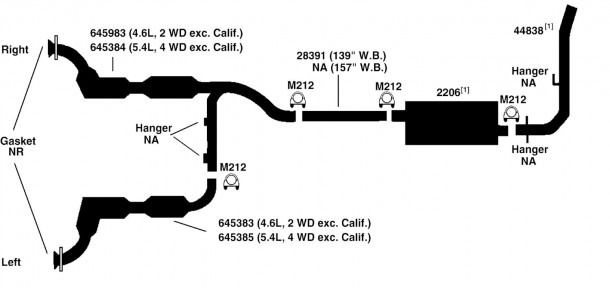
So, you're looking to get under the skin of your 2004 Ford F150's exhaust system? Smart move. Understanding this system is crucial for everything from diagnosing annoying rattles to planning performance upgrades. This article will be your deep dive into the 2004 F150 exhaust system diagram, giving you the knowledge you need to tackle repairs, modifications, and general maintenance with confidence.
Why Bother with the Exhaust Diagram?
Let's face it, exhaust systems aren't the most glamorous part of your truck. But they are essential. A healthy exhaust system ensures optimal engine performance, reduces harmful emissions, and keeps your F150 running efficiently. A diagram is your roadmap for several reasons:
- Diagnosis: Pinpointing the source of exhaust leaks, catalytic converter problems, or muffler issues becomes much easier when you can visualize the entire system.
- Repairs: Knowing the location of each component and how it connects allows for precise repairs and replacements. No more guessing which bolt goes where!
- Modifications: Thinking about upgrading to a cat-back system or installing headers? The diagram is indispensable for planning your modifications and ensuring compatibility.
- Learning: Understanding the flow of exhaust gases and the function of each component is simply good knowledge for any serious DIYer.
Key Specs and Main Parts of the 2004 F150 Exhaust System
The 2004 F150, depending on the engine (4.6L V8, 5.4L V8, or the rare 4.2L V6), has a slightly different exhaust configuration. However, the core components remain the same. Here's a breakdown:
- Exhaust Manifolds/Headers: These collect exhaust gases from the engine cylinders. Headers, often aftermarket upgrades, are designed for improved flow compared to stock manifolds. The term 'headers' and 'exhaust manifolds' are sometimes used interchangeably, but technically, headers are individually routed tubes for each exhaust port and are usually made of higher quality materials.
- Oxygen Sensors (O2 Sensors): These sensors monitor the oxygen content in the exhaust stream before and after the catalytic converters. They provide crucial feedback to the engine control unit (ECU) for optimal fuel-air mixture and emissions control. Pre-cat sensors are often referred to as upstream sensors, and post-cat sensors are referred to as downstream sensors.
- Catalytic Converters: These devices use catalysts (platinum, palladium, and rhodium) to reduce harmful emissions like hydrocarbons (HC), carbon monoxide (CO), and nitrogen oxides (NOx) into less harmful substances. Failing catalytic converters are a common issue on older vehicles, and a clogged converter can severely impact performance.
- Muffler: The muffler reduces exhaust noise by using chambers and baffles to dampen sound waves. There are many types of mufflers available, each offering different levels of sound reduction and performance.
- Tailpipe: This is the final section of the exhaust system that directs exhaust gases away from the vehicle.
- Pipes: These connect all the various components together. Made of steel, or sometimes stainless steel for better corrosion resistance, and use flanges and clamps to attach them together.
- Hangers and Mounts: Rubber or metal hangers support the exhaust system and prevent it from vibrating against the vehicle's chassis. Broken or worn hangers can cause annoying rattles and even damage to the exhaust system.
Key Specs: You'll want to know the pipe diameter (usually 2.5" to 3" for a stock system), the number and type of catalytic converters, and the overall length of the system. These specs are important for ordering replacement parts or planning modifications. Consult your vehicle's repair manual or a reliable parts catalog for the exact specs of your specific F150 configuration.
Understanding the Diagram's Symbols
A good exhaust system diagram isn't just a pretty picture; it's a technical drawing using standardized symbols. Here's what to look for:
- Lines: Solid lines typically represent exhaust pipes. Thicker lines might indicate larger diameter pipes. Dotted lines could represent vacuum lines related to emissions control, if any.
- Arrows: These indicate the direction of exhaust flow. Follow the arrows to understand the gas path from the engine to the tailpipe.
- Boxes/Rectangles: These usually represent components like catalytic converters or mufflers. Sometimes, they will have labels inside indicating the component type.
- Circles: Often used to represent sensors, like O2 sensors. The diagram will usually label the sensor location (e.g., "Pre-Cat O2 Sensor," "Post-Cat O2 Sensor").
- Hatching/Shading: Sometimes used to indicate heat shields or areas prone to high temperatures.
- Fasteners: Bolts, flanges, and clamps are usually represented with small symbols that mimic their appearance.
Pay close attention to the legend or key on the diagram. This will explain the specific symbols used in that particular drawing.
How the Exhaust System Works
The exhaust system's primary function is to safely remove exhaust gases from the engine cylinders and release them into the atmosphere while minimizing emissions and noise. Here's a simplified breakdown of the process:
- Exhaust Gases Exit the Engine: After combustion, exhaust gases are forced out of the cylinders through the exhaust valves.
- Collection and Routing: The exhaust manifolds (or headers) collect these gases from all cylinders and route them into a single pipe.
- Oxygen Sensing: Upstream O2 sensors measure the oxygen content in the exhaust stream before it enters the catalytic converters. This data is sent to the ECU, which adjusts the fuel-air mixture to optimize combustion.
- Emissions Reduction: The exhaust gases then flow through the catalytic converters, where harmful pollutants are converted into less harmful substances.
- Secondary Oxygen Sensing: Downstream O2 sensors measure the oxygen content after the catalytic converters. This data is used to monitor the efficiency of the converters.
- Noise Reduction: The muffler reduces exhaust noise.
- Exhaust Release: Finally, the exhaust gases are released into the atmosphere through the tailpipe.
The entire process is a carefully orchestrated dance of combustion, chemical reactions, and noise suppression.
Real-World Use: Troubleshooting Tips
Armed with your diagram, you can start diagnosing common exhaust system problems:
- Exhaust Leaks: Listen for hissing or chugging sounds, especially near the exhaust manifolds, pipe connections, or muffler. Visually inspect the system for signs of rust, cracks, or holes. Carbon buildup around joints can also indicate a leak.
- Catalytic Converter Problems: Common symptoms include a P0420 code ("Catalyst System Efficiency Below Threshold"), reduced engine performance, and a rotten egg smell. A clogged converter can restrict exhaust flow, leading to poor acceleration and overheating.
- Muffler Issues: A rattling or excessively loud exhaust could indicate a damaged or rusted-out muffler.
- O2 Sensor Problems: Faulty O2 sensors can trigger check engine lights and cause poor fuel economy and rough running. Use an OBD-II scanner to read the sensor values and diagnose the issue.
- Rattling: Check the exhaust hangers. They might be broken, rusted or worn. Replace these to eliminate unwanted vibrations.
Using the Diagram: Start by locating the area where you suspect the problem is occurring. Then, use the diagram to identify the specific components in that area and how they are connected. This will help you narrow down the source of the problem and develop a plan for repair.
Safety First!
Working on exhaust systems can be dangerous. Here are some crucial safety precautions:
- Work on a Cold Exhaust: Never work on an exhaust system while it's hot. Allow the system to cool down completely before touching it. Exhaust systems can reach extremely high temperatures, causing severe burns.
- Use Jack Stands: If you need to lift your F150, always use jack stands to support the vehicle. Never rely solely on a jack.
- Wear Safety Glasses: Protect your eyes from flying debris, rust, and dirt.
- Wear Gloves: Protect your hands from cuts, scrapes, and exposure to potentially harmful chemicals.
- Work in a Well-Ventilated Area: Exhaust fumes contain carbon monoxide, a deadly gas.
- Be Aware of the Catalytic Converter: The catalytic converter gets extremely hot and can remain hot for a long time after the engine is shut off.
The catalytic converter can stay extremely hot for long periods of time. Be careful not to touch it.
Conclusion
Understanding the 2004 Ford F150 exhaust system and having access to a detailed diagram can significantly improve your ability to maintain, repair, and modify your truck. Remember to prioritize safety and consult your vehicle's repair manual for specific instructions and torque specifications. Don't be afraid to tackle these projects yourself – with the right knowledge and tools, you can save money and gain a deeper understanding of your F150. The exhaust system might not be the most glamorous part of your ride, but it is absolutely necessary and very rewarding to maintain.
We have a PDF of the 2004 Ford F150 exhaust system diagram available for download. It includes detailed schematics and component locations. Contact us through the methods listed on this webpage.