2004 Ford F150 Transmission Cooling Line Diagram
Alright, let's dive into the transmission cooling line diagram for your 2004 Ford F-150. Whether you're tackling a leaky line, upgrading your cooling system, or just trying to understand how it all works, this guide will break it down for you.
Purpose of the Transmission Cooling Line Diagram
Why bother with a diagram? Simply put, it's your roadmap to understanding and working on your transmission cooling system. These diagrams are invaluable for:
- Diagnosis: Pinpointing leaks, blockages, or damaged components.
- Repair: Ensuring you replace lines correctly and connect them to the right points.
- Upgrades: Planning and executing modifications like adding an aftermarket cooler.
- Learning: Gaining a deeper understanding of your vehicle's powertrain.
Without a diagram, you're essentially working blind, increasing the risk of incorrect connections, leading to potential transmission damage. Think of it as trying to assemble IKEA furniture without the instructions—possible, but highly frustrating and likely to end in disaster!
Key Specs and Main Parts of the 2004 F-150 Transmission Cooling System
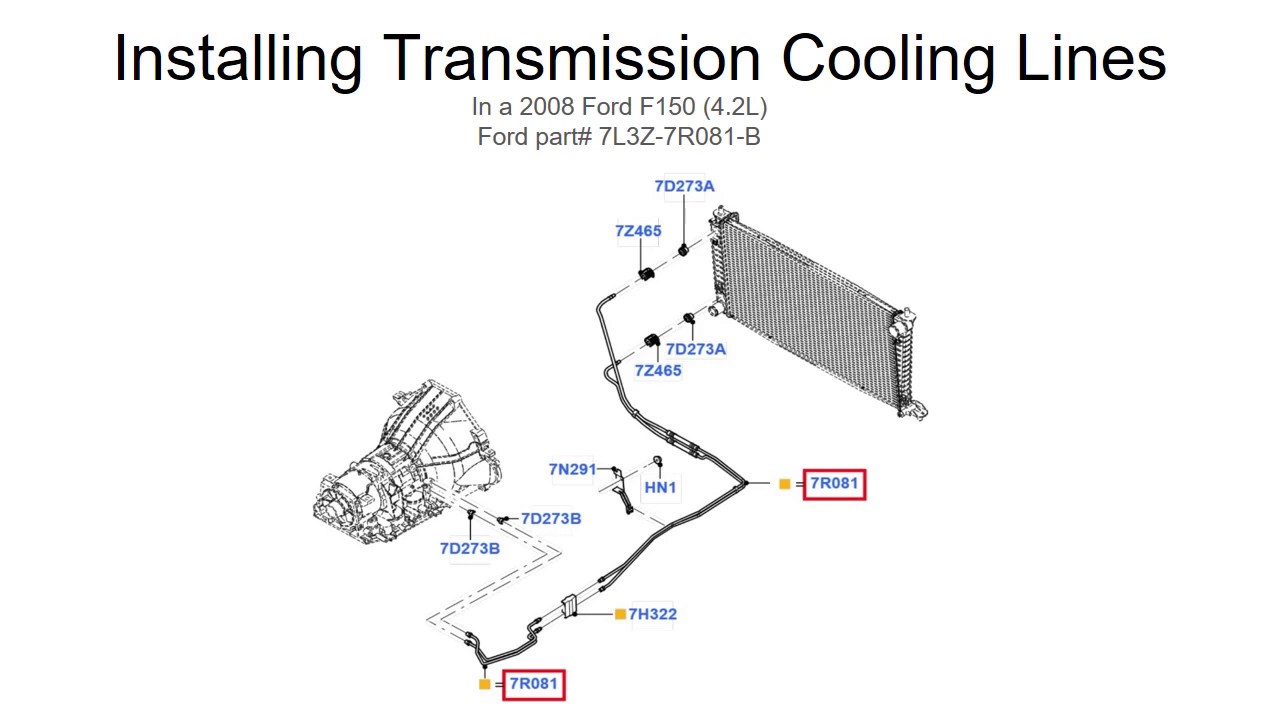
The 2004 F-150, depending on the engine and transmission (most commonly the 4R70W or 4R75E 4-speed automatic), uses a relatively straightforward transmission cooling system. Here's a breakdown of the key components:
- Transmission Fittings: These are the threaded ports on the transmission case where the cooling lines connect. They are crucial for a leak-free seal. Pay attention to the thread size and type (likely SAE or NPT).
- Cooling Lines: Typically made of steel or a combination of steel and rubber hose. They carry transmission fluid between the transmission and the cooler. These lines are often pre-bent to follow specific routing, so using the correct replacement is vital.
- Transmission Cooler: Located either within the radiator (integrated cooler) or as a separate unit mounted in front of the radiator (auxiliary cooler, often for towing packages). This is where the hot transmission fluid is cooled by airflow. The efficiency of the cooler is critical for transmission longevity, especially under heavy loads.
- Hoses and Clamps: Rubber hoses connect the steel lines to the cooler. High-quality hose clamps are essential to prevent leaks, especially under pressure. Avoid using generic worm-gear clamps, especially on high-pressure connections. Fuel-injection style clamps offer a more even clamping force.
- Check Valve (Optional): Some models may include a check valve in the cooling line to prevent fluid drain-back when the engine is off. This helps maintain pressure and ensures quicker lubrication upon startup.
Understanding these components is the first step. Next, we need to decipher the diagram itself.
Decoding the Diagram: Symbols, Lines, and Colors
Transmission cooling line diagrams, like most automotive schematics, use a standardized set of symbols. Here's what you'll typically encounter:
- Lines: Solid lines usually represent fluid lines, while dashed lines often indicate vacuum lines or electrical wiring. The thickness of the line might indicate the size or pressure rating of the line.
- Arrows: Arrows show the direction of fluid flow. In the transmission cooling system, you'll see arrows indicating the flow from the transmission to the cooler, and then back to the transmission.
- Component Symbols: The diagram uses simplified shapes to represent components. For example, a rectangle might represent the transmission cooler, while a circle could indicate a fitting. The diagram key will provide a legend for all symbols.
- Colors: Color-coding is rare in older diagrams, but if present, it may indicate the type of fluid or the pressure level within the line. The legend will explain any color conventions.
Let's break down a hypothetical example. Imagine a solid line with an arrow pointing from a symbol labeled "Transmission" to a symbol labeled "Cooler," then another solid line with an arrow pointing back from the "Cooler" to the "Transmission." This tells you that fluid flows from the transmission to the cooler, and then back to the transmission in a closed loop. Understanding the flow direction is key for proper diagnosis and repair.
How the 2004 F-150 Transmission Cooling System Works
The automatic transmission generates a significant amount of heat due to friction between the internal components. This heat can quickly damage the transmission if not properly dissipated. The cooling system is designed to remove this heat and maintain the transmission fluid within a safe operating temperature range.
Here's the process:
- Hot transmission fluid is pumped out of the transmission case under pressure.
- The fluid travels through the cooling lines to the transmission cooler (either integrated in the radiator or a separate unit).
- In the cooler, the hot fluid transfers heat to the surrounding air or coolant.
- The cooled fluid then flows back to the transmission, lubricating and cooling the internal components.
The thermostat within the transmission helps regulate the flow of fluid to the cooler, ensuring that the transmission reaches operating temperature quickly and maintains it consistently. The efficiency of this cooling loop directly impacts the lifespan of your transmission. Overheating is a major killer of automatic transmissions.
Real-World Use: Basic Troubleshooting Tips
Armed with the diagram and understanding of the system, you can start troubleshooting common problems:
- Leaks: Visually inspect the cooling lines, fittings, and hoses for signs of leaks. Use the diagram to identify the correct routing of the lines and ensure they are properly connected. Check for corrosion around fittings as this can lead to leaks.
- Overheating: If your transmission is overheating, check the cooler for obstructions (leaves, debris, etc.). Also, inspect the cooling lines for kinks or damage that could restrict fluid flow. A failing thermostat could also contribute to overheating.
- Fluid Loss: Low transmission fluid levels can also cause overheating and shifting problems. Check the fluid level regularly and top it off as needed. If you're constantly adding fluid, you have a leak that needs to be addressed.
- Contamination: If you suspect contamination of the transmission fluid, flush the system and replace the filter. Contaminated fluid can damage the internal components of the transmission.
Always use the correct type of transmission fluid specified in your owner's manual. Using the wrong fluid can cause serious damage.
Safety Precautions
Working on the transmission cooling system involves some inherent risks:
- Hot Fluid: Transmission fluid can be extremely hot, especially after driving. Allow the engine and transmission to cool completely before working on the system.
- High Pressure: The cooling lines can be under pressure, even when the engine is off. Relieve the pressure by carefully loosening a fitting before disconnecting any lines. Wear safety glasses to protect your eyes from spraying fluid.
- Flammability: Transmission fluid is flammable. Keep open flames and sparks away from the work area.
- Jack Stands: Never work under a vehicle supported only by a jack. Always use jack stands to provide a safe and stable platform.
Be especially careful when working near the exhaust system, as it can remain hot for a considerable time after the engine is shut off. Always wear appropriate safety gear, including gloves and eye protection.
This guide provides a solid foundation for understanding your 2004 F-150's transmission cooling system. By using the diagram in conjunction with these troubleshooting tips, you'll be well-equipped to tackle most common issues and keep your transmission running smoothly for years to come.
We have access to the full, detailed transmission cooling line diagram for your 2004 Ford F-150. Contact us for details on how to download it.