2004 Honda Accord Interior Fuse Box Diagram
The 2004 Honda Accord's interior fuse box is a critical component for maintaining the electrical integrity of your vehicle. Understanding its layout and function can save you time and money on repairs, assist in modification projects, and give you a deeper understanding of your car's inner workings. This article will provide a detailed breakdown of the 2004 Accord's interior fuse box diagram, empowering you to troubleshoot electrical issues effectively.
Purpose of Understanding the Fuse Box Diagram
Why bother learning about the fuse box? Several compelling reasons exist:
- Troubleshooting Electrical Problems: When a component like the radio, power windows, or interior lights stops working, a blown fuse is often the culprit. The diagram helps you quickly identify the correct fuse to check.
- Performing Modifications: Adding aftermarket accessories, such as a new sound system or auxiliary lights, requires tapping into the car's electrical system. Knowing the function of each fuse is crucial to avoid overloading circuits and causing damage.
- Preventive Maintenance: Occasionally inspecting the fuses can reveal potential problems before they lead to component failure. For example, a repeatedly blowing fuse indicates a potential short circuit that needs investigation.
- General Knowledge: Understanding the fuse box diagram helps you grasp how the car's electrical system is structured and protected. This knowledge can be invaluable in various repair and maintenance scenarios.
Key Specs and Main Parts
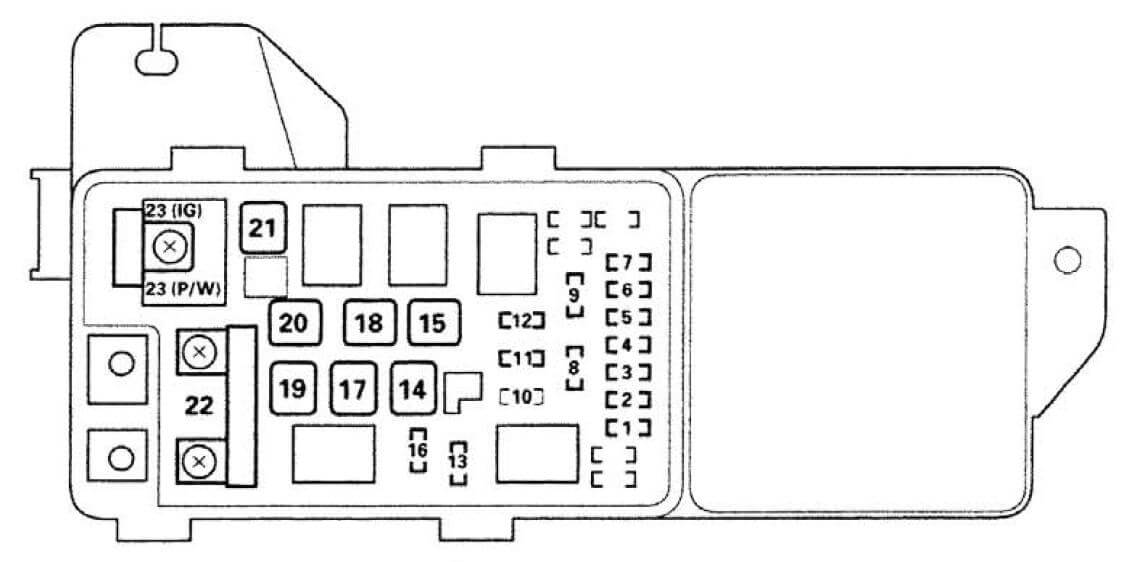
The 2004 Honda Accord's interior fuse box is typically located beneath the dashboard on the driver's side, often behind a small access panel. It houses various fuses and relays. Here's a breakdown of the key specs and parts:
- Fuse Box Location: Driver's side under the dashboard. Consult your owner's manual for precise location as variations may exist based on trim level (e.g., LX, EX).
- Fuse Types: Primarily blade-type fuses (also known as spade fuses). These are small, color-coded fuses with two prongs that insert into the fuse block. They're rated in Amperes (A), indicating the maximum current they can handle.
- Fuse Ratings: Ranging from 5A to 30A or higher, depending on the circuit they protect. The diagram and the fuse box itself will indicate the amperage rating for each fuse position.
- Fuses: The sacrificial components designed to blow and protect the circuit when an overcurrent occurs.
- Relays: Electrically operated switches that control higher-current circuits, like those for the headlights or fuel pump. Relays are often located alongside the fuses but aren’t always explicitly marked on the diagram. They act as intermediaries, using a small current to control a larger current.
- Fuse Puller: A small plastic tool (often found inside the fuse box) used to remove fuses without damaging them.
Understanding the Symbols and Diagram
The fuse box diagram isn't just a random assortment of numbers. It uses standardized symbols and conventions to convey information clearly. Here's a breakdown:
- Lines: Lines on the diagram represent the electrical circuits. A solid line indicates a direct connection.
- Numbers: Numbers on the diagram correspond to specific fuse locations within the fuse box. These numbers are typically labeled on the fuse box itself, making it easy to identify the correct fuse.
- Abbreviations: Common abbreviations include:
- ACC: Accessory
- IGN: Ignition
- DRL: Daytime Running Lights
- ECM: Engine Control Module
- PCM: Powertrain Control Module
- Color Coding: While the diagram itself might not be in color, the fuses are color-coded according to their amperage rating. This helps quickly identify the correct fuse. Standard color codes include:
- Yellow: 20A
- Blue: 15A
- Red: 10A
- Brown: 7.5A
- Orange: 5A
- Icons: The diagram might use icons to represent the components protected by each fuse. Common icons include:
- A lightbulb for lighting circuits
- A radio for the audio system
- A window for power windows
Important Note: Always refer to the specific diagram for your 2004 Honda Accord. While general layouts are similar, minor variations can exist between trim levels and model years. Using the wrong diagram can lead to misdiagnosis and potentially damage the electrical system. We have the 2004 Honda Accord interior fuse box diagram available for download. You can find the link at the end of this article.
How It Works: Protecting the Electrical System
The fuse box is the central protection point for your car's electrical system. Here's how it works:
- Circuit Protection: Each electrical circuit in the car is protected by a fuse of a specific amperage rating.
- Overcurrent Detection: If the current flowing through a circuit exceeds the fuse's rating (due to a short circuit, overload, or component failure), the fuse's internal element melts (blows).
- Circuit Interruption: When the fuse blows, it breaks the circuit, preventing excessive current from flowing and potentially damaging the wiring, components, or even causing a fire.
- Replacement: A blown fuse must be replaced with a fuse of the same amperage rating. Using a higher-rated fuse is dangerous, as it bypasses the circuit protection and can lead to serious damage.
Essentially, a fuse is a deliberate weak link in the electrical system, designed to fail and protect the more valuable components.
Real-World Use: Basic Troubleshooting Tips
Here's how to use the fuse box diagram to troubleshoot common electrical issues:
- Identify the Problem: Determine which component is not working (e.g., the cigarette lighter, power windows, etc.).
- Consult the Diagram: Use the fuse box diagram to identify the fuse associated with the malfunctioning component.
- Locate the Fuse: Find the corresponding fuse in the fuse box.
- Inspect the Fuse: Visually inspect the fuse. If the internal element is broken or blackened, the fuse is blown. A good fuse will have a continuous, unbroken element. A multimeter in continuity mode can be used to confirm if the fuse is good (should show continuity).
- Replace the Fuse: Replace the blown fuse with a new fuse of the same amperage rating. Do not use a higher-rated fuse.
- Test the Component: After replacing the fuse, test the component to see if it's working. If the new fuse blows immediately, there is likely a short circuit in the wiring or component itself that needs further investigation.
Tip: Keep a spare set of fuses in your glove compartment. This will allow you to quickly address blown fuse issues on the road.
Safety Considerations
Working with your car's electrical system can be dangerous if proper precautions are not taken. Here are some key safety points:
- Disconnect the Battery: Before working on the fuse box, disconnect the negative (-) terminal of the battery. This prevents accidental short circuits and electrical shocks.
- Use Insulated Tools: Always use insulated tools when working with electrical components.
- Never Replace with Higher Amperage: As mentioned earlier, never replace a fuse with one of a higher amperage rating. This can bypass the circuit protection and cause serious damage or fire.
- Identify High-Risk Circuits: Be particularly cautious when working with circuits that control critical safety systems, such as the airbags (SRS) or the anti-lock braking system (ABS). Improper handling of these systems can lead to serious injury. If unsure, consult a qualified mechanic.
- Proper Lighting: Ensure adequate lighting to clearly see the fuse box and the diagram.
- Consult a Professional: If you are uncomfortable working with the electrical system or if you cannot identify the cause of a blown fuse, consult a qualified mechanic.
Remember, safety is paramount. If you are ever unsure about a procedure, it's always best to consult a professional.
With a good understanding of the fuse box diagram, you can confidently diagnose and repair many common electrical problems in your 2004 Honda Accord. This knowledge will not only save you money on repairs but also give you a greater appreciation for the complexity and ingenuity of modern automotive technology. Remember to always consult the correct diagram for your specific vehicle and prioritize safety when working with the electrical system.