2004 Jeep Grand Cherokee 4.0 Serpentine Belt Diagram
The 2004 Jeep Grand Cherokee 4.0L inline-six engine is a robust and reliable powerplant, but like any engine, its proper function relies heavily on the serpentine belt system. Understanding the serpentine belt diagram for this specific vehicle is crucial for several reasons, whether you're performing routine maintenance, troubleshooting a problem, or even modifying the engine. This guide will provide a comprehensive overview of the belt diagram, its components, operation, and practical applications, enabling you to confidently tackle serpentine belt-related tasks on your Grand Cherokee.
Purpose of Understanding the Serpentine Belt Diagram
Knowing how to read and interpret the serpentine belt diagram for your 2004 Grand Cherokee 4.0L offers significant benefits:
- Repair and Replacement: When replacing a worn or broken belt, the diagram provides the correct routing path, ensuring proper tension and preventing damage to components.
- Troubleshooting: A squealing belt or malfunctioning accessory often indicates a problem with the belt's tension or routing. The diagram helps isolate the issue quickly.
- Maintenance: Familiarity with the diagram allows for easy inspection of the belt and pulleys for wear and tear, enabling proactive maintenance.
- Modifications: If you're considering adding an accessory, such as an aftermarket supercharger or high-output alternator, understanding the existing belt system is essential for proper integration.
- Learning: Even if you don't plan on doing the work yourself, understanding the system helps you communicate effectively with your mechanic and better understand the repairs performed.
Key Specs and Main Parts
The 2004 Jeep Grand Cherokee 4.0L serpentine belt system comprises several key components, each playing a vital role in powering the engine's accessories:
- Serpentine Belt: A single, continuous belt made of reinforced rubber that transmits power from the crankshaft to various engine accessories.
- Crankshaft Pulley (Damper): Driven directly by the engine's crankshaft, this pulley initiates the belt's movement. It also incorporates a damper to reduce vibrations.
- Alternator Pulley: Driven by the serpentine belt, the alternator generates electrical power for the vehicle's systems.
- Power Steering Pump Pulley: Powers the power steering pump, providing hydraulic assistance for steering.
- Water Pump Pulley: Driven by the serpentine belt, the water pump circulates coolant throughout the engine to maintain optimal operating temperature.
- Air Conditioning Compressor Pulley: Engaged by a clutch, the A/C compressor circulates refrigerant to cool the cabin.
- Tensioner Pulley: A spring-loaded pulley that maintains constant tension on the serpentine belt, preventing slippage and ensuring proper operation of the accessories. This is a critical component for proper belt function.
- Idler Pulley: A smooth pulley that guides the serpentine belt along its designated path. It often changes the belt's direction or provides additional wrap around other pulleys.
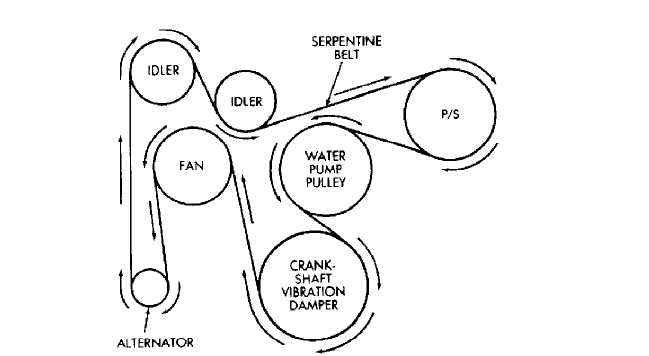
Symbols and Diagram Interpretation
A typical serpentine belt diagram uses various symbols and conventions to illustrate the belt's routing. Understanding these symbols is essential for accurate interpretation:
- Solid Lines: Represent the path of the serpentine belt. The width of the line may or may not indicate the belt width.
- Arrows: Indicate the direction of belt travel around each pulley. It's crucial to follow the arrow directions precisely when routing the belt.
- Pulleys: Typically depicted as circles. Some diagrams may differentiate between grooved pulleys (which drive accessories) and smooth pulleys (idler pulleys).
- Tensioner: Usually indicated by a special symbol, often a pulley with an arrow indicating the direction of tension release. Some diagrams show the specific location of the tensioner release mechanism (e.g., a square hole for a wrench).
- Component Labels: Each pulley is labeled with the corresponding accessory it drives (e.g., ALT for alternator, P/S for power steering, A/C for air conditioning).
A good diagram will also illustrate the relative positions of the pulleys, making it easier to visualize the belt's routing within the engine bay.
How It Works
The serpentine belt system's operation is relatively straightforward. The crankshaft, driven by the engine's pistons, rotates the crankshaft pulley. This rotation is then transferred to the serpentine belt, which loops around all the other pulleys. As the crankshaft pulley turns, it drives the accessories connected to the other pulleys, such as the alternator, power steering pump, water pump, and air conditioning compressor. The tensioner pulley ensures that the belt remains tight against all the pulleys, preventing slippage and ensuring efficient power transfer. The tensioner uses a spring mechanism that applies force to keep the belt at proper tension during operation. Without proper tension, accessories won't operate at their intended speeds, leading to reduced performance (e.g., dim headlights, weak power steering, poor A/C cooling).
The specific routing of the belt is critical. The diagram shows precisely how the belt should wrap around each pulley to provide the necessary grip and direction of rotation for each accessory. A misrouted belt can lead to immediate failure or damage to components.
Real-World Use and Basic Troubleshooting
Here's how you can use the serpentine belt diagram to troubleshoot common problems:
- Squealing Belt: A squealing belt often indicates slippage, usually caused by a worn belt, a loose tensioner, or contaminated pulleys. Inspect the belt for cracks, glazing, or missing ribs. Check the tensioner for proper spring tension. If the belt is contaminated with oil or coolant, clean it and address the source of the leak. If you are using a belt dressing to stop squealing, stop! This is a temporary fix and might lead to belt failure.
- Accessory Malfunction: If an accessory (e.g., alternator, power steering) is not functioning correctly, check the serpentine belt to ensure it's properly routed and tensioned. Also, inspect the specific accessory pulley for damage or seizure. A pulley that is hard to turn might indicate a failing component.
- Belt Replacement: When replacing the belt, carefully compare the new belt to the old one to ensure it's the correct length and type. Use the diagram to route the new belt correctly, paying close attention to the tensioner release mechanism. It is advisable to replace the tensioner pulley at the same time when replacing the serpentine belt.
Important Note: Before replacing the belt, take a picture of the existing routing. This provides a backup reference if you encounter difficulties during the replacement process.
Safety Precautions
Working on the serpentine belt system involves inherent risks. Here are some critical safety precautions:
- Disconnect the Battery: Always disconnect the negative battery cable before working on any electrical components, including the alternator.
- Engine Coolant: Be mindful of the coolant system. Do not remove the water pump if the engine is hot. Allow the system to cool down completely to prevent burns.
- Rotating Parts: Keep hands and clothing away from rotating parts when the engine is running. The serpentine belt can cause serious injury if it catches on clothing or fingers.
- Tensioner Release: Be careful when releasing the tensioner. The spring can exert significant force. Use the correct tool and follow the manufacturer's instructions.
- Eye Protection: Always wear safety glasses to protect your eyes from debris.
The alternator terminals are also a high risk. Accidental contact with grounded surfaces may result in shorts, so be careful when working near these. Take extra precautions to avoid any accidental shocks or burns.
By taking these precautions, you can minimize the risk of injury and ensure a safe and successful repair.
We have a high-resolution, downloadable serpentine belt diagram for the 2004 Jeep Grand Cherokee 4.0L readily available. This diagram provides a clear and detailed visual representation of the belt's routing, aiding in accurate installation and troubleshooting.