2004 Jeep Grand Cherokee Evap System Diagram
Alright folks, let's dive into the EVAP (Evaporative Emission Control) system diagram for the 2004 Jeep Grand Cherokee. Understanding this diagram is crucial whether you're tracking down a pesky check engine light, preparing for emissions testing, or just trying to deepen your knowledge of your Jeep's inner workings. We've got the diagram available for download, and by the end of this article, you'll be able to read it like a pro.
Why Bother with the EVAP Diagram?
The EVAP system's primary purpose is to prevent fuel vapors from escaping into the atmosphere. These vapors are not only pollutants but also represent lost fuel economy. Diagnosing EVAP issues can be a pain because leaks can be incredibly small and difficult to locate. A detailed diagram gives you a roadmap to follow, allowing you to trace components, understand the system's flow, and pinpoint potential problem areas. It's also essential for performing repairs correctly and ensuring compliance with emissions standards. It helps you visualize the entire system instead of relying on guesswork.
Key Specs and Main Parts of the 2004 Grand Cherokee EVAP System
The 2004 Grand Cherokee EVAP system, like most systems of its time, is relatively straightforward. However, understanding its core components is vital for proper diagnosis. Here's a breakdown:
- Fuel Tank: Where fuel resides, and where vapors initially originate.
- Fuel Cap: A seemingly simple component, but a loose or damaged fuel cap is a common cause of EVAP leaks.
- Fuel Tank Pressure (FTP) Sensor: Monitors the pressure inside the fuel tank. The PCM (Powertrain Control Module) uses this data to diagnose leaks.
- Canister: A container filled with activated charcoal that absorbs and stores fuel vapors. It's the heart of the EVAP system.
- Canister Purge Valve: An electronically controlled valve that allows the PCM to draw stored fuel vapors from the canister into the engine to be burned during normal operation. This is a crucial component for both emissions control and fuel efficiency.
- Canister Vent Valve (also called the vapor canister filter vent solenoid): Controls the flow of fresh air into the canister. When the purge valve is open, the vent valve allows air to enter the canister, displacing the fuel vapors and sending them to the engine. When closed, it seals the system for leak testing.
- Leak Detection Pump (LDP) (some models): Some 2004 Grand Cherokees might have a leak detection pump. This pump creates a vacuum in the EVAP system to test for leaks.
- Hoses and Lines: These connect all the components, carrying fuel vapors and air throughout the system.
- PCM (Powertrain Control Module): The computer that controls the EVAP system. It monitors sensor readings and controls the valves based on engine operating conditions.
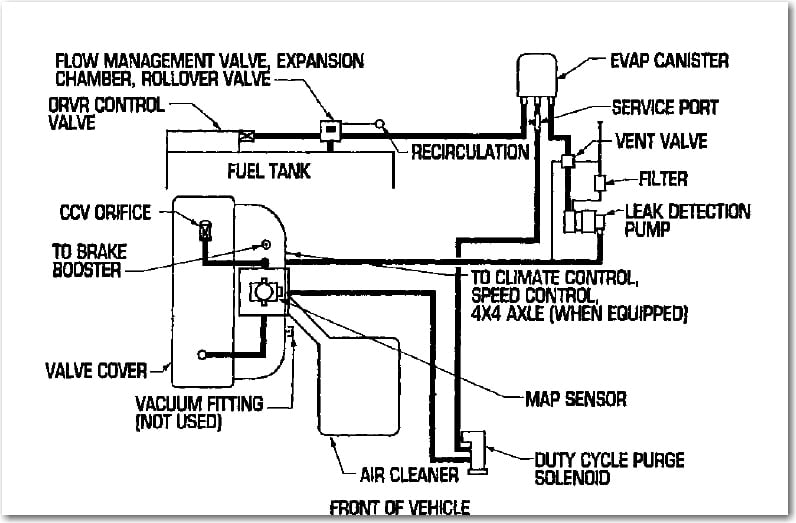
Decoding the EVAP Diagram: Symbols, Lines, and Colors
Understanding the diagram's symbols is like learning a new language. Here's what you need to know:
- Solid Lines: Typically represent vacuum or vapor lines.
- Dotted Lines: Often indicate electrical connections or diagnostic connections.
- Arrows: Show the direction of flow for air and fuel vapors.
- Component Symbols: Each component has a specific symbol, like a rectangle for the canister, a circle with an "X" for a valve, or a more complex symbol for the LDP. Refer to the diagram's legend for a complete list.
- Colors: Colors are often used to differentiate between different types of lines or components. For example, a blue line might represent a vacuum line, while a green line might represent a vent line. The diagram's legend should clarify the meaning of each color.
- Abbreviations: Expect to see abbreviations like "FTP" (Fuel Tank Pressure), "PCM," and "EVAP."
How the EVAP System Works: A Step-by-Step Overview
Here's a simplified explanation of how the EVAP system operates:
- Vapor Generation: As fuel sits in the tank, it evaporates, creating fuel vapors.
- Vapor Storage: These vapors are routed to the charcoal canister, where they are absorbed and stored.
- Purge Cycle: When the engine is running and conditions are right, the PCM opens the canister purge valve. This allows engine vacuum to draw fresh air through the canister vent valve.
- Vapor Combustion: The air flowing through the canister picks up the stored fuel vapors and carries them into the engine's intake manifold, where they are burned along with the regular air-fuel mixture.
- Leak Testing: Periodically, the PCM will run a self-test to check for leaks in the EVAP system. This typically involves sealing the system (closing the vent valve), applying a vacuum (either through engine vacuum or the LDP), and monitoring the fuel tank pressure sensor. If the pressure doesn't hold, a leak is detected, and a check engine light is illuminated.
Real-World Use: Basic Troubleshooting Tips
Using the EVAP diagram, you can perform some basic troubleshooting steps:
- Check the Fuel Cap: Seriously, start here. A loose or damaged fuel cap is the most common cause of EVAP codes. Make sure it's properly tightened and the seal is in good condition.
- Inspect Hoses and Lines: Carefully examine all the hoses and lines for cracks, leaks, or disconnections. Pay close attention to areas near connections and bends. Use the diagram to help you identify each line.
- Listen for Leaks: With the engine running, listen for hissing sounds near the fuel tank, canister, and purge valve. This can indicate a vacuum leak.
- Use a Smoke Machine: For more accurate leak detection, a smoke machine can be invaluable. It introduces smoke into the EVAP system, allowing you to visually identify the location of leaks. Connect the smoke machine to a port in the EVAP system (often the diagnostic port) and look for smoke escaping from anywhere.
- Scan for Codes: Use an OBD-II scanner to retrieve any stored trouble codes. Common EVAP codes include P0440, P0441, P0442, P0455, and P0456. Each code provides clues about the location and nature of the problem.
Safety First: Handling EVAP Components
Working on the EVAP system can involve handling fuel vapors, which are flammable. Here are some safety precautions to keep in mind:
- Work in a Well-Ventilated Area: This helps to dissipate fuel vapors and reduce the risk of fire.
- Avoid Sparks and Flames: Do not smoke or use open flames near the fuel system.
- Disconnect the Battery: Before working on any electrical components, disconnect the negative battery cable to prevent accidental shorts.
- Be Careful with Fuel Lines: Fuel lines can be pressurized, so be cautious when disconnecting them. Depressurize the system if possible before disconnecting any lines.
- Wear Safety Glasses: Protect your eyes from fuel and debris.
- Handle the Charcoal Canister with Care: The charcoal canister contains activated charcoal, which can be irritating to the skin and lungs. Wear gloves and avoid breathing in the dust.
The EVAP system can be tricky to diagnose, but with a little knowledge and the right tools, you can tackle many common problems yourself. Remember to take your time, be thorough, and prioritize safety.
We have the 2004 Jeep Grand Cherokee EVAP system diagram available for download. Having it handy will greatly assist you in understanding and troubleshooting your vehicle's EVAP system. Feel free to download and print it for easy reference!