2004 Jeep Grand Cherokee Interior Fuse Box Diagram
The 2004 Jeep Grand Cherokee WJ/WG series is a robust and reliable vehicle, but like any machine, its electrical system can experience issues. Understanding the interior fuse box diagram is crucial for diagnosing and resolving electrical problems, performing modifications, or simply gaining a deeper understanding of your Jeep's inner workings. This article will serve as your comprehensive guide to the 2004 Grand Cherokee's interior fuse box, equipping you with the knowledge to tackle common electrical tasks with confidence. We even have the file containing the full, high-resolution diagram for you to download at the end!
Purpose of Understanding the Interior Fuse Box Diagram
Why is a fuse box diagram so important? Consider these scenarios:
- Electrical Repairs: A blown fuse is often the culprit behind a malfunctioning component, such as a power window, radio, or interior lighting. The diagram allows you to quickly identify and replace the faulty fuse.
- Aftermarket Installations: When installing accessories like aftermarket stereos, auxiliary lighting, or remote starters, you'll need to tap into the Jeep's electrical system. The diagram helps you locate appropriate power sources and ground locations while ensuring you don't overload existing circuits.
- Troubleshooting: If you're experiencing widespread electrical issues, the diagram can help you trace circuits and pinpoint potential short circuits or grounding problems.
- General Knowledge: Understanding the fuse box layout provides a fundamental understanding of how your Jeep's electrical systems are organized.
Key Specs and Main Parts
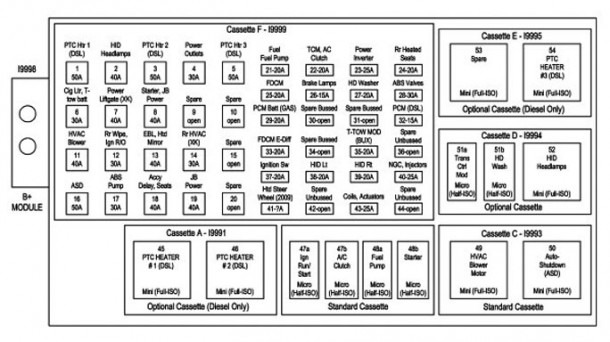
The interior fuse box in the 2004 Jeep Grand Cherokee (WJ/WG) is located on the driver's side, typically beneath the dashboard near the left kick panel. It's protected by a plastic cover that can be easily removed to access the fuses and relays. Here's a breakdown of the key elements:
- Fuse Block: The main housing that holds all the fuses and relays.
- Fuses: These are safety devices designed to protect circuits from overcurrent. They consist of a thin wire that melts and breaks the circuit if the current exceeds a specified limit. Fuses are rated in amperes (amps), which indicates the amount of current they can handle.
- Relays: Electrically operated switches that allow a low-current circuit to control a high-current circuit. Relays are commonly used to control components like headlights, the horn, and the fuel pump.
- Fuse Puller: A small plastic tool, sometimes integrated into the fuse box cover, used to safely remove and install fuses.
- Diagram Label: A label, often affixed to the inside of the fuse box cover, that provides a legend identifying the function of each fuse and relay. This is what we're going to unpack in detail.
Understanding the Symbols and Diagram
Fuse box diagrams use a combination of symbols, lines, colors, and icons to convey information about each fuse and relay. Here's a breakdown of what these elements typically represent:
- Fuse Numbers: Each fuse is assigned a unique number for identification purposes. These numbers correspond to the legend on the diagram.
- Fuse Amperage Rating: This indicates the maximum current the fuse can handle before blowing. It's usually printed directly on the fuse itself and is also indicated on the diagram. Common amperage ratings include 5A, 10A, 15A, 20A, 25A, 30A, and 40A.
- Circuit Description: A brief description of the component or system protected by the fuse (e.g., "Radio," "Power Windows," "Headlights").
- Lines: Lines on the diagram may indicate the pathway of electrical current. These lines are often simplified representations of the wiring harness.
- Colors: While less common on fuse box diagrams themselves, wire colors are important when tracing circuits. The wiring diagrams in the Jeep's service manual provide detailed color-coding information. Knowing wire colors helps you identify specific wires within the harness.
- Icons: Some diagrams use icons to represent specific components, such as a light bulb for lighting circuits or a speaker for audio circuits. These icons are usually self-explanatory.
It's important to note that the specific layout and symbols may vary slightly depending on the exact production date and trim level of your 2004 Grand Cherokee. Always refer to the diagram that corresponds to your vehicle's VIN (Vehicle Identification Number) for the most accurate information.
How It Works: The Fuse Box in Action
The fuse box acts as the central distribution point for electrical power in your Jeep. Power from the battery flows through the ignition switch and then to various circuits within the vehicle, each protected by a fuse. When a circuit experiences an overcurrent condition (e.g., due to a short circuit or excessive load), the fuse's filament melts, breaking the circuit and preventing damage to the component or wiring. This sacrificial nature of the fuse is crucial for protecting the more expensive and complex electrical components in your vehicle.
Relays operate differently. A small amount of current is sent to the relay that energizes an electromagnet. That energized magnet then closes a mechanical switch within the relay to allow a much larger current to flow. This keeps circuits that are controlled by a switch in the cabin from having to run a large power wire through the firewall.
Real-World Use: Basic Troubleshooting Tips
Here are some common scenarios where the fuse box diagram can be invaluable:
- Identifying a Blown Fuse: Look for a broken filament within the fuse. A blown fuse will typically have a blackened or melted appearance. You can also use a multimeter to test for continuity across the fuse. If there's no continuity, the fuse is blown.
- Replacing a Fuse: Always replace a blown fuse with a fuse of the same amperage rating. Using a higher amperage fuse can overload the circuit and cause a fire.
- Locating a Short Circuit: If a fuse repeatedly blows, it indicates a short circuit in the protected circuit. Use the diagram to trace the circuit and look for damaged wiring or components.
- Installing Aftermarket Accessories: Use the diagram to identify appropriate power sources and ground locations for your accessories. Use a multimeter to verify voltage and polarity before connecting any wires.
Safety Precautions
Working with electrical systems can be dangerous. Always take the following precautions:
- Disconnect the Battery: Before working on any electrical components, disconnect the negative (-) terminal of the battery to prevent accidental shorts.
- Use Insulated Tools: Use tools with insulated handles to protect yourself from electric shock.
- Avoid Water: Never work on electrical systems in wet conditions.
- Identify High-Current Circuits: Be particularly cautious when working with circuits protected by high-amperage fuses (e.g., 30A or 40A). These circuits can deliver a significant electric shock. The circuits controlling the airbag system is also something that should be handled by a professional. Messing with it yourself can cause serious injury.
- Consult a Professional: If you're uncomfortable working on electrical systems, consult a qualified mechanic.
Understanding the interior fuse box diagram is a vital skill for any 2004 Jeep Grand Cherokee owner. With the knowledge and tools outlined in this article, you'll be well-equipped to diagnose and resolve common electrical issues, install aftermarket accessories, and gain a deeper understanding of your vehicle's electrical system. Always remember safety first, and don't hesitate to seek professional help if you're unsure about any procedure.
As promised, you can download the high-resolution 2004 Jeep Grand Cherokee interior fuse box diagram here [Placeholder: Insert Download Link Here]. This file contains a detailed and accurate representation of the fuse box layout, making it an invaluable resource for your electrical troubleshooting and repair projects. Good luck!