2004 Jeep Grand Cherokee Laredo Fuse Box Diagram
Let's dive into the fuse box diagram for your 2004 Jeep Grand Cherokee Laredo. This isn't just some abstract blueprint; it's the roadmap to understanding and maintaining the electrical system of your vehicle. Whether you're tackling a faulty component, planning an aftermarket modification, or just trying to diagnose a mysterious electrical gremlin, this diagram is your best friend.
Purpose: Your Electrical System's Rosetta Stone
The primary purpose of the fuse box diagram is to allow you to identify and locate specific fuses and relays within the fuse boxes of your 2004 Jeep Grand Cherokee Laredo. This is crucial for several reasons:
- Troubleshooting Electrical Issues: When a component fails, the first step is often to check its corresponding fuse. The diagram tells you exactly which one to examine.
- Performing Repairs: Knowing the location of fuses and relays associated with a circuit allows you to safely disconnect power to that circuit before working on it.
- Installing Aftermarket Accessories: Planning to install a new sound system, lights, or other electrical upgrades? The diagram helps you tap into the appropriate circuits and add fuses for protection.
- Preventative Maintenance: Familiarity with the diagram enables you to proactively inspect fuses for signs of corrosion or damage, potentially preventing future electrical problems.
- Understanding Your Vehicle: Beyond just repairs, the diagram fosters a deeper understanding of how the various electrical systems in your Grand Cherokee are interconnected.
Key Specs and Main Parts
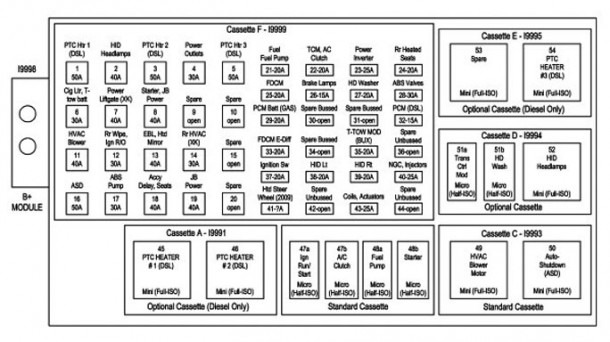
Your 2004 Jeep Grand Cherokee Laredo typically has two main fuse boxes: the Power Distribution Center (PDC) located under the hood, and the Junction Block situated inside the cabin, usually on the driver's side, often behind a kick panel or in a glove box.
- Power Distribution Center (PDC): This houses fuses and relays responsible for high-current circuits like the starter motor, alternator, cooling fan, and exterior lighting. It contains higher amperage fuses and is the first line of defense for the Jeep's vital systems.
- Junction Block: This fuse box is for lower-current circuits within the cabin, such as the radio, interior lights, power windows, and instrument panel.
Key specs to be aware of when consulting the diagram and working with fuses include:
- Fuse Ampere Rating (Amps): The numerical value printed on the fuse indicates the maximum current it can handle before blowing. Using a fuse with a higher rating than specified can damage the circuit it's protecting.
- Fuse Type: The 2004 Grand Cherokee Laredo primarily uses standard ATO/ATC blade-type fuses. Mini-fuses might also be present in some circuits.
- Relay Type: Relays are electromechanical switches that control high-current circuits using a low-current signal. The diagram identifies the relay's function (e.g., fuel pump relay, starter relay). Common relay types include SPST (Single Pole Single Throw) and SPDT (Single Pole Double Throw).
Symbols: Deciphering the Diagram's Language
Fuse box diagrams aren't just pictures; they use a system of symbols to convey information efficiently. Here's a breakdown of what you might encounter:
- Fuses: Represented by a rectangular box, often with the ampere rating printed inside. The placement of the rectangle on the diagram corresponds to its physical location in the fuse box.
- Relays: Depicted as a square or rectangle with terminals (pins) labeled (e.g., 30, 85, 86, 87). The wiring diagram often connects these terminals to indicate the relay's function.
- Wires/Circuits: Solid lines indicate wired connections. Dashed lines may signify circuits that are optional or only present in certain models or configurations.
- Ground Symbols: Usually represented by an inverted triangle or a series of horizontal lines decreasing in length, indicating the connection point to the vehicle's chassis, providing a return path for the electrical current.
- Component Symbols: Simplified drawings of the components being protected by the fuses (e.g., a lightbulb for headlights, a speaker for the radio).
- Color Coding (Wiring Diagrams): Wiring diagrams (often associated with fuse box diagrams) use color codes to identify the wires. For example, a wire labeled "RD/BK" would be a red wire with a black stripe.
How It Works: The Electrical Flow
The fuse box serves as the central distribution point for electrical power in your Jeep. The battery provides the initial source of power, which flows through the main power cables to the PDC. From there, the PDC distributes power to various systems via fuses and relays.
Fuses act as circuit protection devices. When excessive current flows through a circuit (due to a short circuit or overload), the fuse's internal element melts, breaking the circuit and preventing damage to the wiring and components. Think of them as sacrificial lambs, protecting the rest of the system.
Relays are used to control high-current circuits with a low-current signal. For example, the ignition switch sends a low-current signal to the starter relay, which then closes the high-current circuit to the starter motor. This prevents the ignition switch from having to handle the high current required to crank the engine.
Understanding the flow of electricity is key to effective troubleshooting. Trace the circuit from the power source (battery) through the fuse, relay (if applicable), wiring, and finally to the component.
Real-World Use: Basic Troubleshooting Tips
Here are some practical troubleshooting tips using the fuse box diagram:
- Component Failure: If a component stops working, consult the diagram to locate its corresponding fuse. Remove the fuse and inspect it. If the element is broken (the wire inside is melted), replace it with a fuse of the exact same ampere rating.
- Repeated Fuse Blows: If a fuse blows repeatedly, it indicates a short circuit or overload in the circuit. Do not simply replace the fuse with a higher amperage one. This is a fire hazard. Instead, use the diagram to trace the wiring associated with that circuit and look for damaged insulation, pinched wires, or faulty components.
- Testing Relays: Relays can fail intermittently or completely. While a multimeter is the best tool for testing a relay, you can often diagnose a faulty relay by swapping it with a known-good relay of the same type (if available). If the problem disappears after the swap, the original relay is likely the culprit.
- Visual Inspection: Regularly inspect the fuse boxes for signs of corrosion, water damage, or loose connections. Clean any corroded terminals with a wire brush or contact cleaner.
Safety: Proceed with Caution
Working with electrical systems can be dangerous. Here are some important safety precautions:
- Disconnect the Battery: Before working on any electrical component, disconnect the negative terminal of the battery to prevent accidental short circuits.
- Use Proper Tools: Use insulated tools designed for electrical work.
- Never Bypass Fuses: Never replace a blown fuse with a wire or other conductive material. This bypasses the circuit protection and can lead to a fire.
- Identify High-Risk Components: Be particularly careful when working with circuits associated with the airbags (SRS), anti-lock brakes (ABS), and fuel pump. These systems can have specific safety procedures that must be followed. Always consult the service manual for your vehicle before working on these systems.
- Double check the correct AMP before replacing with new fuse
Remember, if you're not comfortable working with electrical systems, it's always best to consult a qualified mechanic.
Now that you're armed with this knowledge, you're better equipped to tackle electrical troubleshooting on your 2004 Jeep Grand Cherokee Laredo.
We have the complete fuse box diagram available for download. This diagram provides a detailed layout of both the Power Distribution Center (under the hood) and the Junction Block (inside the cabin), including fuse locations, ampere ratings, and circuit designations. It will make troubleshooting much easier.