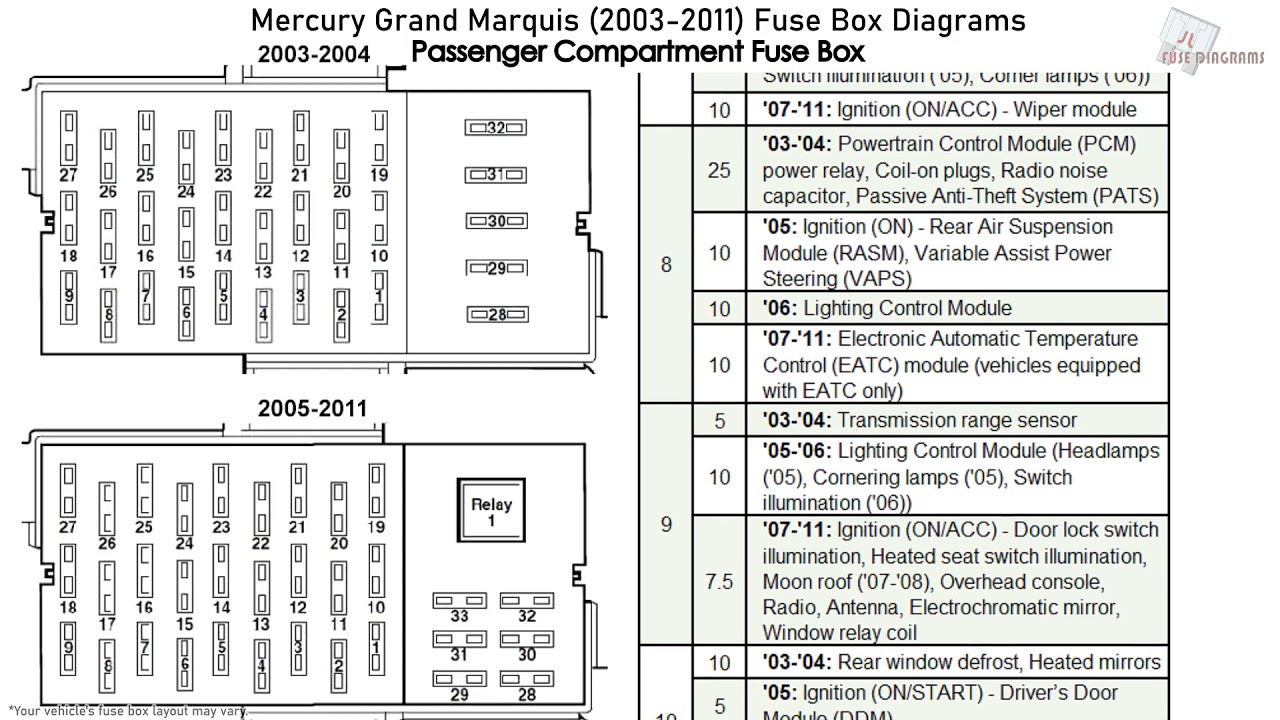
2004 Mercury Grand Marquis Fuse Box Diagram
Alright, let's dive into the 2004 Mercury Grand Marquis fuse box diagram. Understanding this schematic is crucial for anyone tackling electrical repairs, modifications, or even just general troubleshooting on their vehicle. It's your roadmap to the car's electrical system, and being able to read it saves time, money, and potentially prevents a lot of headaches. We'll cover everything from the diagram's purpose to real-world applications, ensuring you're well-equipped to navigate your Grand Marquis's electrical intricacies.
Purpose of the Fuse Box Diagram
Why bother with a fuse box diagram? The most obvious reason is repairs. When a circuit fails, the fuse is usually the first suspect. The diagram tells you which fuse protects which circuit. But it's more than just that. It's a valuable tool for:
- Troubleshooting Electrical Issues: Identifying the root cause of problems beyond just blown fuses. For example, if your power windows aren't working, you can quickly identify the relevant fuse and circuit.
- Adding Accessories: Safely tapping into existing circuits to power aftermarket accessories like lights, radios, or security systems. The diagram helps you determine appropriate amperage and avoid overloading circuits.
- Understanding the Electrical System: Gaining a deeper understanding of how the various electrical components are interconnected within your vehicle.
- Preventing Damage: Correctly identifying fuses and relays prevents replacing them with incorrect ratings, which can lead to component damage or even fire.
Essentially, the diagram empowers you to diagnose and resolve electrical issues yourself, saving you time and money at the mechanic. It’s also indispensable when trying to integrate new electrical components into your car's existing system.
Key Specs and Main Parts
The 2004 Mercury Grand Marquis typically has two main fuse boxes. Understanding where they are and what they control is the first step:
- Under-the-Hood Fuse Box (Power Distribution Box): Located in the engine compartment, this box houses the larger fuses and relays that protect high-current circuits like the starter motor, alternator, headlights, and power windows. It's responsible for the primary power distribution throughout the car.
- Interior Fuse Box (Central Junction Box): Usually found under the dashboard, often on the driver's side, this box contains fuses for lower-current circuits such as the radio, interior lights, and instrument panel.
Key specs to look for when reading the diagram include:
- Fuse Number: A unique identifier for each fuse.
- Amperage Rating (Amps): Indicates the maximum current the fuse can handle before blowing, typically represented by a number (e.g., 10A, 20A). This is critical to replace fuses with the *correct* amperage.
- Protected Circuit Description: Describes the specific component or system the fuse protects (e.g., "Fuel Pump," "Headlights - Low Beam").
- Relay Locations: Indicates the location of relays and their corresponding functions (e.g., "Fuel Pump Relay," "Starter Relay"). A relay is an electrically operated switch, which allows a low-current circuit to control a high-current circuit.
The diagram itself will be a schematic representation of these components, with clear labels and symbols to identify each element.
Understanding Fuse Box Diagram Symbols
The diagram uses a set of standard symbols to represent different electrical components. Familiarizing yourself with these symbols is key to interpreting the schematic accurately. Here are some common ones:
- Fuses: Represented by a zig-zag line or a simple rectangle with a number indicating the amperage.
- Relays: Shown as a square or rectangle with terminals representing the coil and contacts.
- Wires: Represented by straight lines connecting different components. Line thickness may (but rarely on fuse box diagrams) indicate wire gauge (thickness).
- Grounds: Symbolized by a series of descending horizontal lines, indicating a connection to the vehicle's chassis (the ground).
- Circuit Breakers: Similar to fuses but can be reset after tripping. May be shown as a rectangle with a wavy line through it.
Colors of the wires are often indicated on more detailed wiring diagrams (not just the fuse box diagram), but not always. The fuse box diagram focuses on the fuse rating and which circuit it serves. Dashed lines might indicate hidden wiring, wiring on a separate sub-circuit, or optional equipment configurations.
Understanding these symbols allows you to trace the path of electricity through the circuit and identify potential points of failure.
How It Works: Electrical Flow
Think of the fuse box as a central distribution point for electrical power. Power flows from the battery, through the ignition switch, and then to the fuse boxes. Each fuse protects a specific circuit by interrupting the flow of electricity if the current exceeds the fuse's amperage rating.
For example, if the circuit for your radio is rated for 10 amps, a 10-amp fuse will be installed. If a short circuit or an overloaded circuit causes the current to exceed 10 amps, the fuse will blow, breaking the circuit and preventing damage to the radio or other components. A short circuit is an unintended path for current to flow, typically bypassing the intended load (the radio in this example), resulting in very high current.
Relays are used to control high-current circuits with a low-current switch. For instance, the headlight switch in the cabin operates a relay in the under-the-hood fuse box. The low current of the switch activates the relay, which then closes the circuit, allowing high current to flow to the headlights.
Real-World Use: Basic Troubleshooting
Here's a basic troubleshooting scenario:
- Symptom: The interior lights are not working.
- Check the Fuse: Consult the fuse box diagram to identify the fuse for the interior lights.
- Inspect the Fuse: Remove the fuse and visually inspect it. A blown fuse will have a broken filament. You can also use a multimeter set to continuity mode to test the fuse. A good fuse will show continuity (a beep or a reading close to zero ohms).
- Replace the Fuse: If the fuse is blown, replace it with a new fuse of the same amperage rating.
- Test: Turn on the interior lights to see if they now work.
- If the Fuse Blows Again: If the new fuse blows immediately or shortly after replacement, there's likely a short circuit in the interior lights circuit. Further investigation is needed, possibly involving checking the wiring and light fixtures for damage.
Always start with the simplest solution—checking the fuse—before moving on to more complex troubleshooting steps.
Safety Considerations
Working with automotive electrical systems can be dangerous. Here are some key safety precautions:
- Disconnect the Battery: Before working on any electrical components, disconnect the negative (black) terminal of the battery to prevent accidental shorts and electrical shocks.
- Use Proper Tools: Use insulated tools designed for automotive electrical work.
- Never Exceed Fuse Ratings: Never replace a fuse with one of a higher amperage rating. This can overload the circuit and cause a fire.
- Be Careful with High-Current Circuits: Components like the starter motor and alternator carry high currents and can generate significant heat. Avoid touching these components while the engine is running or shortly after it has been running.
- Handle Airbag Circuits with Extreme Care: Airbags are controlled by electrical circuits. Mishandling these circuits can cause accidental airbag deployment, which can result in serious injury. Consult a professional if you need to work on airbag systems. These are almost always colored YELLOW.
Always prioritize safety when working on your vehicle's electrical system. If you're uncomfortable performing any of these tasks, consult a qualified mechanic.
By understanding the fuse box diagram, you can gain valuable insights into your 2004 Mercury Grand Marquis's electrical system and confidently tackle many common repairs and modifications. It’s a skill that will save you money and increase your confidence in your automotive abilities.
We have the detailed 2004 Mercury Grand Marquis fuse box diagram file available for download. It's a high-resolution image that you can zoom in on and print out for easy reference. This diagram will be an invaluable tool for your automotive endeavors.