2004 Nissan Altima Fuse Box Diagram
Let's talk about the fuse box diagram for a 2004 Nissan Altima. This isn't just a piece of paper; it's your roadmap to electrical troubleshooting and a crucial resource for any DIY mechanic or car enthusiast working on this vehicle. Whether you're dealing with a blown fuse, installing aftermarket accessories, or just trying to understand your car's electrical system better, knowing how to read and interpret this diagram is essential. We'll break it down in a way that's both technically accurate and easy to understand.
Why This Diagram Matters
The fuse box diagram is absolutely vital for a number of reasons:
- Electrical Repairs: When an electrical component malfunctions, the first thing you should check is the fuse. The diagram tells you which fuse protects which circuit, saving you time and preventing further damage.
- Accessory Installation: Adding aftermarket accessories (like a new stereo, lights, or a remote starter) often involves tapping into the car's electrical system. The diagram helps you identify safe and appropriate points to draw power without overloading circuits.
- Understanding the System: Studying the diagram gives you a deeper understanding of how your car's electrical system is laid out, which can be incredibly helpful for diagnosing complex issues.
- Preventing Fires: Using the wrong fuse (or bridging a blown fuse) can create a dangerous overload situation, potentially leading to a fire. Correct fuse identification is a safety issue.
Key Specs and Main Parts of the 2004 Altima Fuse Boxes
The 2004 Altima typically has two primary fuse box locations:
- Interior Fuse Box: Located inside the cabin, usually on the driver's side, near the dashboard or under the steering wheel. This box houses fuses for interior components like the radio, power windows, interior lights, and the cigarette lighter (power outlet).
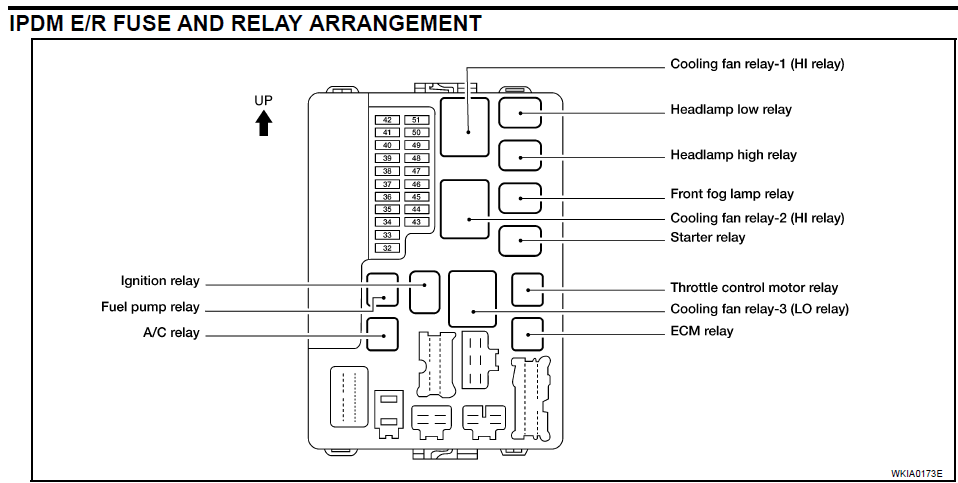
- Engine Compartment Fuse Box: Located under the hood, often near the battery or a fender well. This box contains fuses and relays for engine management systems, headlights, the horn, and other critical components.
The fuse boxes themselves are typically made of durable plastic and are designed to protect the fuses and relays from the elements. The cover of each fuse box usually has a printed or labeled diagram indicating the function of each fuse and relay.
Key Specs: Fuse ratings are measured in Amperes (A). The 2004 Altima typically uses a mix of blade-type fuses, ranging from 5A to 30A. The diagram will specify the correct amperage rating for each fuse location. Using a fuse with a higher amperage rating than specified is extremely dangerous.
Decoding the Symbols
Understanding the symbols on the fuse box diagram is crucial for proper interpretation. Here's a breakdown:
- Lines and Colors: While the fuse box diagram itself might not be color-coded, wiring diagrams for the 2004 Altima will use color-coded wires to indicate different circuits. However, the fuse box label will typically only show a fuse number/label and the amperage. Referencing the wiring diagrams in conjunction with the fuse box diagram will give you the most complete picture.
- Icons: Each fuse location will be labeled with a description, often abbreviated (e.g., "HEAD LP" for headlight). More complex diagrams might include icons representing specific components (e.g., a lightbulb for headlights, a steering wheel for the power steering system, etc.).
- Fuse Numbers: Each fuse has a unique number, which corresponds to the label on the diagram. This number helps you quickly locate the correct fuse.
It's important to note that abbreviations can vary slightly depending on the source of the diagram. However, common abbreviations are usually readily understandable. If you're unsure of an abbreviation, consult the owner's manual or a reliable online resource.
How It Works: Fuse Protection
A fuse is a safety device designed to protect an electrical circuit from overcurrent. It contains a thin strip of metal that melts and breaks the circuit if the current exceeds a predetermined level. This prevents damage to components and reduces the risk of fire.
When an electrical component malfunctions, it can draw excessive current. This could be due to a short circuit (where a wire accidentally contacts ground), a faulty component, or an overload (where too many devices are drawing power from the same circuit).
The fuse acts as a weak point in the circuit. When the current exceeds the fuse's rating, the metal strip melts, opening the circuit and stopping the flow of electricity. This prevents further damage to the wiring and components.
Relays are electromechanical switches that control higher-current circuits using a low-current signal. They are often used to control things like headlights, the starter motor, and the fuel pump. The fuse box may contain relays alongside the fuses, and the diagram will indicate their function.
Real-World Use: Basic Troubleshooting Tips
Here's how to use the fuse box diagram for basic troubleshooting:
- Identify the Problem: Determine which electrical component is not working.
- Consult the Diagram: Locate the fuse that protects the circuit for that component.
- Inspect the Fuse: Remove the fuse and visually inspect it. A blown fuse will have a broken filament (the thin wire inside).
- Replace the Fuse: Replace the blown fuse with a new fuse of the exact same amperage rating. Never use a fuse with a higher rating.
- Test the Component: After replacing the fuse, test the component to see if it is working again.
- If the Fuse Blows Again: If the new fuse blows immediately, there is likely a short circuit or other serious problem in the circuit. Further diagnostics are required. Don't just keep replacing fuses.
Important Tip: Keep a spare set of fuses of various amperage ratings in your glove compartment. This can save you a lot of trouble on the road.
Safety Precautions
Working with automotive electrical systems can be dangerous. Here are some important safety precautions:
- Disconnect the Battery: Before working on any electrical circuit, disconnect the negative terminal of the battery to prevent accidental shorts and electrical shocks.
- Use Proper Tools: Use insulated tools to avoid electrical shocks.
- Never Bypass Fuses: Never bypass a blown fuse with a wire or other conductive material. This can create a dangerous overload situation and potentially cause a fire.
- Handle Capacitors with Care: Some electrical components, such as the air conditioning system, contain capacitors that can store a dangerous electrical charge even after the battery is disconnected. Consult a qualified technician before working on these components.
- High-Current Circuits: Be especially careful when working with high-current circuits like the starter motor and alternator. These circuits can deliver a large amount of current, which can be dangerous.
Risky Components: The Engine Control Module (ECM) and the airbag system are highly sensitive and potentially dangerous components. Unless you have specialized training and equipment, it's best to leave repairs on these systems to a qualified technician.
We have the 2004 Nissan Altima fuse box diagram available for download. This diagram will provide you with a detailed overview of the fuse locations and their corresponding circuits. With this resource and the knowledge you've gained from this article, you'll be well-equipped to tackle a wide range of electrical troubleshooting and repair tasks on your 2004 Altima.