2004 Nissan Sentra Fuse Box Diagram
The 2004 Nissan Sentra, a reliable and popular compact car, relies on a complex electrical system that is protected by a network of fuses and relays. Understanding the fuse box diagram is absolutely critical for anyone performing electrical repairs, troubleshooting issues, or even just wanting a better understanding of their vehicle. This guide will walk you through the specifics of the 2004 Sentra's fuse box diagram, empowering you to confidently tackle electrical projects.
Purpose of Understanding the Fuse Box Diagram
Why bother learning about your car's fuse box? Several key reasons stand out:
- Troubleshooting Electrical Issues: A blown fuse is often the culprit behind malfunctioning lights, wipers, power windows, or other electrical components. Knowing the fuse location for a specific circuit allows you to quickly diagnose and resolve the problem.
- Performing Electrical Repairs and Modifications: Whether you're installing a new stereo system, adding aftermarket lighting, or repairing a damaged wire, the fuse box diagram is essential for safely and effectively integrating new components into the existing electrical system.
- Preventing Further Damage: Ignoring a blown fuse and repeatedly replacing it with a higher amperage fuse can overload the circuit and potentially cause a fire. The fuse box diagram helps you identify the correct fuse rating for each circuit, preventing this dangerous scenario.
- General Vehicle Knowledge: Understanding the fuse box layout provides a deeper understanding of your car's electrical system and how different components are interconnected.
Key Specs and Main Parts
The 2004 Nissan Sentra typically has two main fuse box locations:
- Interior Fuse Box: Located inside the cabin, usually on the driver's side, often behind a small access panel near the steering wheel or under the dashboard. This box primarily houses fuses for interior components like lights, radio, power windows, and the cigarette lighter (power outlet).
- Engine Compartment Fuse Box: Located in the engine bay, this box contains fuses and relays for critical engine management systems, headlights, horn, air conditioning, and other vital functions. It's usually a black plastic box clearly labeled.
The fuse box itself consists of:
- The Housing: A plastic enclosure that protects the fuses and relays from the elements.
- Fuses: Overcurrent protection devices designed to interrupt a circuit if the current flow exceeds a safe level. Fuses come in various amperage ratings (e.g., 5A, 10A, 15A, 20A, 30A) and physical sizes/styles (e.g., blade fuses, mini blade fuses).
- Relays: Electromagnetic switches that control high-current circuits using a low-current signal. Relays are used to switch on components like headlights, fuel pumps, and air conditioning compressors.
- Diagram/Label: A printed or molded label (often on the inside of the fuse box cover) that identifies the function and amperage rating of each fuse and relay. This is the crucial diagram we're discussing.
Symbols: Understanding the Diagram
Fuse box diagrams use a combination of lines, colors, and icons to represent different components and circuits. Here's a breakdown of common symbols you might encounter:
- Lines: Lines represent the electrical circuits. Thicker lines might indicate higher-current circuits.
- Colors: Wire colors are sometimes indicated in the diagram. This can be helpful when tracing wires in the car itself. However, be aware that wire colors can vary slightly depending on the specific model and options package.
- Icons: Specific icons represent different components. Here are a few common examples:
- Lightbulb Icon: Indicates a lighting circuit (e.g., headlights, taillights, interior lights).
- Fan Icon: Represents a fan motor (e.g., radiator fan, blower motor).
- Horn Icon: Indicates the horn circuit.
- Wiper Icon: Represents the windshield wiper motor.
- Radio Icon: Indicates the radio or audio system circuit.
- Engine Icon: Represents a critical engine management system.
- Amperage Rating (A): Each fuse location will be labeled with a number followed by the letter "A," indicating the fuse's amperage rating (e.g., 10A, 20A). This is critical to match when replacing a fuse.
- Circuit Description: The diagram will usually include a brief description of the component or system that the fuse protects (e.g., "Headlight (RH)," "Power Window," "Fuel Pump").
How It Works: Fuses and Circuit Protection
A fuse is a safety device designed to protect an electrical circuit from overcurrent. It contains a thin wire or strip of metal that melts and breaks the circuit if the current exceeds the fuse's amperage rating. This prevents damage to components, wiring, and potentially prevents a fire.
Think of a fuse as a weak link in the circuit. It's designed to fail first, protecting the more expensive and critical components. When a component malfunctions or a short circuit occurs (e.g., a wire accidentally touching ground), the excessive current flow will blow the fuse, interrupting the circuit and preventing further damage.
Relays, on the other hand, act as electrically controlled switches. They allow a low-current circuit (e.g., the switch on your dashboard) to control a high-current circuit (e.g., the headlights). The relay uses a small electrical signal to energize an electromagnet, which then closes a set of contacts, completing the high-current circuit.
Real-World Use: Basic Troubleshooting Tips
Here's how to use the fuse box diagram for basic troubleshooting:
- Identify the Problem: Determine which electrical component is malfunctioning.
- Consult the Diagram: Locate the fuse box diagram for your 2004 Nissan Sentra (remember, there are usually two locations).
- Locate the Fuse: Find the fuse on the diagram that corresponds to the malfunctioning component. Note its amperage rating.
- Inspect the Fuse: Remove the fuse from the fuse box (use a fuse puller if available). Visually inspect the fuse. If the thin wire inside the fuse is broken or blackened, the fuse is blown.
- Replace the Fuse: Replace the blown fuse with a new fuse of the exact same amperage rating. Never use a fuse with a higher amperage rating, as this can overload the circuit.
- Test the Component: Turn on the component to see if it now works.
- If the Fuse Blows Again: If the new fuse blows immediately or shortly after being replaced, there's likely a more serious problem, such as a short circuit or a faulty component. Further diagnosis is required, potentially involving a multimeter and circuit testing.
Safety: Identifying Risky Components
Working with electrical systems can be dangerous. Here are some key safety precautions:
- Disconnect the Battery: Before working on any electrical components, disconnect the negative (-) battery terminal. This will prevent accidental shorts and electric shock.
- Never Use a Higher Amperage Fuse: As mentioned earlier, using a fuse with a higher amperage rating can overload the circuit and cause a fire.
- Be Careful with High-Current Circuits: Components like the starter motor, alternator, and air conditioning compressor draw significant current. Be cautious when working with these circuits.
- Don't Ignore Repeatedly Blown Fuses: A repeatedly blown fuse indicates a more serious problem that needs to be addressed. Don't simply keep replacing the fuse. Investigate the underlying cause.
- Use Insulated Tools: When working with electrical wiring, use insulated tools to prevent accidental shorts and electric shock.
- If in Doubt, Seek Professional Help: If you're not comfortable working with electrical systems, consult a qualified mechanic.
By understanding the 2004 Nissan Sentra's fuse box diagram, you can confidently troubleshoot electrical issues, perform repairs, and enhance your understanding of your vehicle's electrical system. Remember to always prioritize safety and use the correct tools and procedures.
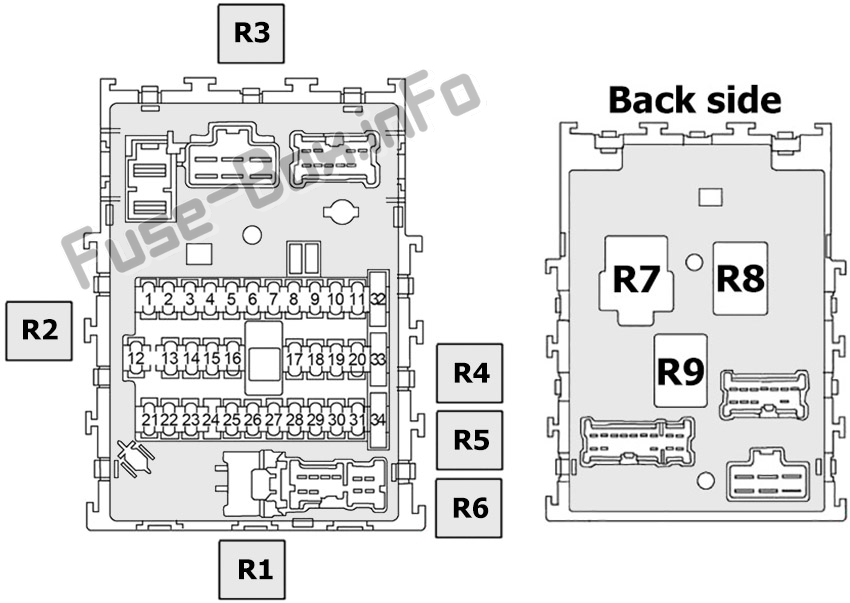
We have the complete 2004 Nissan Sentra Fuse Box Diagram available for download. This detailed diagram will provide you with a comprehensive view of your vehicle's electrical system, making troubleshooting and repairs much easier. Click the link below to download the PDF file.
Disclaimer: Electrical systems can be dangerous. If you are not comfortable working with electrical components, consult a qualified mechanic. This information is provided for educational purposes only and is not a substitute for professional advice.