2004 Pontiac Grand Prix Serpentine Belt Diagram
The serpentine belt in your 2004 Pontiac Grand Prix is a critical component responsible for powering several essential engine accessories. Understanding its layout and function is crucial for DIY maintenance, troubleshooting, and repairs. This article provides a comprehensive guide to the 2004 Pontiac Grand Prix serpentine belt diagram, equipping you with the knowledge to confidently tackle belt-related tasks.
Purpose of the Serpentine Belt Diagram
A serpentine belt diagram, also known as a belt routing diagram, serves several key purposes:
- Repair and Replacement: It's indispensable when replacing a worn or broken serpentine belt. The diagram ensures you route the new belt correctly, preventing accessory malfunctions and potential engine damage.
- Troubleshooting: The diagram helps diagnose issues related to accessories not functioning correctly. For example, a squealing belt or power steering failure might indicate improper belt tension or routing.
- Preventative Maintenance: Familiarity with the diagram allows you to visually inspect the belt's condition and routing during routine maintenance checks. This helps identify potential problems before they lead to complete failure.
- Learning and Understanding: Studying the diagram provides a clear picture of how the engine accessories are interconnected and powered by the serpentine belt. This improves your overall understanding of your Grand Prix's engine operation.
Key Specs and Main Parts
The 2004 Pontiac Grand Prix, depending on the engine, uses different serpentine belt configurations. The two primary engine options are the 3.8L V6 (L36 and L67 - Supercharged) and the 3.1L V6 (LG8). The belt lengths and routing differ significantly between these engines. Therefore, it's essential to identify your engine before attempting any belt-related work.
Common Components
- Crankshaft Pulley: This pulley is driven directly by the engine's crankshaft and provides the rotational force for the serpentine belt.
- Alternator Pulley: The alternator charges the car's battery and provides electrical power. The serpentine belt drives its pulley.
- Power Steering Pump Pulley: This pulley drives the power steering pump, which assists in steering.
- Air Conditioning Compressor Pulley: This pulley drives the A/C compressor, responsible for cooling the car's interior.
- Water Pump Pulley: The water pump circulates coolant throughout the engine, preventing overheating.
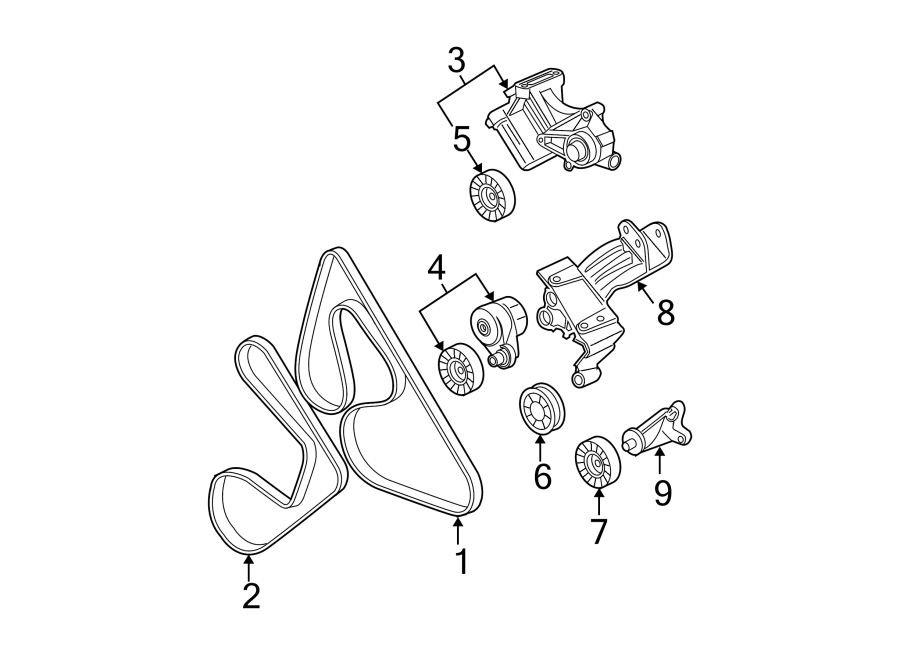
- Idler Pulley(s): These pulleys provide a smooth path for the belt, preventing excessive wear and ensuring proper tension. They are usually smooth and non-driven.
- Tensioner Pulley: This pulley is part of the tensioner assembly. The tensioner maintains the correct tension on the serpentine belt, preventing slippage and ensuring optimal accessory performance. The tensioner is spring loaded and allows for belt stretch and wear.
Belt Length: The serpentine belt length varies based on the engine and whether the vehicle has A/C. A typical belt length for the 3.8L engine without supercharger is around 93-94 inches, while the supercharged version and the 3.1L might use different lengths. Always consult the specific diagram for your engine configuration.
Symbols and Lines Explained
Understanding the symbols and line styles used in the serpentine belt diagram is critical for proper interpretation:
- Solid Lines: A solid line represents the path of the outer surface of the serpentine belt. This is the surface that makes contact with the grooved pulleys (alternator, power steering, A/C compressor, crankshaft).
- Dashed Lines: A dashed line indicates the path of the inner surface of the serpentine belt, which contacts smooth pulleys (idler pulleys, tensioner pulley).
- Arrows: Arrows on the belt path indicate the direction of belt rotation. Pay close attention to these, as incorrect routing can cause the belt to rotate in the wrong direction, damaging the accessories.
- Pulley Symbols: The diagram uses simplified symbols to represent each pulley. These symbols often include a small label indicating the component (e.g., ALT for alternator, P/S for power steering, A/C for air conditioning compressor).
- Tensioner Symbol: The tensioner pulley is typically represented by a symbol indicating its spring-loaded function. It may show an arrow indicating the direction of tension.
While color coding isn't typically used in these diagrams, a darker line may indicate the belt's primary route, and a lighter line indicates secondary contact or wrap.
How It Works: The Serpentine Belt System
The serpentine belt system is a marvel of engineering. The engine's crankshaft turns, rotating the crankshaft pulley. This rotational force is transferred to the serpentine belt, which wraps around and drives the pulleys of various engine accessories. The tensioner pulley maintains constant tension on the belt, preventing slippage. Without proper tension, accessories won't function correctly, leading to problems like a weak battery (alternator not charging), poor steering (power steering pump not working), or lack of air conditioning.
The "serpentine" name comes from the belt's winding path as it snakes around the various pulleys. This efficient design allows a single belt to power multiple accessories, simplifying engine design and reducing maintenance complexity.
Real-World Use: Troubleshooting Tips
Here are some basic troubleshooting tips using the serpentine belt diagram:
- Squealing Noise: A squealing noise often indicates a loose or worn serpentine belt. Check the tensioner for proper function and inspect the belt for cracks, fraying, or glazing. Compare the belt's position with the diagram to ensure it's correctly routed.
- Accessory Malfunction: If an accessory isn't working correctly (e.g., A/C not blowing cold air), check the serpentine belt to ensure it's properly routed around the accessory's pulley. Also, verify the belt isn't slipping on that specific pulley.
- Belt Slippage: Slippage can be caused by a loose belt, worn pulley, or oil contamination on the belt. The diagram helps identify the correct belt routing and allows you to visually inspect the pulleys for damage.
- Visual Inspection: Regularly inspect the serpentine belt for signs of wear and tear, such as cracks, fraying, or missing chunks. Compare the belt's condition to a new belt. Use the diagram to ensure the belt is running in the correct position on all pulleys.
If you suspect a faulty tensioner, visually inspect it for smooth movement and proper tension. A failing tensioner can cause belt slippage and premature wear.
Safety Considerations
Working on the serpentine belt system can be hazardous. Here are some crucial safety precautions:
- Disconnect the Battery: Before working on the serpentine belt, disconnect the negative battery cable to prevent accidental electrical shocks.
- Hot Engine: Never work on the serpentine belt when the engine is hot. Allow the engine to cool completely to prevent burns.
- Moving Parts: Be extremely cautious when the engine is running. Keep your hands and tools away from the moving serpentine belt and pulleys. The rotating belt can cause serious injury.
- Tensioner Release: When removing or installing the serpentine belt, use the appropriate tool (usually a wrench or socket) to release the tension on the tensioner. Follow the manufacturer's instructions carefully to avoid injury. The spring loaded tensioner can snap back with force, causing injury.
Risk of Component Damage: Incorrect belt routing can damage the accessories and even the engine. Double-check the serpentine belt diagram before starting the engine after replacing the belt.
Understanding the 2004 Pontiac Grand Prix serpentine belt diagram is a valuable skill for any DIY mechanic or car owner. It empowers you to perform routine maintenance, troubleshoot issues, and potentially save money on repairs.
We have the 2004 Pontiac Grand Prix serpentine belt diagram available for download. Please contact us to obtain the file.