2004 Toyota 4runner Serpentine Belt Diagram
Alright folks, let's dive into the serpentine belt diagram for the 2004 Toyota 4Runner. Whether you're tackling a squealing belt, prepping for some maintenance, or just expanding your automotive knowledge, understanding this diagram is crucial. It's your roadmap to properly routing and tensioning the belt, ensuring all your accessories are spinning happily.
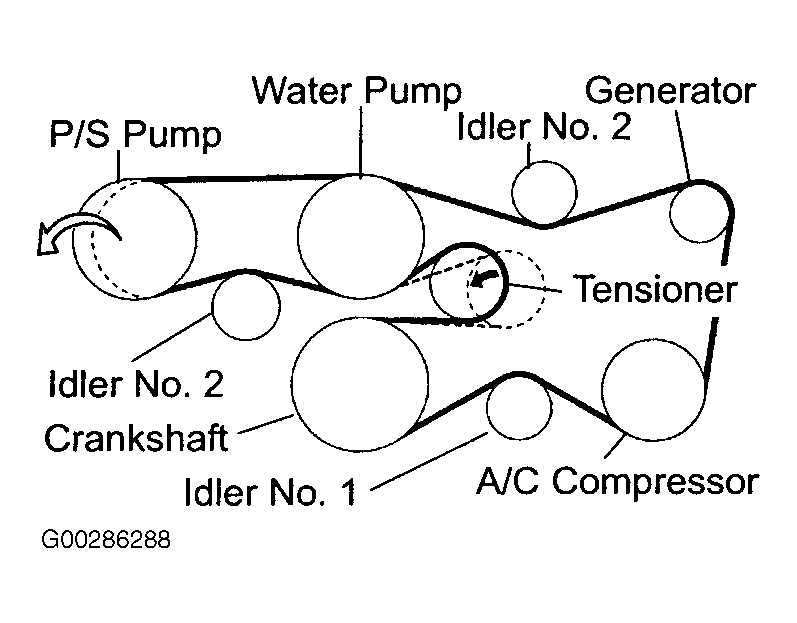
Why This Diagram Matters
Think of the serpentine belt as the circulatory system of your 4Runner's accessory drives. It's a single, continuous belt that snakes around various pulleys, powering vital components. Using the wrong belt path can lead to catastrophic damage. This diagram will prove to be invaluable when:
- Replacing a worn or damaged belt: Knowing the exact routing is essential to avoid improper installation and potential damage.
- Troubleshooting accessory issues: A slipping or incorrectly routed belt can cause problems with the alternator, power steering, A/C, and water pump.
- Performing engine maintenance: You'll need to remove the belt for certain repairs, and the diagram ensures you can reinstall it correctly.
- Understanding your vehicle's mechanics: A good grasp of the belt system demonstrates fundamental knowledge of how your engine operates.
Key Specs and Main Parts
The 2004 Toyota 4Runner came equipped with a few different engine options, primarily the 4.0L V6 (1GR-FE) and the 4.7L V8 (2UZ-FE). While the core principle is the same, the routing might slightly differ between these engines. Therefore, make sure you have the correct diagram for your specific engine!
Here are the key components you'll see on the diagram:
- Crankshaft Pulley (or Harmonic Balancer): This is the driving force of the entire system, connected directly to the engine's crankshaft.
- Alternator Pulley: Powers your electrical system.
- Power Steering Pump Pulley: Provides hydraulic assistance for steering.
- Air Conditioning Compressor Pulley: Engages and disengages to provide cooling.
- Water Pump Pulley: Circulates coolant to regulate engine temperature.
- Idler Pulleys: Smooth, free-spinning pulleys that guide the belt and maintain proper tension.
- Tensioner Pulley: Spring-loaded or hydraulically controlled pulley that maintains constant tension on the belt. This is crucial. Incorrect tension can lead to slippage, premature wear, and even damage to the accessories.
The Serpentine Belt itself is a multi-ribbed belt designed for durability and flexibility. It’s usually made of a reinforced rubber compound. The correct belt length and width are critical; consult your owner's manual or a parts retailer for the specific part number for your 2004 4Runner engine.
Understanding the Symbols
Serpentine belt diagrams are relatively straightforward, but understanding the symbols makes things much easier.
- Solid Lines: Represent the path of the serpentine belt. Follow them carefully!
- Arrows: Indicate the direction of rotation for each pulley. This is important for understanding how the accessories are driven.
- Pulley Symbols: Usually depicted as circles. They might be labeled with abbreviations indicating the component they're attached to (e.g., ALT for Alternator, P/S for Power Steering).
- Tensioner Symbol: Often represented as a pulley with an arrow indicating the direction of spring-loaded tension. You might also see a wrench symbol near the tensioner, indicating the location to apply a wrench for belt removal and installation.
- Dotted Lines (less common): Can represent the back (smooth) side of the belt contacting a pulley, as opposed to the grooved side.
While colors aren't universally standardized on these diagrams, some might use color-coding to distinguish different sections or components. Always refer to the diagram's legend if color is used.
How It Works
The crankshaft pulley, driven by the engine, is the power source for the entire system. The serpentine belt wraps around this pulley and transfers rotational energy to the other pulleys. The tensioner maintains the correct belt tension, preventing slippage and ensuring efficient power transfer. Each accessory (alternator, power steering pump, etc.) is then driven by its respective pulley, performing its specific function.
The key here is that the belt needs to have sufficient contact area with each pulley to transmit power effectively. This is why the routing is so specific and why the tension is so important. Too little tension, and the belt slips. Too much tension, and you risk premature wear on the belt and bearings in the accessories.
Real-World Use & Basic Troubleshooting
Here are a few common scenarios where you'll need the serpentine belt diagram:
- Squealing Belt: A squealing belt is often a sign of slippage. Check the belt tension and condition. If the belt is glazed or cracked, it needs to be replaced. Use the diagram to ensure correct routing after replacement.
- Accessory Failure: If your alternator isn't charging, power steering is weak, or A/C isn't working, a broken or slipped serpentine belt could be the culprit. The diagram helps you quickly diagnose if the belt is correctly routed.
- Belt Inspection: Regularly inspect your serpentine belt for cracks, fraying, or glazing. Use the diagram to guide your inspection, ensuring you check the belt's condition at all points along its path.
Troubleshooting Tips:
- Belt Slippage: Indicates low tension, worn belt, or contaminated pulleys.
- Belt Wear: Check for cracks, fraying, missing ribs. Replace if necessary.
- Pulley Misalignment: Use a straight edge to check pulley alignment. Misalignment can cause premature belt wear.
Safety Considerations
Working around a running engine can be dangerous. Here's what you need to keep in mind:
- Disconnect the Battery: Always disconnect the negative battery terminal before working on the serpentine belt system to prevent accidental electrical shorts.
- Engine Must Be Off and Cool: Never attempt to work on the serpentine belt system with the engine running. Allow the engine to cool completely before starting any work to avoid burns.
- Moving Parts: The serpentine belt system contains rapidly rotating parts. Keep your hands, tools, and clothing clear of these components when the engine is running (even for a quick check).
- Tensioner Spring: The tensioner pulley is under significant spring tension. Use the correct tools and techniques to release the tension safely. Refer to your vehicle's service manual for specific instructions.
- Protective Gear: Wear safety glasses and gloves to protect yourself from debris and potential hazards.
The tensioner is a particularly risky component because of the spring load. Always use the correct size wrench and apply force smoothly and steadily when releasing the tension. Snapping the wrench can cause serious injury. Always inspect the tensioner itself for wear. If it's sticking, difficult to move, or obviously damaged, replace it.
By understanding the 2004 Toyota 4Runner serpentine belt diagram, you can confidently tackle belt replacements, troubleshoot accessory issues, and maintain your vehicle's performance. Always refer to the specific diagram for your engine type and follow safety precautions to avoid injury.
We have the complete and detailed diagram readily available for you. You can download it here to assist you in your maintenance or repairs.