2004 Toyota Corolla Serpentine Belt Diagram
Alright, let's dive into the serpentine belt diagram for the 2004 Toyota Corolla. This isn't just a pretty picture; it's your roadmap for understanding and maintaining a critical component of your car's accessory drive system. Whether you're tackling a noisy belt, replacing a worn-out component, or just trying to get a better handle on your car's mechanics, this diagram is invaluable.
Purpose of the Serpentine Belt Diagram
The serpentine belt diagram serves several key purposes:
- Repair and Replacement: The most common use is for correctly routing a new serpentine belt. Messing this up can lead to serious problems.
- Troubleshooting: The diagram helps identify the specific components driven by the belt, allowing you to isolate the source of issues like squealing noises or non-functioning accessories.
- Understanding System Layout: It provides a visual representation of the entire accessory drive system, improving your overall understanding of how your engine functions.
- Preventative Maintenance: Using the diagram, you can inspect belt condition and pulley alignment as part of your routine maintenance checks.
Key Specs and Main Parts of the 2004 Corolla Serpentine Belt System
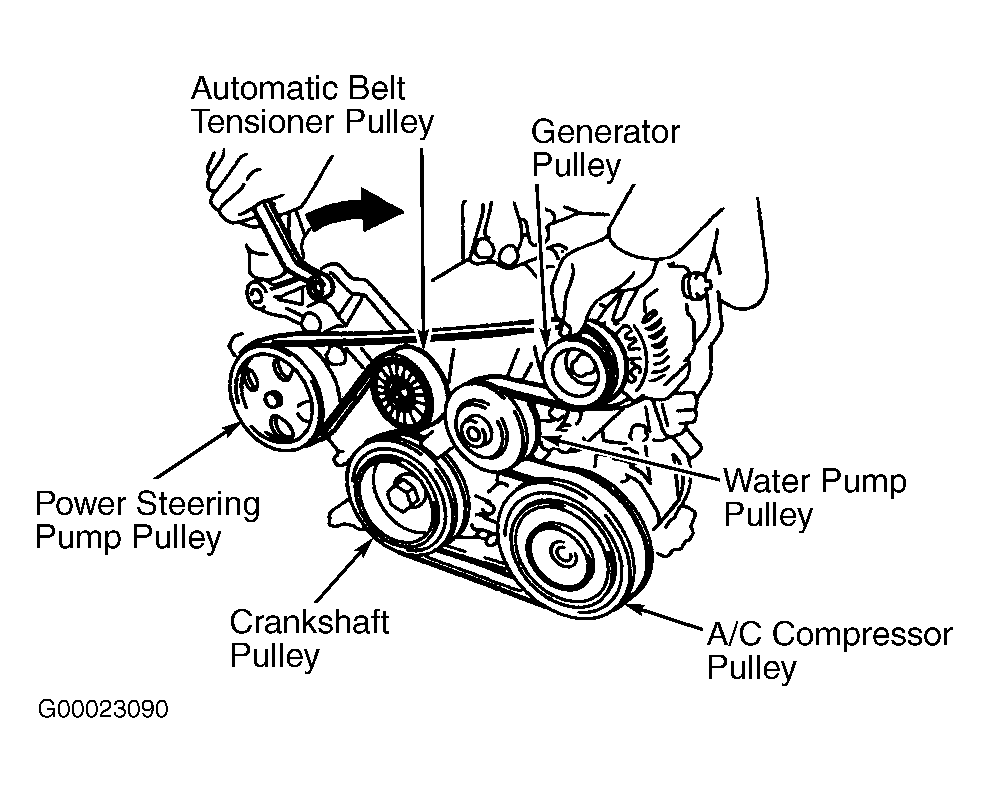
The 2004 Toyota Corolla, equipped with the 1.8L 1ZZ-FE engine, utilizes a single serpentine belt to drive multiple accessories. Here's a breakdown of the key components:
- Crankshaft Pulley (Crank Pulley): This is the driving force. Connected directly to the engine's crankshaft, it transfers rotational energy to the serpentine belt.
- Alternator Pulley: The alternator generates electrical power for the car's systems and recharges the battery. The serpentine belt spins the alternator pulley to make this happen.
- Power Steering Pump Pulley: The power steering pump provides hydraulic assistance to make steering easier. Its pulley is also driven by the serpentine belt.
- Air Conditioning Compressor Pulley: The AC compressor is responsible for cooling the cabin air. The serpentine belt turns its pulley when the AC is activated.
- Idler Pulley(s): These are smooth, unpowered pulleys that guide the belt along its path and maintain proper tension. They reduce belt vibration and prevent slippage. Often there's one or two.
- Tensioner Pulley: This spring-loaded pulley automatically maintains the correct tension on the serpentine belt. It’s crucial for optimal performance and preventing premature wear. The tensioner body includes a spring and dampener.
- Serpentine Belt: The continuous belt that connects all the pulleys, transmitting rotational force from the crankshaft to the accessories. The belt is typically made of reinforced rubber.
Understanding Symbols and Markings on the Diagram
Serpentine belt diagrams use various symbols to represent components and belt routing. Knowing what these mean is essential for accurate interpretation.
- Solid Lines: A solid line indicates the path of the serpentine belt itself. The thickness of the line doesn't usually signify anything specific, though some diagrams might use thicker lines for easier visibility.
- Arrows: Arrows indicate the direction of belt travel. Pay close attention to these, as incorrect routing can damage the belt and the accessories.
- Circles/Ovals: Circles or ovals represent the pulleys. The size of the circle doesn't necessarily correspond to the physical size of the pulley.
- Text Labels: Each pulley is typically labeled with its function (e.g., "ALT" for alternator, "P/S" for power steering, "A/C" for air conditioning).
- Routing Indicators: Some diagrams might use specific markings to indicate whether the belt should pass on the front or back side of a particular pulley. Follow these instructions carefully.
- Tensioner Indicator: The tensioner is often marked with a special icon or symbol to differentiate it from the idler pulleys. Often, this is a depiction of the spring mechanism.
How the Serpentine Belt System Works
The 2004 Corolla's serpentine belt system is a relatively simple but effective design. The crankshaft pulley, powered by the engine, drives the serpentine belt in a continuous loop. The belt then transmits this rotational force to each of the accessory pulleys (alternator, power steering pump, A/C compressor). The idler pulleys and the tensioner pulley work together to guide the belt and maintain the correct tension.
The tensioner is particularly important. As the belt stretches over time, the spring-loaded tensioner automatically adjusts to maintain the proper amount of force, ensuring consistent performance of the accessories. Without proper tension, the belt can slip, leading to reduced accessory performance and potential damage.
Real-World Use: Basic Troubleshooting Tips
Here are some common issues you might encounter and how the serpentine belt diagram can help:
- Squealing Noise: A squealing noise, especially when starting the engine or turning the steering wheel, often indicates a slipping serpentine belt. Use the diagram to inspect the belt for cracks, wear, or glazing. Also, check the tensioner to ensure it's functioning properly. A worn tensioner might not be applying enough pressure.
- Accessory Malfunction: If the alternator, power steering, or A/C stops working, the serpentine belt might be broken or severely damaged. The diagram helps you quickly identify which accessories are driven by the belt.
- Belt Jumping Off: A belt that repeatedly jumps off the pulleys could indicate misaligned pulleys, a worn tensioner, or an incorrect belt size. The diagram allows you to visually check the alignment of the pulleys. Use a straight edge to confirm they are all in the same plane.
- Belt Wear: Regular inspection using the diagram as a reference is key. Look for cracks, fraying, or missing chunks. Replace the belt if you see significant wear.
Safety Considerations
Working on the serpentine belt system involves potential hazards. Here are some key safety precautions:
- Disconnect the Battery: Always disconnect the negative battery terminal before working on any electrical components, including the alternator. This prevents accidental shorts and potential injury.
- Hot Engine: Never work on the serpentine belt system when the engine is hot. Allow the engine to cool completely before starting any repairs.
- Moving Parts: The serpentine belt system contains rapidly moving parts. Keep your hands, hair, and clothing away from the belt and pulleys when the engine is running.
- Eye Protection: Wear safety glasses to protect your eyes from debris.
- Correct Tools: Use the appropriate tools for the job, including a serpentine belt tool (or suitable wrench) for releasing the tension on the tensioner.
The tensioner itself can be dangerous. It's spring-loaded and can snap back with considerable force if released incorrectly. Always use the correct tool and follow the manufacturer's instructions carefully.
Finally, remember that the alternator carries high current when the engine is running. Avoid touching the alternator terminals while the engine is running to prevent electrical shock.
With a good understanding of the serpentine belt diagram and these safety precautions, you can confidently tackle most serpentine belt-related maintenance and repairs on your 2004 Toyota Corolla.
We have the complete diagram file available for download. It contains the full routing and all the necessary details to complete this job safely and correctly. This resource will allow you to keep your 2004 Corolla running smoothly and efficiently. Let us know if you'd like to retrieve the document.