
2004 Volkswagen Beetle Fuse Box Diagram
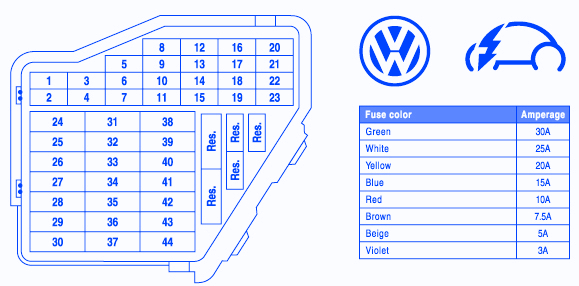
The 2004 Volkswagen Beetle, affectionately known as the New Beetle, is a popular car for its retro styling and reliable mechanics. One crucial aspect of maintaining this vehicle, especially when tackling electrical issues or modifications, is understanding its fuse box diagram. This article provides a comprehensive guide to the 2004 VW Beetle's fuse box, empowering you with the knowledge needed for successful troubleshooting and repairs.
Purpose of Understanding the Fuse Box Diagram
The fuse box diagram is essentially a roadmap to your car's electrical system. It identifies the location and function of each fuse and relay. Understanding it is essential for several reasons:
- Troubleshooting Electrical Problems: When an electrical component fails (e.g., a headlight, radio, or window motor), the first step is often to check the corresponding fuse. The diagram helps you locate the correct fuse quickly.
- Performing Repairs: Some repairs involve disconnecting and reconnecting electrical components. The diagram ensures you're working with the correct circuits and avoid short circuits or damage.
- Installing Aftermarket Accessories: If you're adding accessories like a new stereo, amplifier, or lighting system, you'll need to tap into the car's electrical system. The diagram helps you identify suitable power sources and protect your circuits with appropriate fuses.
- Preventative Maintenance: Periodically inspecting the fuse box and checking for corroded or damaged fuses can prevent future electrical problems.
- General Understanding of Vehicle Systems: Even without immediate problems, studying the fuse box diagram gives you a deeper understanding of how your car's electrical systems are designed and interconnected.
Key Specs and Main Parts
The 2004 VW Beetle typically has two main fuse boxes. Their locations are:
- Interior Fuse Box: Located on the left side of the dashboard, behind a small access panel. This box primarily houses fuses for interior components like the radio, lights, and wipers.
- Engine Compartment Fuse Box: Located near the battery under the hood. This box handles fuses for engine management systems, the cooling fan, and other critical functions.
Inside each fuse box, you'll find:
- Fuses: These are small, replaceable devices designed to protect electrical circuits from overcurrent. They contain a thin metal strip that melts and breaks the circuit if the current exceeds a certain level. Fuses are rated in amperes (amps or A), indicating the amount of current they can handle before blowing.
- Relays: These are electromechanical switches that control high-current circuits using a low-current signal. They are often used for components that require a lot of power, such as the starter motor or headlights. Relays help protect delicate control circuits from high voltage loads.
- Fuse Puller: Most fuse boxes include a small plastic tool specifically designed for removing fuses. Using the correct tool prevents damage to the fuse or the fuse box.
Understanding the Symbols and Markings
Fuse box diagrams use symbols and markings to identify each fuse and relay's function. These symbols may seem cryptic at first, but once understood, they provide crucial information. Here's a breakdown of common elements:
- Lines: Lines on the diagram represent electrical circuits. Thicker lines may indicate circuits that carry higher currents.
- Colors: Different colored wires in the car's wiring harness are often indicated on the diagram, helping you trace circuits. Common colors include red (power), black (ground), and various other colors for specific functions.
- Fuse Ratings (Amperage): Each fuse location is typically labeled with its amperage rating (e.g., 10A, 15A, 20A). Using a fuse with a higher amperage than specified can damage the circuit and increase the risk of fire. Using a lower amperage fuse can cause it to blow prematurely.
- Icons/Symbols: These represent the component that the fuse protects. Some common icons include:
- Headlight icon: Headlights
- Radio icon: Radio
- Windshield wiper icon: Windshield wipers
- Cigar lighter icon: Cigarette lighter/accessory power outlet
- Fan icon: Cooling fan
- Relay Symbols: Relays are typically represented by a square or rectangle with internal connections showing the coil and the switch contacts.
The specific symbols used can vary slightly, but the key is to consult the legend or key that accompanies the fuse box diagram. The legend translates each symbol into its corresponding function.
How It Works: The Electrical Flow
Understanding how the electrical system functions is crucial for effective troubleshooting. Here's a simplified overview:
- Power Source: The car's battery provides the primary source of electrical power.
- Distribution: The power is distributed through the wiring harness to various components.
- Fuse Protection: Each circuit is protected by a fuse, which is a weak link designed to break if the current exceeds its rating.
- Relay Control: Relays act as switches, allowing low-current circuits to control high-current devices.
- Component Operation: When a circuit is complete, the electrical component (e.g., a light bulb or motor) operates.
- Ground: The circuit returns to the battery through a ground connection, completing the loop.
When a fuse blows, it indicates an overcurrent condition in the circuit. This can be caused by a short circuit, an overloaded circuit (too many devices drawing power), or a faulty component.
Real-World Use: Basic Troubleshooting Tips
Here's how to use the fuse box diagram to troubleshoot common electrical problems:
- Identify the Symptom: Determine which electrical component is not working (e.g., the radio, headlights, or wipers).
- Consult the Diagram: Locate the fuse that corresponds to the non-functional component using the fuse box diagram.
- Inspect the Fuse: Use the fuse puller to remove the fuse and visually inspect it. A blown fuse will have a broken filament.
- Replace the Fuse: Replace the blown fuse with a new fuse of the same amperage rating. Never use a fuse with a higher amperage rating.
- Test the Component: Turn on the component to see if it now works.
- If the Fuse Blows Again: If the new fuse blows immediately, there is likely a short circuit or another underlying problem in the circuit. Further diagnostics are needed. This may require a multimeter to test for continuity and voltage.
Safety Precautions
Working with automotive electrical systems can be dangerous. Follow these safety precautions:
- Disconnect the Battery: Before working on any electrical components, disconnect the negative terminal of the battery to prevent accidental short circuits. This is especially important when working on circuits connected to the airbag system or the ECU (Engine Control Unit).
- Use the Correct Tools: Always use the correct tools for the job, including a fuse puller and appropriate screwdrivers.
- Avoid Water: Never work on electrical components in wet or damp conditions.
- Never Bypass a Fuse: Do not use a wire or other conductive material to bypass a fuse. This can cause a fire or damage to the electrical system.
- Consult a Professional: If you are not comfortable working on electrical systems, consult a qualified mechanic.
The components connected to the ECU and airbag system are particularly sensitive. Mishandling these circuits can cause serious damage or personal injury. Always exercise extreme caution when working near these components.
We have a downloadable PDF of the 2004 Volkswagen Beetle fuse box diagram. This file provides a detailed and easily accessible reference for your troubleshooting and repair needs. Consider it your dedicated resource as you work on your vehicle.