2005 Chevy Silverado 1500 Serpentine Belt Diagram
Alright, let's dive into the serpentine belt diagram for your 2005 Chevy Silverado 1500. Whether you're tackling a repair, planning some preventative maintenance, or simply expanding your automotive know-how, understanding this diagram is crucial. We're going to break it down in a way that's clear and practical, even if you're not a seasoned pro.
Purpose of the Serpentine Belt Diagram
So, why bother with a diagram at all? Well, the serpentine belt is a single, continuous belt that snakes around various engine components, powering them simultaneously. It's the unsung hero of your accessories. The diagram acts as your roadmap for the belt's proper routing. Without it, you risk installing the belt incorrectly, which can lead to:
- Accessory Malfunction: Power steering failure, alternator problems (dead battery), air conditioning issues, and more.
- Belt Damage: Premature wear, fraying, or even snapping, leaving you stranded.
- Engine Damage: In extreme cases, a misrouted belt can interfere with other components.
Having the diagram on hand makes belt replacement, tensioner checks, and general troubleshooting significantly easier and safer.
Key Specs and Main Parts for a 2005 Silverado 1500 Serpentine Belt System
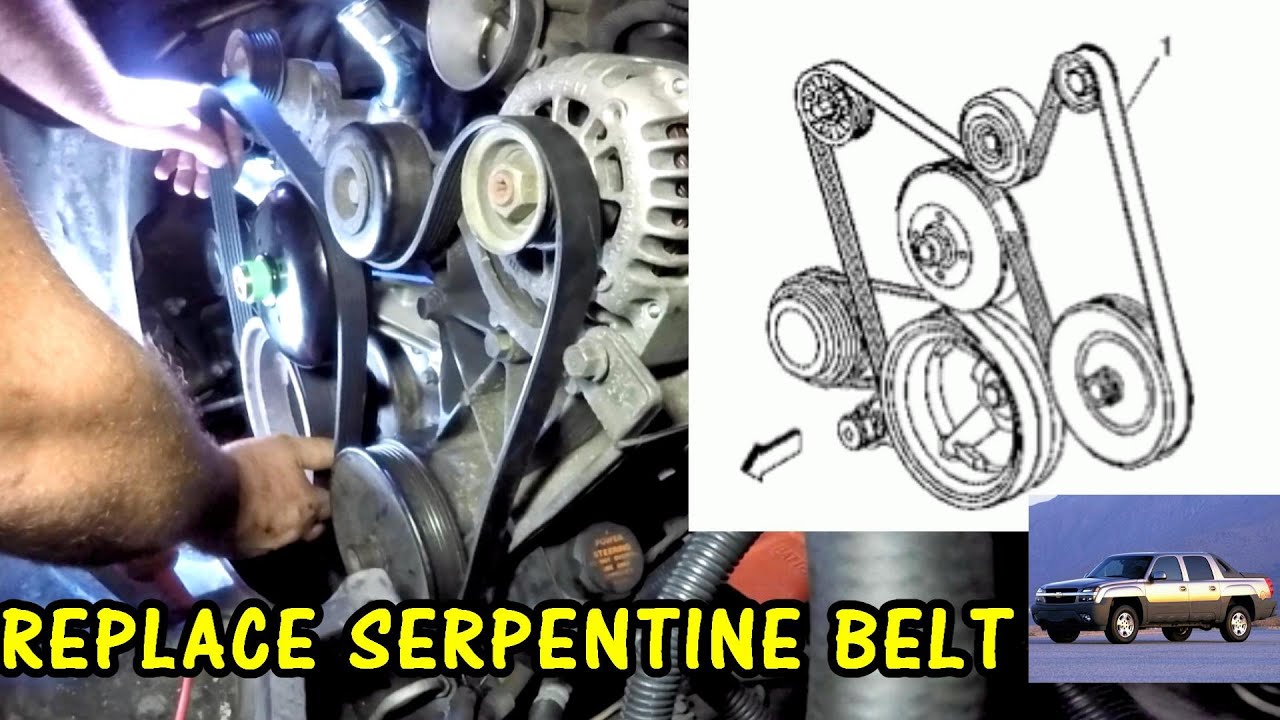
The 2005 Silverado 1500 came with several engine options, and while the general principle remains the same, the specific routing of the serpentine belt can vary. The most common engines are the 4.3L V6 (LU3), 4.8L V8 (LR4), and 5.3L V8 (LM7 or L59). It is crucial to find the diagram corresponding to your *exact* engine configuration. We have a downloadable version available, but be sure to double check against your VIN to ensure it is correct.
The main components involved in the serpentine belt system are:
- Crankshaft Pulley (Harmonic Balancer): This is the driven pulley connected directly to the engine's crankshaft. It's the heart of the system, transferring engine power to the belt.
- Alternator Pulley: Powers the alternator, which charges your battery and provides electrical power to the vehicle.
- Power Steering Pump Pulley: Drives the power steering pump, providing hydraulic assistance for steering.
- Air Conditioning Compressor Pulley: Engages and disengages to power the A/C compressor, cooling the cabin.
- Idler Pulley(s): Smooth, bearing-equipped pulleys that guide the belt and maintain proper tension. They do not directly drive any accessories.
- Tensioner Pulley: Spring-loaded pulley that automatically maintains the correct tension on the belt. This is crucial for proper accessory function and belt longevity. A failing tensioner is a common cause of squealing belts.
- Water Pump Pulley: On some engines (particularly the V6), the serpentine belt directly drives the water pump, which circulates coolant through the engine.
Understanding the Symbols in a Serpentine Belt Diagram
Serpentine belt diagrams use symbols to represent the various components and the belt routing. Here's a breakdown of what to look for:
- Solid Lines: Represent the front (or outside) of the serpentine belt. This is the side that makes direct contact with the pulley grooves.
- Dotted Lines: Typically indicate the back (or smooth side) of the belt. This side rides against idler pulleys.
- Arrows: Show the direction of belt travel. Pay close attention to these, as they are critical for proper routing.
- Pulley Icons: Simple circular shapes representing each pulley. Some diagrams may label these with abbreviations (e.g., ALT for Alternator, P/S for Power Steering).
- Tensioner Icon: Usually depicted as a pulley with an arrow indicating the direction of its spring-loaded movement. This visually represents how the tensioner applies force to the belt.
Color Coding: Some diagrams use color coding to further differentiate the belt path, but this is less common. If present, a legend will explain the meaning of each color.
How the Serpentine Belt System Works
The serpentine belt system is elegantly simple in its function. The crankshaft pulley, directly driven by the engine, provides the rotational force. This force is transferred to the serpentine belt, which then drives all the accessory pulleys. The tensioner maintains the correct belt tension, preventing slippage and ensuring optimal performance of all components. When you start the engine, the crankshaft pulley spins, and the serpentine belt immediately starts powering the alternator (charging the battery), power steering pump (assisting steering), and air conditioning compressor (cooling the cabin). If the belt is worn, cracked, or improperly tensioned, it will slip, resulting in reduced performance of these systems.
Real-World Use: Basic Troubleshooting Tips
Here are some common issues and how the diagram can help:
- Squealing Belt: Often caused by a worn belt, loose tensioner, or misaligned pulleys. Use the diagram to check the belt's routing and inspect the tensioner. Replace the belt if it's cracked or glazed. If the squealing persists after a new belt, suspect a faulty tensioner or misaligned pulley.
- Accessory Failure: If one of your accessories isn't working (e.g., no power steering), first check the serpentine belt. Is it intact? Is it properly routed according to the diagram? A snapped or misrouted belt is a likely culprit.
- Battery Not Charging: The alternator is driven by the serpentine belt. If the belt is slipping or broken, the alternator won't charge the battery. Check the belt's condition and tension.
- Difficulty Installing a New Belt: The diagram is essential! Follow the routing shown in the diagram meticulously. Make sure the belt is seated correctly in all the pulley grooves before releasing the tensioner.
Visual Inspection: Regularly inspect your serpentine belt for cracks, fraying, glazing (a shiny, smooth surface), or missing chunks. These are all signs of wear and indicate that the belt needs replacement. Also, check the pulleys for rust or damage.
Safety Considerations
Working around the serpentine belt system can be dangerous if you're not careful:
- Rotating Parts: The engine must be OFF and the key removed before working on the serpentine belt. The engine and all pulleys rotate at high speed and can cause serious injury.
- Hot Engine: Allow the engine to cool down completely before working on the belt. Touching a hot engine can cause burns.
- Tensioner Spring: The tensioner pulley is spring-loaded. Use the correct tool (usually a serpentine belt tool with the correct socket size) to relieve the tension before removing or installing the belt. Releasing the tensioner without the proper tool can cause the tensioner to snap back violently, potentially causing injury.
Battery Disconnect: While not always required, disconnecting the negative battery terminal adds an extra layer of safety, preventing accidental starting of the engine during your work.
Remember, the serpentine belt is a critical component of your 2005 Chevy Silverado 1500. Taking the time to understand its routing and operation will empower you to perform basic maintenance and troubleshooting, saving you time and money in the long run.
We have the serpentine belt diagram available for download. Make sure to confirm the part number matches your vehicles specifications.