2005 Chevy Silverado Radio Wiring Harness Adapter
Alright, let's dive into the wiring harness adapter for a 2005 Chevy Silverado radio. Whether you're upgrading your head unit, troubleshooting a faulty factory radio, or simply trying to understand how your audio system is wired, understanding this adapter is crucial. Think of this article as your comprehensive guide to navigating the often-intimidating world of automotive electrical systems, specifically tailored for the 2005 Silverado.
Purpose and Importance
Why bother with this diagram and understanding the adapter? The primary reason is modularity. Modern car radios are deeply integrated into the vehicle's systems. Replacing or upgrading your radio used to be a simple matter of unplugging the old one and plugging in the new. Now, you need a way to interface with the car's existing wiring harness without cutting or splicing any wires, which can damage the factory harness and potentially void your warranty (or introduce a whole host of electrical gremlins). This is where the wiring harness adapter comes in.
Using a wiring harness adapter allows you to:
- Install an aftermarket radio: Adapters translate the proprietary GM wiring to the industry-standard connectors found on aftermarket head units.
- Maintain factory wiring integrity: No cutting means no compromised wiring, and easy reversibility.
- Simplify installation: Adapters are designed for plug-and-play functionality, greatly reducing installation time and potential errors.
- Troubleshoot audio problems: Understanding the wiring diagram can help you diagnose issues related to power, speakers, or other audio functions.
- Learn and understand your car's electrical system By examining the harness and diagram, you can trace signals and understand how the radio interacts with other components.
Key Specs and Main Parts of a 2005 Silverado Radio Wiring Harness Adapter
A typical wiring harness adapter for a 2005 Chevy Silverado consists of two main connectors and a bundle of color-coded wires. Let's break it down:
- Vehicle-Specific Connector (GM Connector): This connector plugs directly into the factory radio wiring harness in your Silverado. It's designed to fit perfectly and securely. Typically, you'll encounter one or two of these, depending on your truck's trim level and options (e.g., Bose sound system).
- Aftermarket Radio Connector (ISO Connector): This connector is standardized across most aftermarket radios (Pioneer, Kenwood, Alpine, Sony, etc.). It allows you to easily plug the adapter into your new head unit.
- Color-Coded Wires: The wires connecting the two connectors are color-coded according to industry standards. Each color corresponds to a specific function (power, ground, speakers, illumination, etc.). This is where the wiring diagram becomes indispensable.
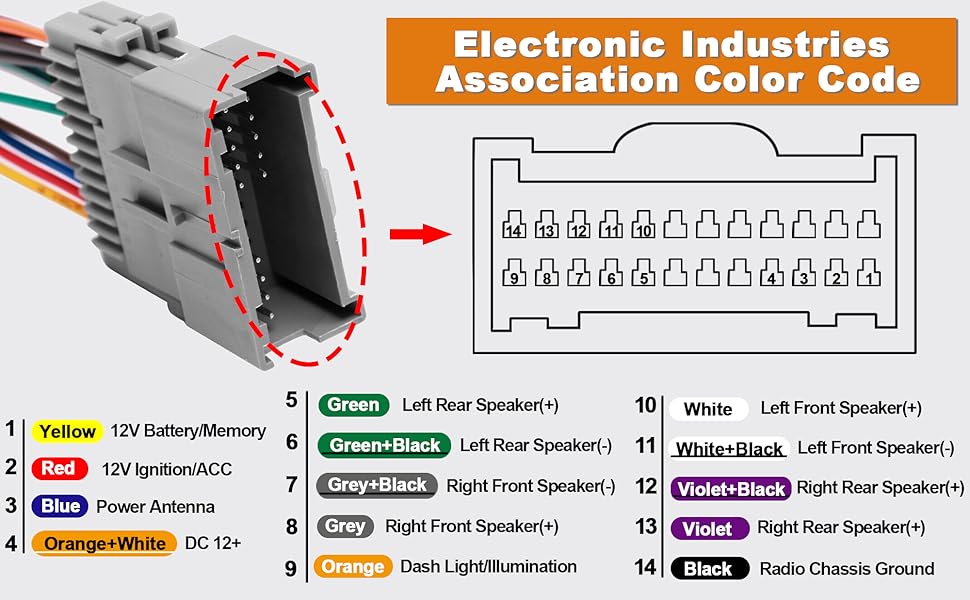
Here are some common wire functions and colors you'll find:
- +12V Constant (Battery): Typically a yellow wire. Provides constant power to the radio, even when the ignition is off (for memory functions, clock, etc.).
- +12V Switched (Ignition): Typically a red wire. Provides power to the radio only when the ignition is turned on.
- Ground: Typically a black wire. Provides the return path for electrical current.
- Speakers: Multiple pairs of wires, often white, gray, green, and purple, each with a solid and striped version, representing positive (+) and negative (-) for each speaker (front left, front right, rear left, rear right).
- Illumination: Typically an orange wire. Dims the radio display when the headlights are turned on.
- Power Antenna: Typically a blue wire. Activates the power antenna (if equipped) when the radio is turned on.
- Remote Turn-On (Amplifier): Typically a blue/white wire. Signals an external amplifier to turn on when the radio is powered on.
It's important to note that the exact wire colors might vary slightly depending on the manufacturer of the adapter. Always refer to the wiring diagram provided with your specific adapter.
Understanding Wiring Diagram Symbols
Wiring diagrams use standardized symbols to represent electrical components and connections. Here's a basic rundown of what you might see:
- Lines: Wires connecting different components. A solid line indicates a direct connection.
- Dots: A dot at the junction of two or more lines indicates that they are electrically connected. If the lines cross without a dot, they are not connected.
- Battery Symbol: Represents the vehicle's battery (a long line and a short line).
- Ground Symbol: Represents a connection to the vehicle's chassis ground (usually looks like a series of downward-pointing lines).
- Resistor Symbol: Represents a resistor (a zig-zag line).
- Capacitor Symbol: Represents a capacitor (two parallel lines).
- Fuse Symbol: Represents a fuse (a wavy line or a box with a line through it).
- Connector Symbols: Rectangles or other shapes with numbered pins, indicating the connections between different wiring harnesses.
Color codes are usually indicated next to the wires on the diagram (e.g., "RED," "BLK," "GRN/WHT").
How It Works: Signal Flow and Integration
The wiring harness adapter acts as a translator between the Silverado's electrical system and the aftermarket radio. Here's a simplified explanation of how it works:
- Power Supply: The adapter receives power (both constant and switched) from the Silverado's wiring harness through the vehicle-specific connector.
- Ground Connection: The adapter establishes a ground connection to the vehicle's chassis through the ground wire.
- Signal Routing: The adapter routes the power and ground signals to the appropriate pins on the aftermarket radio connector.
- Speaker Connections: The adapter connects the Silverado's speaker wires to the corresponding speaker outputs on the aftermarket radio connector.
- Auxiliary Signals: The adapter may also handle auxiliary signals such as illumination, power antenna, and remote turn-on.
The key is that the adapter bridges the gap between the two different wiring systems, allowing them to communicate without any permanent modifications to the Silverado's wiring.
Real-World Use: Basic Troubleshooting Tips
Here are a few common problems you might encounter and how the wiring diagram can help:
- No Power to Radio: Check the +12V constant (yellow) and +12V switched (red) wires using a multimeter. Verify that you're getting voltage on both wires when the ignition is on. Also, check the ground connection.
- No Sound from Speakers: Check the speaker wire connections. Make sure they are securely connected to both the adapter and the radio. Use the wiring diagram to identify the correct speaker wires. You can use a multimeter to perform a continuity test on the speaker wires to verify that they are not broken.
- Radio Loses Memory: This usually indicates a problem with the +12V constant (yellow) wire. Check the connection and the fuse associated with that wire.
- Dimmer Not Working: Check the illumination (orange) wire. Make sure it's properly connected to the radio and that the headlights are turned on.
Pro-Tip: Always double-check your connections before powering on the radio. Incorrect wiring can damage the radio or the vehicle's electrical system.
Safety Considerations
Working with automotive electrical systems can be dangerous if proper precautions are not taken. Here are a few safety tips:
- Disconnect the Battery: Always disconnect the negative terminal of the battery before working on any electrical components. This will prevent accidental shorts and potential electrocution.
- Use Proper Tools: Use insulated tools to avoid electrical shocks.
- Work in a Well-Lit Area: This will help you see what you're doing and avoid mistakes.
- Consult a Professional: If you're not comfortable working with electrical systems, consult a qualified mechanic or car audio installer.
- Airbags: Be extremely careful when working near airbags. Accidental deployment can cause serious injury. Consult your vehicle's service manual for instructions on how to safely disable the airbag system.
The constant +12V wire can carry significant current. A short circuit can quickly overheat the wire and potentially start a fire. Be extra careful when working with this wire.
We have a detailed wiring diagram file available for download that specifically outlines the 2005 Chevy Silverado radio wiring harness adapter. It includes all the color codes, pinouts, and signal descriptions you'll need. Download it and use it in conjunction with this article for a successful installation or troubleshooting experience.