
2005 Ford F150 Serpentine Belt Diagram
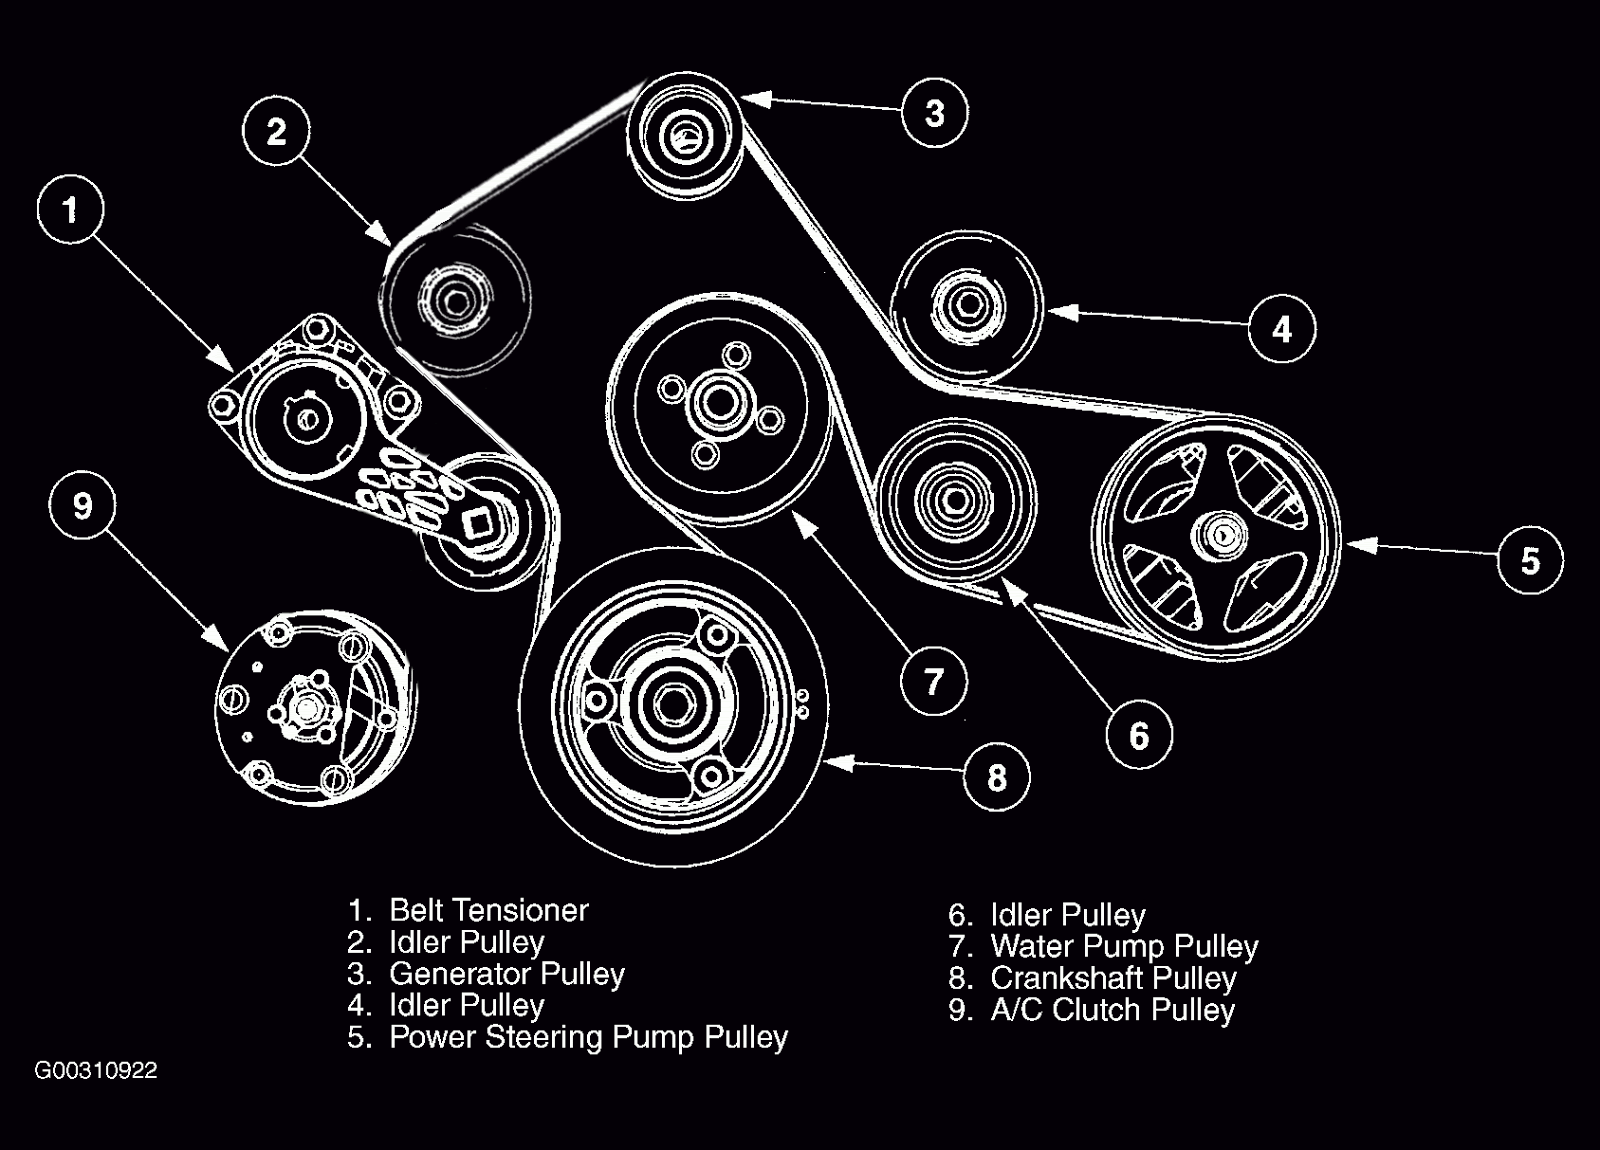
Alright, let's dive into the serpentine belt system for the 2005 Ford F150. Understanding this system is crucial for a variety of reasons, from basic maintenance to diagnosing and fixing driveability issues. Whether you're replacing a worn belt, swapping out a component like the alternator, or simply trying to get a better handle on your truck's engine bay, knowing the serpentine belt diagram inside and out is a valuable skill.
Purpose of the Serpentine Belt Diagram
Why bother with a serpentine belt diagram? Simple. It’s your roadmap to understanding how the single, long, winding belt routes around the various engine accessories. Without it, you’re basically guessing when it comes to replacing the belt or troubleshooting accessory issues. The diagram helps you:
- Replace the belt correctly: Incorrect routing can lead to serious damage.
- Identify components: Know what you're looking at – alternator, power steering pump, etc.
- Diagnose issues: A slipping belt can point to a failing tensioner or a seized accessory.
- Plan repairs: Knowing the routing helps you anticipate the steps involved in replacing related components.
- General learning and Familiarity: Become more familiar with your truck's layout, and improve your DIY skill.
Key Specs and Main Parts (2005 Ford F150)
The 2005 Ford F150 came with a few different engine options, each with a slightly different serpentine belt arrangement. We'll focus on the common ones:
- 4.6L V8 (2-Valve): This engine features a relatively straightforward serpentine belt layout.
- 5.4L V8 (3-Valve): This engine typically has a slightly more complex routing due to the addition of variable camshaft timing (VCT) components.
Main Components involved in the serpentine belt system are:
- Crankshaft Pulley (Harmonic Balancer): The driving force behind the entire system. The belt gets its initial rotation from this pulley.
- Alternator: Charges the battery and powers the electrical system.
- Power Steering Pump: Provides hydraulic assistance for steering.
- Air Conditioning Compressor: Compresses refrigerant for the AC system.
- Water Pump: Circulates coolant through the engine to prevent overheating.
- Idler Pulley(s): Smooth, non-driven pulleys used to guide the belt and maintain proper tension.
- Belt Tensioner: A spring-loaded device that automatically maintains the correct tension on the belt. This is critical for proper system operation. A worn tensioner can cause belt slippage and premature wear.
Belt Length: The exact belt length varies depending on the engine and whether or not your F150 has AC. You'll need to consult the specific diagram for your engine or look up the correct part number based on your VIN.
Serpentine Belt Diagram Symbols Explained
Understanding the symbols on the diagram is key to interpreting it correctly. While the exact symbols can vary slightly depending on the source, here are the common ones you'll encounter:
- Solid Line: Represents the path of the belt. Follow it carefully to ensure proper routing.
- Arrows: Indicate the direction of belt rotation around each pulley. This is crucial for understanding how each component is driven.
- Pulley Shapes: Different shapes may represent different types of pulleys (grooved, smooth, etc.). The grooved pulleys are typically for driving accessories, while smooth pulleys are usually idler pulleys or the tensioner pulley.
- Component Labels: Abbreviations or names (e.g., ALT, P/S, A/C, W/P) indicate the specific accessory being driven by the pulley.
Sometimes, diagrams will use different colors to highlight specific parts of the system, or different line thickness to indicate the front or back of the belt.
How It Works
The serpentine belt system is relatively simple in concept. The crankshaft pulley, driven by the engine, is the power source. The belt wraps around this pulley and then snakes its way around all the other accessory pulleys. As the crankshaft turns, it drives the belt, which in turn drives all the accessories. The tensioner maintains constant pressure on the belt, preventing it from slipping. Without proper tension, the accessories won't operate efficiently, leading to issues like a weak alternator output, poor power steering, or ineffective AC.
The placement of the idler pulleys is also important. They strategically guide the belt to maintain the correct wrap angle on each pulley. A good wrap angle is necessary for the belt to "grip" the pulley and transfer power effectively. Insufficient wrap can lead to slippage.
Real-World Use: Basic Troubleshooting Tips
Here are some common issues you might encounter and how the serpentine belt diagram can help you troubleshoot them:
- Squealing Belt: Often caused by a loose belt, worn belt, or a misaligned pulley. Check the tensioner first. If the tensioner seems weak, it may need replacement. Using the diagram, visually inspect all pulleys for proper alignment. A misaligned pulley will cause the belt to rub and squeal.
- Belt Slippage: Can be caused by a worn belt, a weak tensioner, or a seized accessory. Inspect the belt for cracks, fraying, or missing ribs. Check the tensioner's operation. If an accessory is difficult to turn by hand (with the engine off!), it may be seized.
- Accessory Failure: If an accessory stops working, the belt might be the culprit. Ensure the belt is properly routed and in good condition. Check the accessory pulley for proper rotation.
- Difficulty Replacing the Belt: Refer to the diagram to ensure you're routing the new belt correctly. Pay close attention to the placement of the belt around the idler pulley and the tensioner. Consider taking a picture of the old belt's routing before removing it.
Safety Considerations
Working on the serpentine belt system can be dangerous if you're not careful. Here are some crucial safety precautions:
- Disconnect the Negative Battery Terminal: Always disconnect the negative battery terminal before working on any electrical components, including the alternator.
- Engine Off and Cool: Never work on the serpentine belt system with the engine running or hot. Wait for the engine to cool completely.
- Keep Hands and Clothing Clear: The serpentine belt is a powerful component. Keep your hands, fingers, and loose clothing away from the belt and pulleys when the engine is running (especially during diagnostic tests).
- Use the Correct Tools: Use the correct wrench or socket to release the tension on the tensioner. Do not use makeshift tools that could slip and cause injury.
- Inspect Carefully: When replacing the belt, carefully inspect all pulleys for damage or wear. Replace any damaged pulleys before installing the new belt.
Serpentine Belt Diagram Access
Having a readily available diagram for your 2005 Ford F150 is invaluable. It will guide you through repairs, installations, and general troubleshooting. We have the file available for download, ensuring you have the correct information for your specific engine configuration. Always verify the diagram against your vehicle's specific setup before proceeding with any work.