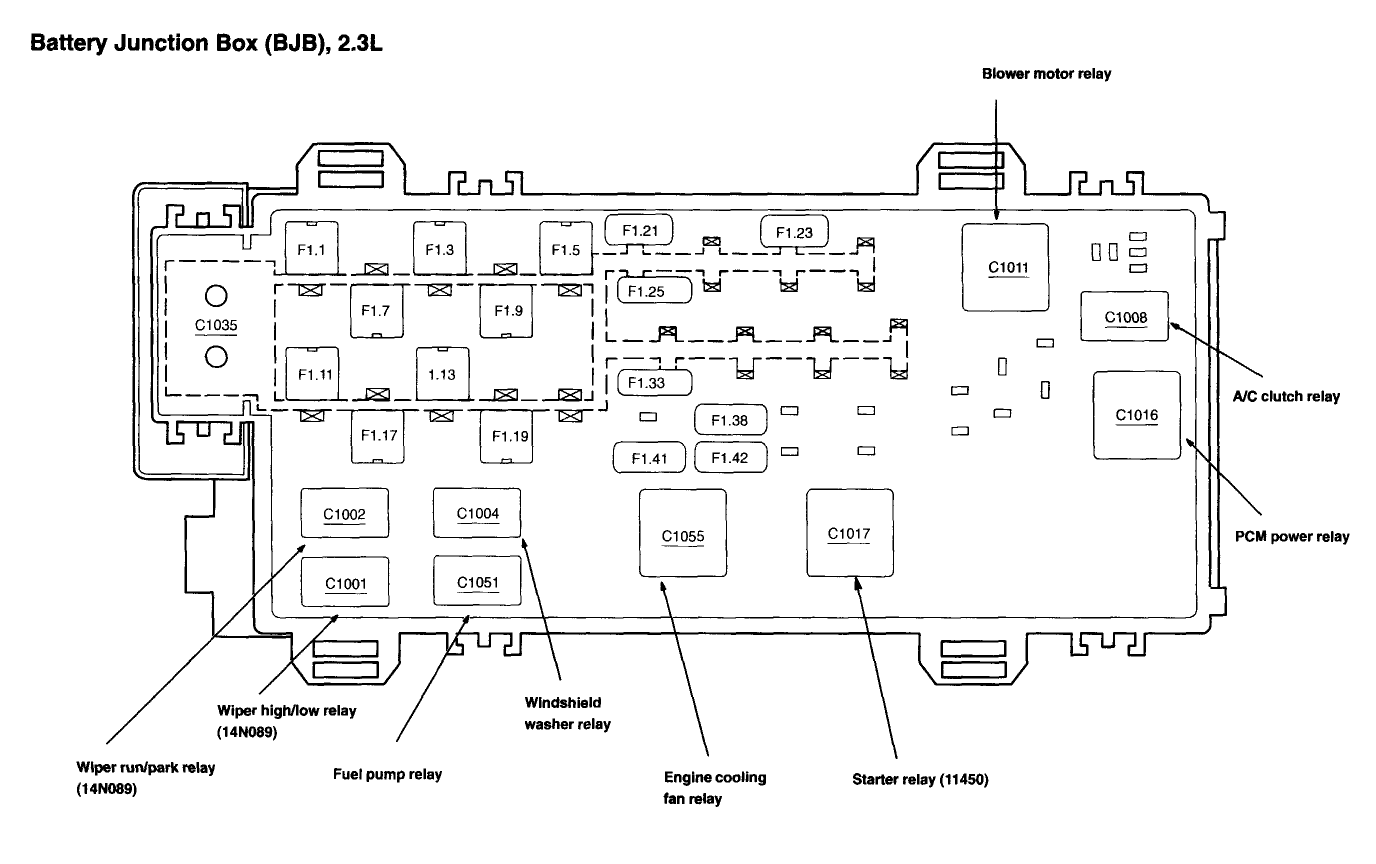
2005 Ford Ranger Fuse Box Diagram Under Hood
The 2005 Ford Ranger is a workhorse, a reliable compact truck that's still popular for its simplicity and affordability. But even the toughest vehicles can have electrical gremlins. Understanding your 2005 Ford Ranger's under-hood fuse box diagram is crucial for diagnosing and resolving electrical issues, performing modifications, or simply gaining a deeper understanding of your truck's electrical system. This article provides a detailed breakdown of the diagram, enabling you to confidently tackle electrical tasks.
Purpose of the Fuse Box Diagram
Why is a fuse box diagram so important? Imagine your headlights suddenly stop working, or the radio goes silent. Before tearing apart the entire electrical system, the first place to check is the fuse box. The fuse box diagram is essentially a roadmap, identifying each fuse and relay's specific function. It allows you to quickly pinpoint a blown fuse, potentially saving you hours of diagnostic time and expensive repairs. Here’s why it's vital:
- Troubleshooting: The diagram guides you to the correct fuse for a malfunctioning component, enabling quick diagnosis.
- Repairing: Replacing a blown fuse or a faulty relay becomes a straightforward task when you know what you're looking at.
- Modifications: Adding accessories like auxiliary lights or a new stereo requires tapping into the electrical system. Knowing the fuse ratings and circuits prevents overloads and potential damage.
- Understanding: Studying the diagram deepens your knowledge of the vehicle's electrical system, making you a more informed owner.
Key Specs and Main Parts
The under-hood fuse box, often called the Power Distribution Box (PDB), is typically located on the driver's side of the engine compartment, near the battery. It houses a collection of fuses and relays, each protecting a specific electrical circuit. Here’s a breakdown of the key components:
- Fuses: These are safety devices designed to protect circuits from overcurrent. They contain a thin wire that melts and breaks the circuit when the current exceeds a safe level. Fuses are rated in amperes (amps), indicating the amount of current they can handle before blowing. Common amp ratings include 5A, 10A, 15A, 20A, 25A, and 30A.
- Relays: These are electromechanical switches that control high-current circuits using a low-current signal. Relays are used to switch on components like the headlights, starter motor, and air conditioning compressor. They consist of a coil, which, when energized, creates a magnetic field that pulls a switch to complete the circuit.
- Fuse Puller: A small plastic tool used to safely remove fuses without damaging them. It’s usually clipped to the fuse box cover.
- The Diagram Itself: Usually a sticker on the inside of the fuse box cover, or found in the owner's manual. It's a graphical representation of the fuse and relay layout, with labels indicating the function of each.
Understanding the Symbols
Fuse box diagrams aren't always intuitive. They use symbols and abbreviations to convey information efficiently. Here's a guide to understanding the common elements:
- Fuses are typically represented as small rectangles with a number indicating the amperage rating.
- Relays are usually shown as squares or rectangles with a coil symbol inside. The diagram may indicate whether the relay is normally open (NO) or normally closed (NC).
- Lines on the diagram represent electrical circuits. A solid line indicates a direct connection, while a dashed line may indicate a connection through a switch or other component.
- Colors: While not always present on the diagram itself, wire colors are crucial for tracing circuits. A wiring diagram (a separate document from the fuse box diagram) will specify the wire colors for each circuit.
- Icons: Certain components are often represented by icons, such as a light bulb for headlights, a speaker for the radio, or a steering wheel for power steering.
How It Works
The fuse box acts as a central distribution point for electrical power. The battery provides the primary power source, and the fuse box routes this power to various components throughout the vehicle. Each circuit is protected by a fuse or relay, preventing damage from overloads or short circuits.
When a component fails or a short circuit occurs, the current flow increases dramatically. This excessive current melts the fuse wire, breaking the circuit and preventing damage to other components. Relays are used to control high-current circuits with low-current signals. For example, the headlight switch only needs to handle a small amount of current to energize the relay that switches on the high-current headlight circuit.
Real-World Use: Basic Troubleshooting Tips
Here's how to use the fuse box diagram for basic troubleshooting:
- Identify the Problem: Determine which component is malfunctioning. For example, if your windshield wipers aren't working, that's the circuit you'll need to investigate.
- Consult the Diagram: Locate the fuse or relay associated with the malfunctioning component on the fuse box diagram. The diagram should be located inside the fuse box lid.
- Inspect the Fuse: Carefully remove the fuse using a fuse puller. Examine the fuse wire. If the wire is broken or blackened, the fuse is blown and needs to be replaced.
- Test the Fuse (Optional): Use a multimeter set to continuity mode to test the fuse. A good fuse will show continuity (a beep or a reading of 0 ohms), while a blown fuse will show no continuity.
- Replace the Fuse: Replace the blown fuse with a new fuse of the same amperage rating. Never use a fuse with a higher amperage rating, as this could damage the circuit.
- Test the Component: After replacing the fuse, test the component to see if it's working. If the fuse blows again immediately, there's likely a short circuit in the wiring or the component itself.
Safety Considerations
Working with electrical systems can be dangerous. Here are some crucial safety precautions:
- Disconnect the Battery: Always disconnect the negative battery cable before working on the electrical system. This prevents accidental shorts and electrical shocks.
- Use the Correct Fuse: Never replace a fuse with one of a higher amperage rating. This bypasses the circuit protection and could cause a fire.
- Avoid Water: Never work on the electrical system in wet conditions. Water is an excellent conductor of electricity.
- Be Careful with Relays: Relays can get hot when they're operating. Be careful when handling them, especially after the vehicle has been running.
- High-Risk Components: The starter solenoid and the alternator carry very high currents. Exercise extreme caution when working on these components. Improper handling can result in serious injury or death. When working around the starter solenoid, avoid any contact with metal tools to prevent short circuit and sparks.
Understanding the 2005 Ford Ranger under-hood fuse box diagram is a valuable skill for any Ranger owner. It empowers you to diagnose and fix electrical problems, perform modifications, and gain a better understanding of your vehicle. Remember to prioritize safety and consult a qualified mechanic if you're unsure about any procedure.
We have a digital copy of the 2005 Ford Ranger Under Hood Fuse Box Diagram available for download. It's a high-resolution image that you can print or view on your computer or mobile device.