2005 Honda Odyssey Drive Belt Diagram
The drive belt, often called the serpentine belt, in your 2005 Honda Odyssey is a critical component responsible for powering several essential engine accessories. Understanding its routing and operation is crucial for preventative maintenance, troubleshooting, and performing repairs. This article provides a comprehensive guide to the 2005 Honda Odyssey drive belt diagram, empowering you to tackle related tasks with confidence.
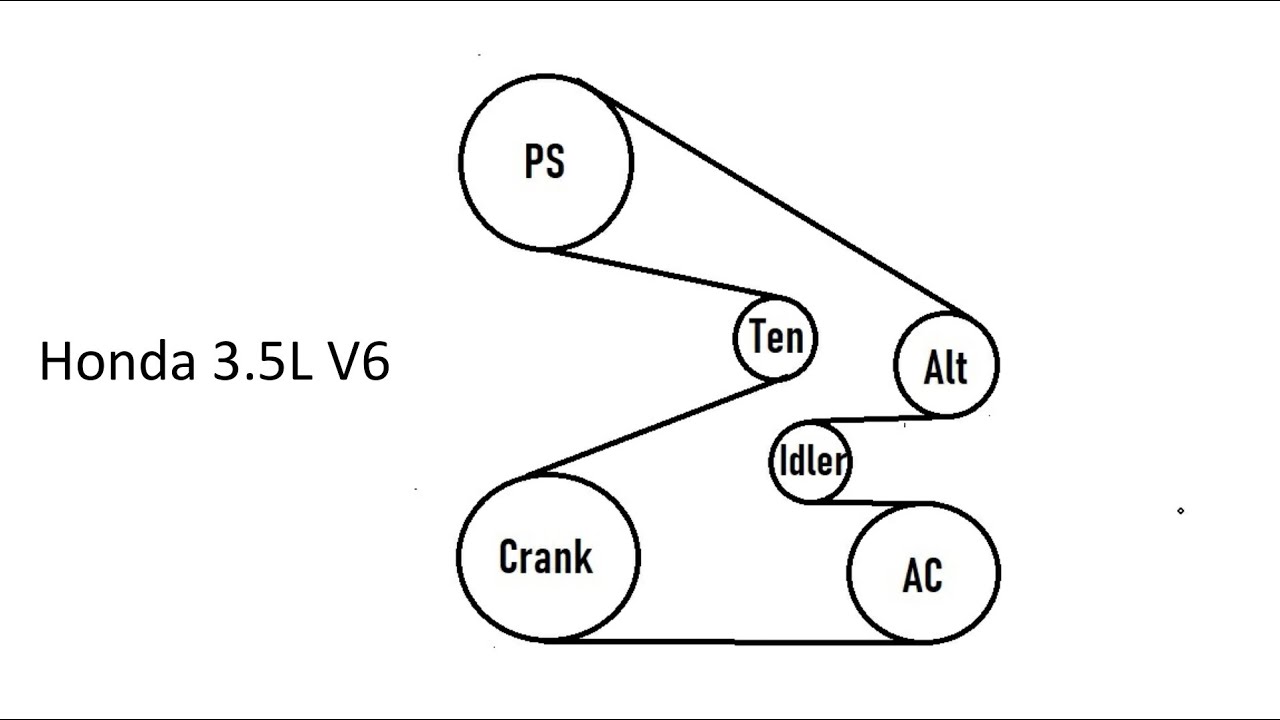
Purpose: Why This Diagram Matters
The drive belt diagram is your roadmap for understanding the serpentine belt system. It's essential for several reasons:
- Replacement: If your belt is worn, cracked, or broken, the diagram shows you the correct routing for installing a new one. Incorrect routing can lead to component failure and even engine damage.
- Troubleshooting: A squealing or chirping noise from the engine bay often indicates a problem with the drive belt or one of its associated components. The diagram helps you identify the pulleys and their functions, aiding in pinpointing the source of the noise.
- Maintenance: Periodically inspecting the drive belt and its components is crucial for preventing breakdowns. The diagram allows you to quickly locate and inspect each pulley, ensuring proper alignment and function.
- Learning and Understanding: Even if you're not planning on performing any repairs, studying the diagram provides valuable insight into how your engine operates and how different components interact.
Key Specs and Main Parts
Before diving into the diagram, let's identify the key components and their approximate specifications. Note that belt lengths can vary slightly depending on manufacturer.
- Drive Belt Length: Typically around 84-85 inches. Refer to your specific vehicle's VIN tag for precise length. Use a belt measuring tool if unsure.
- Crankshaft Pulley: The crankshaft drives the entire system. It's connected directly to the engine's crankshaft and is the starting point for the drive belt's rotation.
- Alternator Pulley: Powers the alternator, which charges the battery and provides electrical power to the vehicle.
- Power Steering Pump Pulley: Drives the power steering pump, which provides hydraulic assistance to the steering system.
- Air Conditioning Compressor Pulley: Powers the air conditioning compressor, responsible for cooling the cabin.
- Idler Pulley(s): One or more idler pulleys are used to guide the belt and maintain proper tension. They don't directly drive any accessories.
- Tensioner Pulley: The tensioner maintains the correct tension on the drive belt. It usually has a spring-loaded mechanism that automatically adjusts for belt stretch.
Symbols: Lines, Colors, and Icons
Understanding the symbols used in the drive belt diagram is essential for interpreting the routing correctly.
- Solid Lines: Represent the path of the drive belt itself. The thicker the line, the easier to see the main route.
- Arrows: Indicate the direction of rotation for each pulley. Pay close attention to these, as incorrect routing can cause components to rotate in the wrong direction.
- Pulleys: Typically represented as circles, with or without a shaded area. The shaded area usually indicates the part of the pulley the belt comes into contact with.
- Component Icons: Each component (alternator, power steering pump, etc.) may be represented by a small icon or abbreviation near its corresponding pulley. For example, "ALT" for alternator or "P/S" for power steering.
- Tensioner Direction Arrow: An arrow on the tensioner indicates the direction in which to move the tensioner to relieve tension on the belt for removal or installation.
How It Works
The drive belt system works on the principle of rotational force transfer. The crankshaft pulley, driven by the engine, spins and transfers this rotational force to the drive belt. The belt, in turn, wraps around the various accessory pulleys (alternator, power steering pump, A/C compressor), causing them to spin as well. Each accessory pulley is connected to its respective component, powering it.
The tensioner pulley is critical for maintaining the correct amount of tension on the belt. Too little tension can cause the belt to slip, resulting in reduced performance and noise. Too much tension can overload the accessory components and shorten the belt's lifespan.
Real-World Use: Basic Troubleshooting Tips
Here are some common issues and how the drive belt diagram can help:
- Squealing Noise: A squealing noise, especially when the engine is first started or under heavy load (like turning the steering wheel at low speeds), often indicates a slipping drive belt. Use the diagram to inspect the belt for cracks, glazing, or wear. Also, check the tensioner for proper function. A weak tensioner spring can cause the belt to slip.
- Chirping Noise: A chirping noise, which may be more intermittent than a squeal, can be caused by a misaligned pulley. Use the diagram to visually inspect the alignment of each pulley. A straightedge or laser pointer can help you confirm that all the pulleys are in the same plane.
- Belt Failure: If the drive belt breaks, all the accessories it powers will stop working. This can be dangerous, especially if the power steering pump fails. The diagram shows you the correct routing for installing a new belt. It is *imperative* that the belt is correctly installed.
- Accessory Failure: If an accessory fails (e.g., the alternator stops charging the battery), the drive belt diagram can help you trace the power flow from the crankshaft to the accessory. This can help you isolate the source of the problem.
Safety: Highlight Risky Components
Working on the drive belt system involves potential hazards. Remember these important safety precautions:
- Disconnect the Battery: Always disconnect the negative battery cable before working on the drive belt system. This prevents accidental starting of the engine.
- Hot Engine: Avoid working on the drive belt system immediately after the engine has been running. The engine components can be extremely hot and can cause burns.
- Moving Parts: Keep your hands and tools clear of moving parts. The drive belt and pulleys can cause serious injury if they come into contact with your skin or clothing.
- Eye Protection: Wear safety glasses to protect your eyes from debris.
- Belt Tension: The spring tension on the tensioner pulley can be significant. Use the correct tools and techniques to relieve the tension safely. Consult your vehicle's repair manual for specific instructions. Improper handling of the tensioner can lead to injury.
Finally, understand the crankshaft pulley is directly connected to the engine. Any interference with the crankshaft, like jamming a tool in its path, can damage the engine internals. Exercise extreme caution in this area.
This guide provides a comprehensive overview of the 2005 Honda Odyssey drive belt diagram. With this knowledge, you can confidently troubleshoot issues, perform maintenance, and replace the drive belt when necessary. Remember to consult your vehicle's repair manual for specific instructions and torque specifications.
For your convenience, we have a detailed, downloadable version of the 2005 Honda Odyssey drive belt diagram available. This diagram can be a valuable resource for your repairs and maintenance.