
2005 Jeep Grand Cherokee Belt Diagram
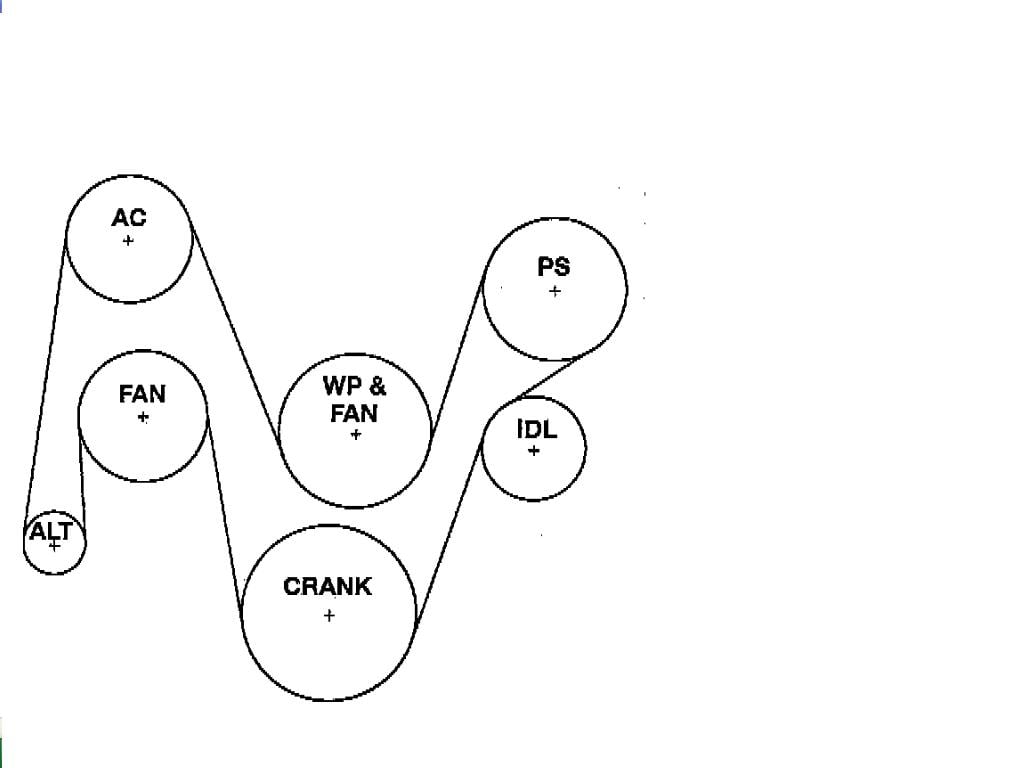
Alright, let's dive into the serpentine belt system on your 2005 Jeep Grand Cherokee. This is a critical system, and understanding its layout, function, and potential issues is essential for any serious DIY mechanic. Whether you're facing a squealing belt, replacing a component, or simply want to understand how your engine's accessories are powered, this guide, along with the downloadable belt diagram we provide, will give you the knowledge you need.
Why This Diagram Matters
The serpentine belt diagram is your roadmap to understanding the accessory drive system. It's essential for several reasons:
- Repair and Replacement: Accurately routing a new serpentine belt after removing the old one is critical. An incorrectly routed belt can cause significant damage to accessories and even lead to engine failure. The diagram ensures correct installation.
- Troubleshooting: The diagram helps you identify which accessory might be causing problems. For instance, if your power steering is failing, you can check the belt path to the power steering pump.
- General Understanding: It provides a visual representation of how various engine components – like the alternator, power steering pump, AC compressor, and water pump – are interconnected and powered by the engine.
- Preventative Maintenance: Knowing the routing allows you to quickly inspect the belt for wear, cracks, or fraying, allowing for timely replacement and preventing more costly breakdowns.
Key Specs and Main Parts (2005 Jeep Grand Cherokee)
The exact configuration of the serpentine belt system can vary slightly depending on the engine in your 2005 Grand Cherokee. However, the core components and principles remain the same. Common engine options include the 3.7L V6, the 4.7L V8, and the 5.7L Hemi V8. Always verify the diagram matches your specific engine configuration.
Main Components:
- Serpentine Belt: The single, long belt that snakes around multiple pulleys, transferring rotational power from the crankshaft to the accessories. Made from durable rubber compounds, it's designed to withstand high temperatures and constant flexing.
- Crankshaft Pulley (Damper): The pulley attached directly to the crankshaft. This is the driving force behind the entire serpentine belt system. It often incorporates a harmonic damper to reduce torsional vibrations from the engine.
- Alternator Pulley: Driven by the belt, the alternator generates electrical power to charge the battery and run the vehicle's electrical systems.
- Power Steering Pump Pulley: Drives the power steering pump, which provides hydraulic assistance to make steering easier.
- Air Conditioning (AC) Compressor Pulley: Powers the AC compressor, responsible for cooling the vehicle's cabin.
- Water Pump Pulley: Circulates coolant throughout the engine to regulate its temperature.
- Idler Pulleys: Smooth, non-driven pulleys that guide the belt and maintain proper tension and routing. They help the belt clear other components and prevent excessive wear.
- Tensioner Pulley (Automatic or Manual): Maintains the correct tension on the serpentine belt. Automatic tensioners use a spring-loaded mechanism to automatically adjust tension as the belt stretches. Manual tensioners require manual adjustment. A properly functioning tensioner is critical for belt longevity and accessory performance.
Diagram Symbols Explained
Understanding the symbols on the belt diagram is just as important as having the diagram itself.
- Solid Lines: Represent the belt itself. The thickness of the line might indicate the section of the belt under load.
- Pulleys: Depicted as circles. Smaller circles generally represent idler pulleys, while larger circles represent driven components.
- Arrows: Indicate the direction of belt travel around each pulley. Following the arrows is crucial when routing the belt.
- Component Labels: Each pulley will be labeled with a short abbreviation indicating the component it's attached to (e.g., ALT for Alternator, P/S for Power Steering, AC for Air Conditioning, WP for Water Pump, CRK for Crankshaft).
- Tensioner Symbol: The tensioner pulley is often represented with a spring symbol or an arrow indicating the direction of movement when releasing or applying tension.
- Routing Marks: Some diagrams use different colors or shading to highlight specific sections of the belt path or indicate the "smooth" (ribbed) or "grooved" side of the belt. Make sure you understand which side contacts each pulley.
How It Works: The Serpentine Belt System in Action
The serpentine belt system is a relatively simple but highly efficient method for powering multiple engine accessories. The engine's crankshaft provides the rotational force that drives the entire system. The crankshaft pulley, connected directly to the crankshaft, spins the serpentine belt. This belt then transfers that rotational force to all the other pulleys attached to the various accessories.
The tensioner pulley is vital. It maintains optimal belt tension, preventing slippage and ensuring efficient power transfer. Too little tension leads to belt squeal and reduced accessory performance. Too much tension can lead to premature belt wear, bearing failure in the accessories, and even crankshaft damage.
The order in which the belt wraps around the pulleys is strategically designed. It’s optimized to provide the necessary wrap angle on each pulley, maximizing grip and preventing slippage. The idler pulleys play a critical role in maintaining this optimal wrap angle.
Real-World Use: Basic Troubleshooting Tips
Here are some common issues and how the belt diagram can help you diagnose them:
- Belt Squeal: A squealing belt often indicates slippage. Check the belt tension. Use the diagram to locate the tensioner pulley and ensure it’s functioning correctly. Also inspect the belt for glazing or wear.
- Accessory Failure: If an accessory isn’t working (e.g., no power steering), use the diagram to verify the belt is routed correctly and that the pulley for that accessory is spinning. If the pulley is spinning, the problem likely lies within the accessory itself. If the pulley isn't spinning, the accessory might be seized, or the belt might be broken or severely slipping.
- Belt Wear: Regularly inspect the belt for cracks, fraying, or missing ribs. Use the diagram to identify areas where the belt makes sharp turns or rubs against other components, as these are prone to accelerated wear.
- Incorrect Routing After Replacement: If you replaced the belt and the accessories aren't working correctly, immediately double-check the routing against the diagram. Incorrect routing is a common cause of accessory malfunction and can lead to serious engine damage.
- Idler Pulley Noise: A noisy idler pulley can be identified by isolating the location of the noise, and comparing it with the diagram to determine which pulley is making noise. You can also take off the belt and spin each pulley manually to feel for play.
Safety: Be Aware of Risky Components
Working on the serpentine belt system can be dangerous if proper precautions aren’t taken.
- Engine Off: Always ensure the engine is off and the key is removed from the ignition before working on the serpentine belt system.
- Hot Engine: Avoid working on the system immediately after the engine has been running, as components can be extremely hot.
- Rotating Parts: Keep hands, clothing, and tools clear of the belt and pulleys while the engine is running. The force of the rotating belt can cause serious injury.
- Battery Disconnect: Disconnecting the negative battery terminal is a good practice to prevent accidental starting of the engine.
- Spring-Loaded Tensioner: Be extremely cautious when releasing the tension on an automatic tensioner. The spring can be very strong, and the tensioner arm can snap back quickly, potentially causing injury. Use the correct tools and techniques.
By understanding the principles outlined here, and meticulously following the provided 2005 Jeep Grand Cherokee belt diagram (available for download), you'll be well-equipped to maintain and troubleshoot this critical engine system. Remember to always prioritize safety and double-check your work. Happy wrenching!