2005 Mazda Tribute 3.0 Serpentine Belt Diagram
Alright, let's dive into the serpentine belt diagram for the 2005 Mazda Tribute with the 3.0L V6 engine. Understanding this diagram is crucial for a variety of tasks, from routine maintenance and belt replacement to diagnosing issues with your vehicle's accessories. Think of it as the roadmap for your engine's accessory drive system.
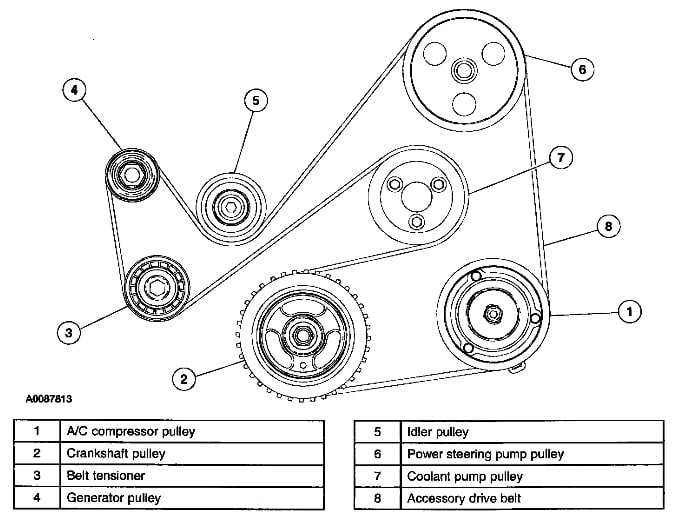
Purpose of the Serpentine Belt Diagram
Why bother with a diagram? Well, it's not just a pretty picture. This diagram serves several critical purposes:
- Replacement Guidance: The primary use is to show you the correct routing of the serpentine belt when replacing it. A misrouted belt can lead to accessory failure, belt damage, and even engine damage in severe cases.
- Troubleshooting: If you're experiencing issues with your power steering, air conditioning, or alternator, the diagram helps you trace the belt's path and identify potential problems, such as a seized pulley or a slipping belt.
- Component Identification: The diagram clearly labels all the components driven by the serpentine belt, allowing you to quickly identify them and understand their function within the system.
- General Understanding: Even if you're not actively working on your car, understanding the serpentine belt's layout gives you a better overall grasp of how your engine functions.
Key Specs and Main Parts of the 2005 Mazda Tribute 3.0L Serpentine Belt System
Before we get into the diagram itself, let's cover the key components involved. This particular setup, the 3.0L V6 in the 2005 Tribute, is fairly standard, but knowing the parts beforehand will make understanding the diagram much easier.
- Serpentine Belt: The star of the show! This single, long belt drives multiple accessories. The length and specific type of the belt are critical; incorrect belts will not fit properly and will cause issues. The OEM specification (or a quality aftermarket equivalent) is always recommended.
- Crankshaft Pulley (or Damper): Mounted to the crankshaft, this pulley is the power source for the entire system. It's usually the largest pulley in the system.
- Alternator Pulley: Driven by the serpentine belt, the alternator generates electricity to power the vehicle's electrical system and charge the battery.
- Power Steering Pump Pulley: This pulley drives the power steering pump, which provides hydraulic assistance to make steering easier.
- Air Conditioning Compressor Pulley: This pulley drives the A/C compressor, which is responsible for cooling the cabin air.
- Idler Pulley(s): These pulleys provide tension and guide the belt around the other components. They don't drive any accessories themselves. Some diagrams may refer to them as "guide pulleys."
- Tensioner Pulley: A spring-loaded mechanism that maintains the correct tension on the serpentine belt. This is a crucial component; a failing tensioner can cause belt slippage, noise, and reduced accessory performance.
Serpentine Belt Diagram Symbols Explained
Understanding the symbols used in the diagram is essential for interpreting it correctly. While specific diagrams may vary slightly, here's a general guide:
- Solid Lines: Typically represent the path of the serpentine belt itself. The thickness of the line may vary, but it generally indicates the belt's main route.
- Arrows: Indicate the direction of rotation for each pulley. This is crucial for understanding how the belt needs to be routed. Ensure the belt wraps around the pulleys in the correct direction.
- Circles or Ovals: Represent the pulleys themselves. The size may be proportional to the actual pulley size in some diagrams.
- Labels: Each pulley will be labeled with its corresponding component (e.g., "ALT" for Alternator, "P/S" for Power Steering, "A/C" for Air Conditioning).
- Tensioner Symbol: The tensioner pulley is often depicted with a spring or an arrow indicating the direction of the tensioning force.
- Dashed Lines (less common): In some diagrams, dashed lines might indicate the back side of the belt, where it's running against a smooth pulley surface.
How the Serpentine Belt System Works
The serpentine belt system is elegantly simple in concept. The crankshaft pulley, driven by the engine's rotation, transfers power to the serpentine belt. The belt, in turn, wraps around and drives the various accessory pulleys (alternator, power steering pump, A/C compressor, etc.). The tensioner pulley maintains the appropriate tension on the belt to prevent slippage and ensure efficient power transfer. Idler pulleys guide the belt and provide the necessary wrap angle on the accessory pulleys.
The tensioner is critical. It's designed to automatically adjust for belt stretch and wear. A worn or failing tensioner will often exhibit symptoms such as:
- Belt squealing, especially under load (e.g., when the A/C is turned on).
- Visible belt slippage.
- Excessive vibration of the tensioner arm.
- Unusual noises coming from the engine bay.
Real-World Use and Basic Troubleshooting Tips
Here's how you can use the serpentine belt diagram for real-world troubleshooting:
- Belt Squeal: A common problem. First, inspect the belt for cracks, fraying, or glazing. A worn belt needs replacement. If the belt is in good condition, check the tensioner. A weak tensioner spring can cause slippage and squealing. Also, inspect the pulleys for damage or contamination (oil or coolant leaks can cause slippage).
- Accessory Failure: If an accessory (e.g., the alternator) stops working, check the serpentine belt first. Is it intact? Is it properly routed? Is it slipping? If the belt is fine, the issue likely lies within the accessory itself.
- Visual Inspection: Regularly inspect the serpentine belt for signs of wear and tear. Look for cracks, fraying, missing chunks, or excessive glazing. Early detection can prevent a complete belt failure, which can leave you stranded.
- Pulley Alignment: While not explicitly shown on most diagrams, proper pulley alignment is crucial. Misaligned pulleys can cause premature belt wear and accessory failure. A straight edge can be used to check alignment.
Safety Precautions
Working on the serpentine belt system can be risky. Here are some key safety considerations:
- Disconnect the Battery: Before working on any part of the electrical system, including the alternator, disconnect the negative battery cable to prevent accidental shorts.
- Hot Engine: Never work on the serpentine belt system when the engine is hot. Allow the engine to cool down completely before starting any work.
- Moving Parts: The serpentine belt system involves moving parts. Keep your hands, hair, and clothing clear of the belt and pulleys when the engine is running.
- Tensioner Spring: The tensioner spring is under significant tension. Use the correct tools to relieve the tension and prevent injury. Improper handling can cause the tensioner arm to snap back violently.
- Eye Protection: Wear safety glasses to protect your eyes from debris.
Remember, if you're not comfortable performing any of these tasks, it's always best to consult a qualified mechanic.
We have a downloadable PDF file containing the 2005 Mazda Tribute 3.0L Serpentine Belt Diagram ready for you. It includes a high-resolution image and detailed labeling for easier understanding. This resource will greatly assist you in your maintenance and repair endeavors.