2005 Nissan Frontier Serpentine Belt Diagram
Alright, let's dive into the serpentine belt diagram for your 2005 Nissan Frontier. Whether you're tackling a squeaky belt, replacing a component, or just expanding your automotive knowledge, understanding this diagram is crucial. It's essentially a roadmap for your engine's accessory drive system, allowing you to trace the belt's path and pinpoint potential problems.
Purpose of the Serpentine Belt Diagram
Why bother with this diagram? Well, it’s indispensable for several reasons:
- Replacement: The most common reason. When your serpentine belt cracks, frays, or breaks, the diagram ensures you route the new belt correctly. An incorrectly routed belt will not function properly, leading to accessory failure and potential engine damage.
- Troubleshooting: If you’re hearing squealing or experiencing accessory malfunctions (power steering, AC, charging system), the diagram helps you visually inspect the belt and pulleys for misalignments, wear, or damage.
- Maintenance: Periodic inspection, guided by the diagram, allows you to catch potential problems before they lead to catastrophic failure. A preventative approach will save you time and money in the long run.
- Learning: For the DIY enthusiast, studying the diagram provides a solid understanding of how your engine's accessory systems are driven and interconnected.
Key Specs and Main Parts
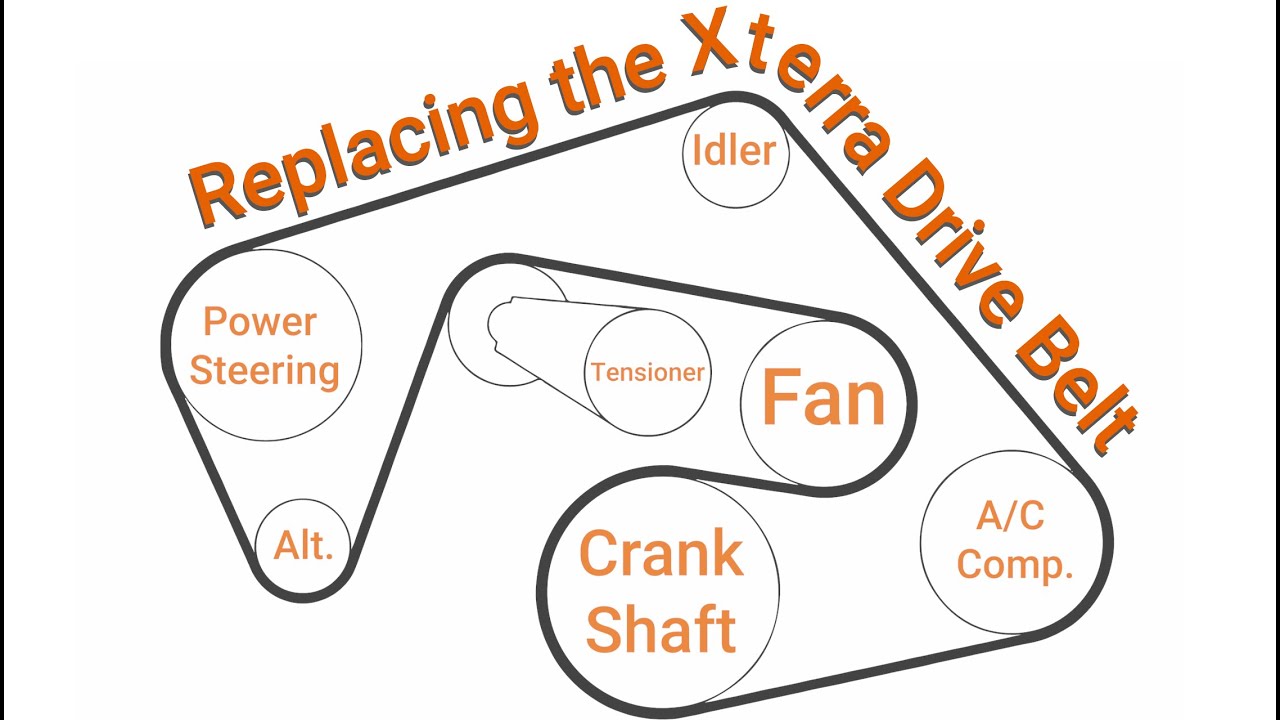
Let’s get down to the specifics. The 2005 Nissan Frontier, depending on the engine (2.5L I4 or 4.0L V6), will have a slightly different serpentine belt arrangement. While the fundamental principles remain the same, the routing and component placement will vary. Here are the key components the serpentine belt interacts with:
- Crankshaft Pulley: This is the driving force behind the entire system. Connected directly to the crankshaft, it transfers rotational power to the serpentine belt.
- Alternator Pulley: Driven by the serpentine belt, the alternator generates electrical power to charge the battery and run the vehicle's electrical systems.
- Power Steering Pump Pulley: This pulley drives the power steering pump, providing hydraulic assistance to the steering system.
- Air Conditioning Compressor Pulley: Engaged when the AC is turned on, this pulley drives the compressor, which circulates refrigerant to cool the cabin.
- Idler Pulley(s): These smooth, non-driven pulleys are strategically placed to guide the belt and maintain proper tension, optimizing the wrap angle around driven pulleys. They provide support and prevent excessive belt vibration.
- Tensioner Pulley: This spring-loaded pulley maintains the correct tension on the serpentine belt. It’s critical for preventing belt slippage and ensuring all accessories operate efficiently. A failing tensioner is a common cause of squealing belts.
- Water Pump Pulley: On some engines, the serpentine belt may also drive the water pump, which circulates coolant through the engine to regulate its temperature.
The serpentine belt itself is a critical component. It's usually made of a reinforced rubber compound designed to withstand high temperatures, constant flexing, and significant stress. The belt *length* and *rib profile* are engine-specific. Using the wrong belt can lead to improper fit, slippage, and damage to the accessories.
Understanding the Diagram Symbols
Serpentine belt diagrams aren’t always the easiest things to decipher at first glance. Here's a breakdown of common symbols:
- Solid Lines: Represent the path of the belt. The thickness may vary to highlight important sections or the belt’s outer surface.
- Pulleys: Shown as circles or rounded shapes. The diameter of the circle roughly corresponds to the pulley's size.
- Arrows: Indicate the direction of rotation for each pulley. Understanding the rotation is crucial for verifying the belt’s correct routing.
- Text Labels: Identify each component (e.g., ALT for alternator, AC for air conditioning compressor, PS for power steering pump).
- Tensioner Indicator: The tensioner is often indicated with a spring symbol to show its adjustable nature. The direction of movement needed to relieve tension for belt removal is usually indicated with an arrow.
While color isn't consistently used across all diagrams, some may employ it to highlight specific features or sections. A legend will always explain the meaning of any colors used. Newer diagrams may even include 3D renderings of components for enhanced clarity.
How It Works: The Serpentine Belt System
The serpentine belt system is a brilliantly simple yet effective method for powering multiple engine accessories from a single source. The crankshaft pulley, driven directly by the engine's rotation, transfers its power to the serpentine belt. The belt then wraps around the various accessory pulleys, causing them to rotate. The tensioner pulley maintains the necessary tension to prevent slippage and ensure efficient power transfer. The routing of the belt is critical; it must engage each pulley with sufficient wrap angle (the amount of contact the belt has with the pulley) to provide adequate grip.
The efficiency of this system depends on proper belt tension, pulley alignment, and the condition of the belt itself. Any slippage reduces the power available to the accessories, leading to decreased performance. For example, a slipping alternator pulley will reduce the alternator's output, potentially leading to a discharged battery.
Real-World Use: Basic Troubleshooting
Here are some common problems you might encounter and how the diagram can help:
- Squealing Belt: This is often caused by a loose or worn belt, a failing tensioner, or misaligned pulleys. Use the diagram to inspect the belt's condition. Check for cracks, fraying, or glazing. Also, examine the tensioner for proper movement and spring tension. If the pulleys aren't aligned correctly (e.g., due to a bent bracket or worn pulley bearing), the belt will likely squeal.
- Accessory Malfunction: If your power steering is weak, your AC isn't cooling properly, or your battery isn't charging, the serpentine belt or one of the pulleys might be to blame. Use the diagram to visually inspect the belt's path to the affected accessory. A broken or slipping belt can prevent the accessory from operating correctly. A seized pulley will cause the belt to stop moving, potentially damaging the belt and other components.
- Belt Slippage: Obvious slippage can be detected by visible dust accumulating around the pulleys or by a burning rubber smell. The diagram helps you identify the tensioner and verify it is functioning. If the tensioner has failed and is no longer applying pressure to the belt, slippage will occur.
When diagnosing belt issues, always visually inspect all pulleys for wear or damage. A damaged pulley can quickly destroy a new belt. Also, be mindful of contaminants like oil or coolant, which can degrade the belt's rubber.
Safety Considerations
The serpentine belt system operates with a rapidly moving belt and rotating components. Exercise extreme caution when working near the engine:
- Never work on the serpentine belt system with the engine running. Accidental contact with the moving belt can cause serious injury.
- Disconnect the negative battery cable before starting any work. This prevents accidental starts.
- Be aware of hot engine components. Allow the engine to cool down before working on the serpentine belt system.
- Keep hands and tools clear of the moving belt and pulleys. Use appropriate tools and techniques to avoid injury.
- The tensioner stores significant spring energy. Always use the correct tool and technique to relieve the tension safely.
Additionally, when replacing the serpentine belt, always consult the vehicle's service manual for specific torque specifications for the tensioner and other components. Overtightening can damage the tensioner or other parts.
By understanding the serpentine belt diagram and the principles behind the system, you can confidently diagnose and address many common accessory drive issues on your 2005 Nissan Frontier. Remember safety first, and always double-check your work before starting the engine. Happy wrenching!
We have the 2005 Nissan Frontier Serpentine Belt Diagram readily available for download. This detailed diagram will further assist you in your repairs and maintenance tasks. Feel free to download it and keep it as a handy reference!