2005 Nissan Murano Fuse Box Diagram
Alright, let's dive into the fuse box diagram for the 2005 Nissan Murano. Whether you're tackling an electrical issue, planning an aftermarket modification, or simply trying to understand your vehicle better, knowing your way around the fuse box is absolutely essential. This isn't just about swapping out a blown fuse; it's about understanding the electrical architecture that keeps your Murano running.
Why You Need This Diagram
Think of the fuse box diagram as the Rosetta Stone of your car's electrical system. It allows you to:
- Diagnose Electrical Problems: Identifying a blown fuse is the first step to troubleshooting issues like non-functioning headlights, malfunctioning power windows, or a dead radio. The diagram tells you which fuse controls what.
- Plan Modifications: Adding aftermarket accessories (lights, amplifiers, etc.) requires tapping into the existing electrical system safely. Knowing which circuits are available and their amperage ratings prevents overloading and potential damage.
- Perform Basic Maintenance: While not part of routine maintenance, replacing a fuse correctly is crucial. The diagram ensures you're replacing it with the correct amperage rating, which is a critical safety factor.
- General Understanding: Even if everything's working perfectly, understanding your car's electrical system empowers you as an owner. It gives you a better appreciation for how everything works together.
Key Specs and Main Parts of the 2005 Murano Fuse Boxes
The 2005 Nissan Murano actually has two primary fuse boxes. It's important to locate both:
- Interior Fuse Box: Typically located under the dashboard on the driver's side. You might need to remove a small panel to access it. This box houses fuses for interior components like the radio, power windows, interior lights, and climate control.
- Engine Compartment Fuse Box: Situated in the engine bay, usually near the battery. This box contains fuses and relays for critical engine components like the fuel pump, ignition system, headlights, ABS, and cooling fans.
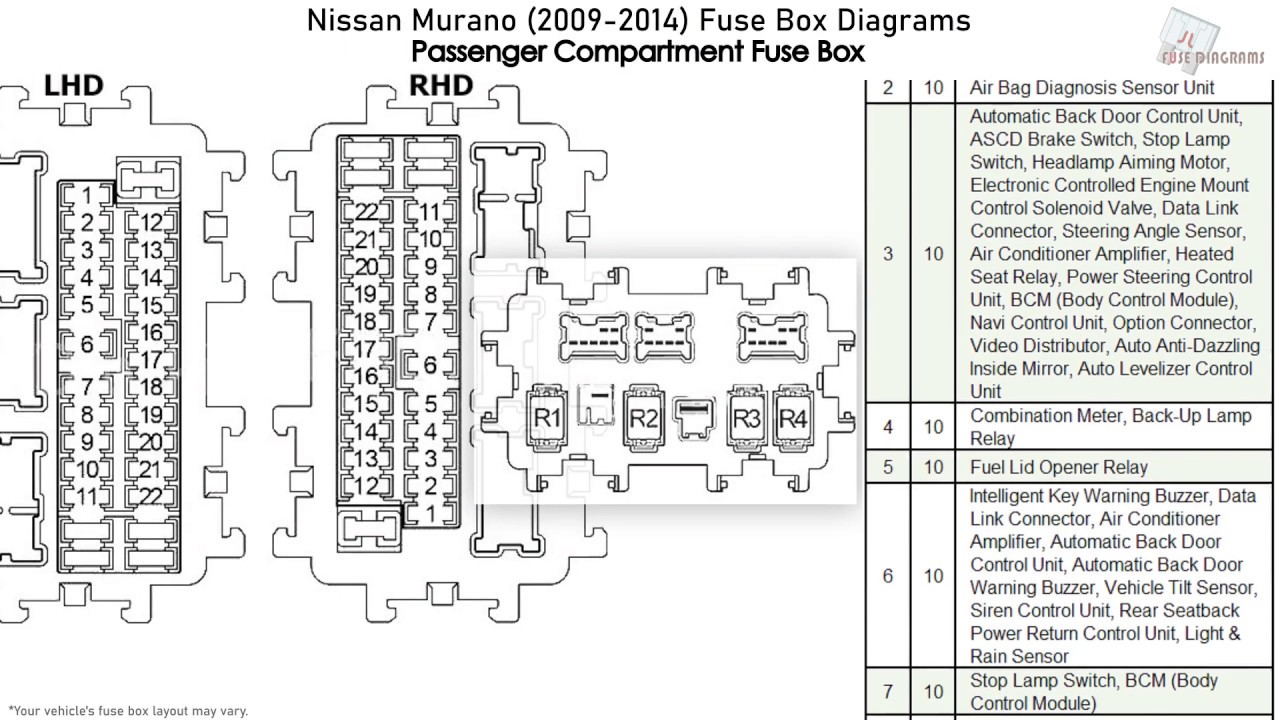
The diagram covers both boxes. The layout of the fuses will be depicted in a grid-like format. Each fuse location will be labeled with a number or letter, which corresponds to a listing that describes the circuit it protects and the amperage rating.
Key Specs to Note:
- Amperage Ratings: Fuses are rated in amps (A). This indicates the maximum current the fuse can handle before it blows (breaks the circuit). Common ratings include 5A, 7.5A, 10A, 15A, 20A, 25A, and 30A. Never replace a fuse with a higher amperage rating than specified, as this can cause serious damage and fire hazards. Using a lower amperage rated fuse will simply cause the fuse to repeatedly blow.
- Fuse Types: The 2005 Murano primarily uses blade-type fuses (ATO/ATC). These are small, rectangular fuses with two prongs. They come in different sizes and colors, each corresponding to a specific amperage rating.
- Relays: While not fuses, relays are often located in the fuse boxes. Relays are electrically operated switches that control higher-current circuits. They're used to protect the vehicle's switches from high current, allowing a low current signal to activate a higher current device.
Understanding the Symbols and Legend
The fuse box diagram isn't just a picture; it's a map with its own language. Here's how to decipher it:
- Lines: Lines represent electrical circuits. They connect fuses, relays, and components.
- Colors: While the diagram itself is usually black and white, some diagrams may use colors to distinguish different circuits. If present, there will be a color code legend explaining what each color represents (e.g., red for power, black for ground).
- Icons: Icons represent the components that the fuses protect. Common icons include headlights, windshield wipers, radio, cigarette lighter (power outlet), engine control unit (ECU), and various sensors. The icon will be next to the amperage rating.
- Numbers/Letters: Each fuse and relay location is assigned a unique number or letter. This identifier is crucial for cross-referencing the diagram with the actual fuse box. Always confirm the location based on the diagram.
- Relay Symbols: Relays are typically represented by a square or rectangle with internal lines indicating the coil and switch contacts.
The legend is the most important part! It provides a detailed explanation of each fuse and relay location, including the amperage rating and the components it protects. Take your time to understand the legend before attempting any work.
How It Works: The Fuse as a Circuit Protector
A fuse is a simple but vital safety device. It's designed to protect electrical circuits from overcurrent. Inside each fuse is a thin wire (the element) that's designed to melt and break the circuit if the current exceeds the fuse's amperage rating.
Think of it like a dam on a river. Under normal conditions, the water (current) flows freely. But if there's a flood (overcurrent), the dam breaks, preventing the water from damaging everything downstream. The fuse "blows," breaking the circuit and preventing damage to the wiring and components connected to that circuit.
Overcurrent can be caused by several factors, including:
- Short Circuit: A direct connection between a power wire and ground, bypassing the intended circuit.
- Overload: Drawing more current than the circuit is designed to handle (e.g., plugging too many devices into a single outlet).
- Component Failure: A faulty component can draw excessive current, causing the fuse to blow.
Real-World Use: Basic Troubleshooting Tips
Here's how to use the fuse box diagram to troubleshoot common electrical problems:
- Identify the Problem: Determine which component isn't working. For example, "The windshield wipers don't work."
- Consult the Diagram: Locate the fuse associated with the windshield wipers in the fuse box diagram. Note the fuse location (e.g., "Fuse #12 in the interior fuse box") and the amperage rating (e.g., "20A").
- Inspect the Fuse: Locate the fuse in the actual fuse box. Visually inspect the fuse. If the wire inside is broken or blackened, the fuse is blown. A multimeter can also be used to test for continuity; a good fuse will show continuity (0 ohms resistance).
- Replace the Fuse: Replace the blown fuse with a new fuse of the exact same amperage rating.
- Test the Component: Turn on the windshield wipers to see if they now work.
If the fuse blows again immediately: There's likely a more serious problem, such as a short circuit. Further diagnosis is required, which may involve checking wiring, connectors, and the component itself. This may be best left to a professional.
Safety Precautions: Working with Electrical Components
Working with automotive electrical systems can be dangerous. Keep these safety tips in mind:
- Disconnect the Battery: Always disconnect the negative battery terminal before working on the electrical system. This minimizes the risk of short circuits and electrical shock.
- Use Proper Tools: Use insulated tools designed for automotive electrical work.
- Avoid Water: Never work on electrical components in wet conditions.
- Never Bypass a Fuse: Never use a wire or other conductive material to bypass a fuse. This can cause serious damage and fire.
- High-Risk Components: Be particularly cautious when working around the SRS (Supplemental Restraint System, i.e., airbags) and ABS (Anti-lock Braking System). These systems have their own dedicated fuses and wiring. Tampering with these systems can be extremely dangerous. If you suspect a problem with the SRS or ABS, consult a qualified technician.
Disclaimer: Working on automotive electrical systems can be dangerous. If you are not comfortable performing these tasks, it is best to consult a qualified technician. The information provided in this article is for informational purposes only and should not be considered a substitute for professional advice.
By keeping safety in mind, a 2005 Nissan Murano fuse box diagram can be a very valuable tool.